Do-it-yourself cake from sweets. DIY candy cake: step by step photo for beginners (master class)
A universal selection of gift ideas for every occasion and occasion. Surprise your friends and loved ones! ;)
Hello dear guests of my blog. We continue the holiday theme, and today I will tell you how to make a gift from sweets with your own hands for various events.
It is no secret that chocolate in small quantities is one of the sources of joy in our body and is the most favorite treat for children. Souvenirs are something that both adults and children love. Today we will combine it into a single whole, and prepare delicious souvenirs. We need certain skills and simple consumables.
How to make a gift from sweets with your own hands: we surprise men
Representatives of the strong half of humanity always radiate confidence and steadfastness, but they, like children, rejoice even in insignificant souvenirs. And their bright presentation causes genuine delight.
Here are some ideas for such gifts that can be brought to life (there will also be photos).
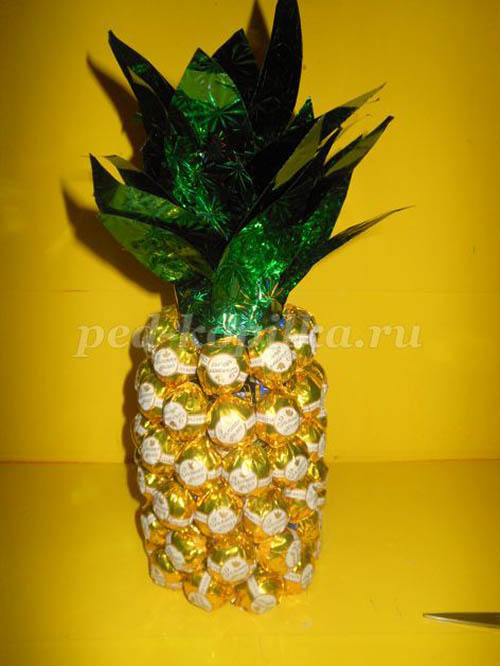
A pineapple
It is a symbol of the greatness and uniqueness of a creative person. Having made such a souvenir, you do not just make a gift, but give him a talisman. It helps to bring brilliant ideas to life and bring them to life. Its manufacturing process is simple. You will need:
- A bottle of champagne;
- Round candies in a gold wrapper;
- Green wrapping paper;
- Yellow sisal (these fabrics can be found in the flower shop);
- tourniquet;
- Glue gun.

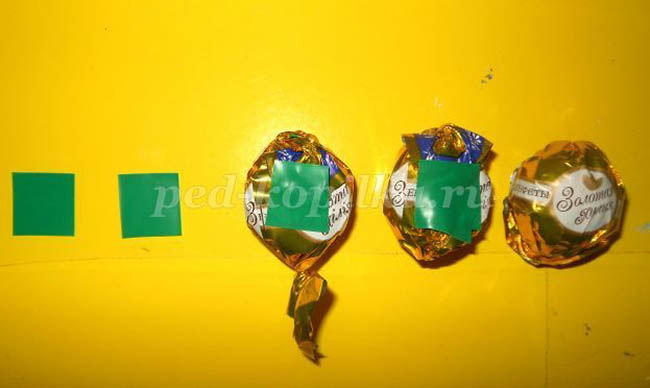
I offer you a step-by-step photo of the creative process. All candies will need to stick pieces of double-sided tape on one side (or use a glue gun later).
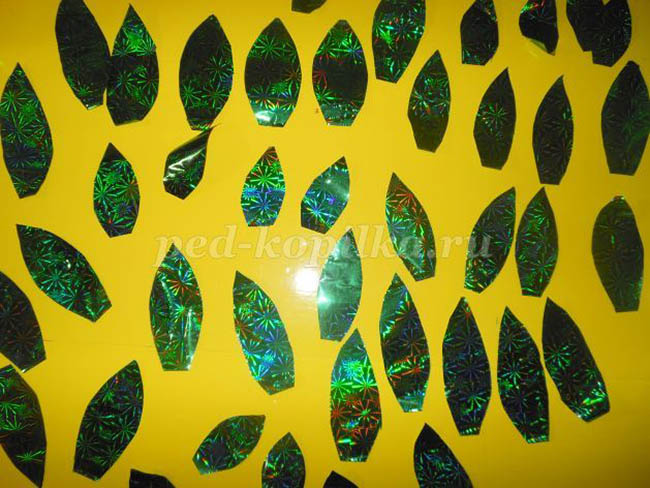
Cut out several layers of pineapple top from wrapping paper.
Now it's time to wrap the bottle with sisal.

Glue the candy to the bottle in rows.

Stick the leaves of the top on double-sided tape and glue in rows to the top of the bottle.

Master classes in video format
Photos and text descriptions are, of course, good, but video is much more convenient.
Gun
Such a surprise will delight any man, whether he is related to hunting (military affairs) or not. Guys love war games. And fun with toy guns or sticks instead of them is their childhood. In addition, it is in the genes of a man that he is a hunter and earner, which means that such a present would be appropriate.
Anchor
Such a sweet surprise will suit a man - her husband. And that's why. Even in ancient Egypt, the anchor was considered a symbol of the universe.
If you look closely at this figure, you will see that it consists of three elements. This is a mast, a boat and a snake. The mast symbolizes the masculine, the boat symbolizes the feminine. And both of these elements are entwined with the snake of life, which is the sacrament of marriage. Later, the anchor began to be considered simply a sign of a calm family life.
Having prepared such a surprise for your husband, you will emphasize the reverent attitude towards the union of your hearts. And the video will help you create this masterpiece:
Tank: how to make a beautiful surprise for February 23
Incredibly, this toy captivates the male, even if the boy is well over thirty. The game "World of Tanks" swallowed up the world. And your man will be happy to absorb a sweet tank. By the way, this idea can be used as a surprise on February 23rd. How to decorate this gift beautifully is shown in detail in the video:
Candy wheel
If the person for whom you are preparing a souvenir is a car enthusiast, then a present, as they say, "in ten". If you don’t have a car yet, don’t worry, because in any case, he is a tough guy who rules his life. I offer you a video of this master class:
Glass of tea and sweets
This craft is suitable for both beer lovers and kvass fans. And the result of your work, in essence, is perfect for tea drinking. After all, it consists of tea and sweets. So, to create a glass you will need:
- A tin can of tea (black or green, it doesn't matter);
- Sweets "Leshchina" ("Enchantress" or "Konafetto");
- Two round candies like "Lindt Lindor";
- Angel threads (for beer foam);
- Glue gun.
First you need to bend the edges of the "Hazel". Using hot glue, we attach them to the jar in two rows (vertically). We attach the handle to the formed base of the glass. To do this, we glue round sweets, and there are 2 “Hazels” on them. The glass is ready. We decorate the top with threads - we create the illusion of foam. You can attach the finished product to an impromptu tray.
Sweet Candy Surprise Ideas for Women
Our mothers, sisters, girlfriends, teachers, fitness trainers, leaders - all without exception love it when they remember their birthdays and professional holidays.
I offer you the top 5 original projects made from sweets:
sweet tree
This evergreen tree is certainly associated with the New Year, with the Christmas holidays, with home comfort and the warmth of a family hearth. Chocolate waffle spruce will be an original souvenir for any woman on frosty days.
A simple instruction for creating a winter beauty is shown in the photo. 
rowan twig
The ancient Slavs considered mountain ash a sacred tree. Houses were decorated with its branches and fruits, because. believed that they are able to protect the house and the person from any trouble. In addition, she is a symbol of peace and happiness in the family. Rowan branches are used to create amulets.
And rowan as a souvenir will bring sweet joy. To create it, you need confectionery in a red wrapper, wire, green teip tape, an artificial leaf and a little time. You need to create elements as shown in the photo: 

Bouquet of candy roses
Such a surprise is perfect for a teacher on a professional holiday, and for a leader on his birthday. Live roses, of course, will please women, but they will not surprise. And a gift made with your own hands is original and creative, therefore, it will leave a mark in your memory for a long time. You can use crepe paper in the color shown in the video, or you can choose your own. The main thing is that everyone is satisfied with the result.
Heart
Such a gift is perfect for Valentine's Day or any day of your girlfriend. What else can you add here? All love and violent emotions are combined in this symbol. A sweet heart will melt the ice in the eyes of a loved one. You can create it like this:
Handbag
Well, how can a lady live without this stylish accessory. A bag is needed for going out, for shopping, for a harmonious look with new shoes. I offer you a video of making a handbag, which, for sure, was not yet in the arsenal of the girl you are going to surprise:
Sweet ideas for a boy
The fact that sweets are a delicious surprise is understandable. And here are a few ideas that will please not only the stomach, but also the eyes.
Poster
This gift is especially popular with teenagers. In fact, this is a gift, and a postcard, and a wall newspaper at the same time. In order to create it you will need:
- Whatman;
- Glue;
- Color markers;
- Various confectionery.
It is better to create a poster on a large table or on the floor. Think over the sketch of the work in advance. Imagine how it will look on the poster. Write the text first on a draft, so as not to make mistakes later.
On whatman paper you write your congratulations and wishes, replacing some words with glued edible elements. Handwriting does not have to be calligraphic. It will be even more fun if it is like Comic Sans font. One condition - the letters must be large so that they can be seen at a distance of at least 2 meters.
And one more experienced advice: buy sweets at least in two copies. Because someone will eat candy during work, no, no, and eat it.

Car
Well, what kid doesn't dream of owning a car, of being a race car driver and of being a freeway star? And even if while his favorite hero is Makvin from the cartoon "Cars", this does not change the essence. You can please the boy with a candy machine. This is a surprise, chocolate and a toy (almost like the motto of Kinder Surprise). A visual aid on how to bring this idea to life in this video:
Barbell
Even if the boy is not a fan of weightlifting, he will like a sports souvenir. And, perhaps, it will push you to think about playing sports. After all, sport is movement, and movement is life. You will need cardboard, a foil sleeve, double-sided tape, satin ribbon, sheets of paper and round candies.
And to create a beautiful and tasty barbell, a step-by-step master class from this video will help you:
crafts for girls
To please a child is much easier than an adult, the main desire. And on the Internet, interesting projects are a dime a dozen.
As a surprise, you can create:
Corrugated paper and candy doll
This gift will combine everything that the girl likes: a doll, a beautiful outfit, flowers and a treat. As a rule, dolls of the Barbie type from the Small classification are used. Their height is from 20 to 39 cm.
But you can make a souvenir with a 40-49cm MSD (Mini super Dollfie) or SD (Super Dollfie) 50-69cm doll. In this case, the supplies will need to be increased accordingly.
And the master class presented in this video will help you create this beauty:
This is a joyful and long-awaited gift. You can be sure that it will bring a lot of pleasure to both a little girl and a teenager. Although what to distort the soul - even for an adult.
This gift is reminiscent of the essence of a chocolate egg - a surprise awaits inside.
To create a cake you will need:
- Cardboard and paper;
- Chocolates and eggs;
- Satin ribbon;
- Glue gun;
- Bows, rhinestones;
- Lace.
The work steps are as follows:
- From the cardboard we cut out 2 circles corresponding to the diameter of the future cake - this will be the base and the lid.
- Inside this one circle we draw a smaller circle - we will glue the side of the cake to it.
- From thick A4 paper, cut out a rectangle with a height equal to the desired height of the cake.
- On one of the long sides we cut out small triangles, approximately 1 cm - it will be more convenient to attach the side.
- Glue it to the cardboard base with triangles down.
- We attach kinder chocolates to the board.
- We wrap chocolates with a festive satin ribbon.
- Decorate the cardboard cover. You can glue lace, rhinestone bows and kinder surprise eggs to it.
Cake, in general, is ready. It remains to figure out what the "stuffing" will be. Inside the resulting box, you can put more chocolates, soft toys and other things that can fit in it.
You can use the cake box for any event: March 8, birthday, New Year, Valentine's Day, etc. After all, she looks solemn.
Once again about the materials for decoration and some nuances
Creating homemade surprises is not as difficult as it seems at first glance. As you can see, even the materials for their production are used at hand: cardboard from shoe boxes, the remaining foam after a new purchase, adhesive tape, sheets of paper that are already on our worksheet, toothpicks. And even decor: lace, bows, ribbons can be found on clothes that are no longer needed.
It may be necessary to purchase a glue gun and crepe paper, although you can find an alternative to them.
And if you go to stores where handmade products are presented, you can find anything there, down to the smallest details.
- If you want to make a surprise with your own hands, but you are new to this business, start making a souvenir in advance.
- Choose an idea. Check out tutorials and step by step instructions.
- Get and prepare everything you need for work. The manufacturing process may take longer than you think. This is especially true for small design nuances: bending the edges of confectionery, attaching wire, etc. It takes time to get used to and adjust.
This is where I end. I know that you will succeed. Rejoice loved ones and rejoice yourself. Do not forget to leave your comments, share little tricks. If you liked the article, do not be greedy and recommend to friends in the social. network to read it. See you!
Sincerely, Anastasia Skoreva
If you are already fed up with the usual and uninteresting serving of sweets, then you should come up with a more creative idea. For example, you can make a cake from sweets with your own hands.
Of course, recreating this idea is not so easy, you have to work a little, but the result is worth the effort.
Candies will look very beautiful and unusual.
Candy cake will be a beautiful table decoration. In addition, it can be used as a gift.
If you are interested in this idea, then we suggest learning how to make a cake from sweets yourself.
DIY candy cake: master class
What you need:
- Sweets of different types at your discretion;
- corrugated paper;
- Styrofoam;
- Round cookie box;
- Round box from Raffaello;
- Double-sided adhesive tape;
- Scissors;
- beads;
- hot glue;
- Foil;
- Toothpicks;
- Fabric with a beautiful pattern or just plain - at your discretion.
Let's start making:
- We cut out the bottom base from the foam material. It should be bigger than the cookie and Raffaello box. We process all edges with sandpaper, they should be even;

- The second tier is a cookie box. It needs to be pasted over with a piece of beautiful material. We stick with double-sided tape;

- Then we cut out a small strip of corrugated paper with a width of 4 cm. We glue this strip on the middle tier in the form of a frill along the edges;
- Glue candies with double-sided tape on the sides of the box;

- For the bottom tier of the cake, cut out a small ribbon of corrugated paper a little above the base;
- Next, using double-sided tape, attach the ribbon to the foam base. We stretch the upper edges of the paper a little in the form of wavy frills;
- Then we attach beads to the paper frill. They need to be glued with hot glue;
- Then, along the edges of the foam, we attach sweets to the adhesive tape;

- Now we proceed to the design of the upper tier - the box from under Raffaello. We glue it with a cloth;

- Then we cut out a wide ribbon of corrugated paper and attach it along the edges;

- The result should be 3 layers with a beautiful design. We tie each tier with ribbons and tie bows;
- The bottom layer can be decorated with candles. To do this, pieces of toothpicks should be attached to the bases of the candles on double-sided tape;

- Small flower petals should be cut out of foil or other shiny paper;
- Petals should be glued to each other with adhesive tape so that you get the appearance of flowers;

- Then insert candles into the flowers and attach them to the bottom layer of the cake;

- The top tier can be decorated with any color you like.

We make a cake for children: instructions and step-by-step photos
What you will need for a candy cake for children:
- Sweets - kinder chocolate, mini snickers, twix, nesquik, barney (any favorite children's sweets);
- Styrofoam;
- Medium round box, you can take a metal one from under the cookies;
- A small round box for the top tier;
- hot glue;
- Double-sided tape;
- Corrugated paper in pink (if for girls) or blue (for boys);
- Multi-colored ribbons for tying tiers;
- Scissors.
Let's get to work with your own hands:
- Let's start with the bottom base. She must be big. Therefore, we will use foam material for it;

- Cut out a round shape from the foam. It should be noted that the width of the tier should correspond to the height of the sweets. If you need to be able to fit Kinder chocolate candies on them later, then you should cut out two circles and glue them together with hot glue;

- Then we proceed to decorate the tier. To do this, we use corrugated paper. You can take any color at your discretion;

- We cut out a square from corrugated paper and glue the bottom and top of the foam mold with it. We bend the edges and glue;


- Then we cut out a wide strip from corrugated paper, its width should be slightly more than the height of the candy;

- Glue the strip around the tiers with hot glue;


- We pull off the upper edges a little, which looks like a wavy frill;


- Then the edges of the circles should be pasted over with double-sided tape with sweets and chocolates;

- They can be hidden, and corrugated paper of the same color as the cake itself can be simply pasted open;


- If the sweets do not hold well, then they can be tied with any ribbon. It will also serve as an element of decor;

- Between the tiers, you can pour multi-colored dragees, put berries, kinder surprises, icicles or various chocolates;

- The result is a beautiful candy cake that will delight many kids!

How to build a sweet "masterpiece" in the shape of a heart
What you need to make a heart-shaped candy cake:
- A box in the shape of a heart, if not, then you will need thick cardboard for the base and thinner for the sides;
- Pieces of newspaper to seal the surface of the base;
- Corrugated paper in red and pink;
- Foil of different colors for decoration;
- Ribbons, beads for decor at your discretion;
- Toothpicks;
- Film from bouquets of flowers;
- PVA glue;
- Double-sided tape;
- Scissors;
- Pencil;
- Sweets of your choice.
How to do:

Delicious construction of juice and sweets
What you will need for a cake made of juice and sweets:
- Juices in boxes are small at their discretion;
- Candies;
- Cookies in packages for children;
- Cardboard paper for boxes under tiers;
- White A4 sheets for gluing tiers;
- hot glue;
- Corrugated paper in two colors;
- Scotch;
- Ribbons, beads for decoration;
- Simple pencil;
- Scissors.
How to do:
- To begin with, we cut out a round part for the middle tier from cardboard, make it large;

- Then, under the size of the height of the juice on the cardboard, we draw a strip for the sides;

- We draw cloves along the edges so that they can be used to glue the entire box;


- Then we glue everything with glue and fix the edges with tape;

- By the same principle, we make the lower base, only it should be larger in size. If there is a desire, you can make an even smaller tier, which is installed on top;


- A small hole can be made on the side of the lower base so that a surprise can be put inside;

- We glue everything with white paper, A4 sheets;

- Tiers can be glued together with double-sided tape;
- We install juices, cookies on the tiers, for example, "Barney Bear";

- Then, for the side of the lower tier, we cut out a long strip of corrugated paper. We make the edges wavy and bend so that they look like petals;


- Glue on hot glue;

- You can also attach a smaller strip of white paper on top of the blue corrugated paper. We tie it with a ribbon;

- Then we cut out the same stripes with wavy edges from corrugated paper and wrap them around sweets in the form of petals. The result should be a kind of flowers with sweets in the middle;


- Ready-made flowers with sweets must be inserted in the gaps between the juice and cookies;

- In the hole in the lower tier, you can add what did not fit;
- The end result is this beauty:

For decoration, you can use whatever you wish - ribbons, beads, artificial flowers.
If you are making a cake for children, then you can show your imagination and make some kind of figure out of cardboard, for example, a car, a tree, a flower, a Christmas tree, and so on. And only then decorate everything with multi-colored paper and stick various sweets, chocolates, icicles.
Candy cake is an excellent decoration for the festive table, it will become a colorful decoration for any holiday. In addition, you can come up with your own interesting presentation, make it in the form of various shapes and add beautiful decor elements.
Photo of candy cakes
We bring to your attention to admire the photo of ready-made candy cakes, and perhaps you will even find among them one that you want to make yourself:


Deciding on a gift for any holiday is not at all an easy task, even though it is intended for your close, well-known person. Many prefer the easy way: they are not original and buy flowers and sweets. But it is much more interesting for you yourself and more pleasant for the birthday person to make a cake from sweets with your own hands. Such a present will not only be remembered for a long time, but also will be a great addition to the festive menu.
Easy peasy
If you are going to learn how to create culinary creations from sweets, you can use the most versatile option that is suitable for all occasions. Before starting work, prepare the necessary materials. You will need:
- several types of sweets;
- simple and double-sided tape;
- wide satin ribbon;
- gift paper (glossy, matte, corrugated or even transparent - it depends on what design you have in mind for your future creation);
- ordinary paper;
- several toothpicks;
- glue (you can use PVA, but it is better to take a stronger one so that it better fastens the materials and holds them together);
- paints.
So, how to make a do-it-yourself candy cake? First of all, create its foundation - cakes. But unlike the classic, familiar dessert, they will be inedible.
Cut out two identical circles and a straight strip from whatman paper. Its length should be equal to their circumference. Connect these elements with glue to form a cylindrical structure that resembles the shape of a cake layer.
Cover the base with colored paints, as well as gift self-adhesive paper. To make a two-tiered dessert, design another such figure according to the same pattern. But it should have a smaller diameter. To make things easier and save time, you can use round cookie or candy boxes.
When you make a DIY candy cake, you need to place the smaller half on top of the larger one and secure it with glue or double-sided tape. Then apply a thin layer of a bonding agent on their walls and fix sweets on it. To make the dessert more beautiful, cover each base with different types of candies with bright candy wrappers. Make sure they match well in color.

After the decoration is completed, wrap the tiers with ribbon and tie a beautiful neat bow out of it. Thus, you will not only give the gift a festive mood, but also create an additional mount that will hold candies on its walls.
Additional design
The next stage of work on creating a do-it-yourself candy cake is filling in the "bald patches" between the sweets. If you are creating a present for a girl, use artificial flowers for this purpose. And for a guy, you can use buttons, pieces of denim or other decorative elements.
To implement the first option, take corrugated paper, adhesive tape and a toothpick. Cut out a dozen small hearts, they will become the petals of the future flower. Stretch each of them slightly with your thumbs. Do this very carefully so as not to tear the paper. Do-it-yourself candy cakes, photos of which can cause a smile and tenderness in anyone, look doubly attractive with such flowers.
Glue the petals around the head of the toothpick, which in this case acts as a stem. Make two dozen of these roses to cover all unwanted gaps in your work. Attach them to those places where the walls of the base are visible between the sweets.
chocolate cake
If you are planning to make a DIY candy cake for a chocolate bar and cookie lover, the following method will come in handy.

To get started, collect the necessary materials:
- 2 cylindrical boxes for cookies or sweets (they should be of different sizes);
- circle cut out of cardboard;
- double sided tape;
- foil (you can take the material for baking); corrugated paper;
- sweets and thin oblong bars or chocolate cookies of the same shape.
Instruction
Start work by creating a stand. To do this, wrap a circle of cardboard with foil and secure it with tape. Make sure that the coating fits snugly to the base, does not swell or crumple anywhere.
How to make a cake from sweets with your own hands? The master class recommends further gluing a large box to the finished “tray”. The best way to do this is with double sided tape. From above, fix the smaller package in the same way.
Decorate the building with sweets: cover the lower tier with bars, and the upper one with sweets.

You can fill a small box with any sweets, and hide an additional gift in a large box. Do not forget to cover both parts with corrugated paper before this.
Romantic option
Do-it-yourself candy cakes, photos of which will delight your loved ones for more than one year, are not difficult to do. You can give them not only on the occasion of your birthday, but also on other holidays, or if you just want to make a pleasant surprise for a caring person.
As a romantic present for your soulmate, you can use a gentle and sophisticated version. To prepare it you will need:
- a large piece of foam;
- special glue gun;
- satin ribbon and beads, which are useful for decoration;
- wrapping paper in pastel pink, sky blue, cream or white;
- oblong sweets;
- most common scissors.
Stages of work
Cut out a large and a small base from the styrofoam. Decorate them with wrapping paper. To fix it, you need a glue gun. Connect the parts together and fix the candy on their walls using double-sided tape.

How to make a cake from sweets with your own hands? The master class advises to proceed further to the stage of decorating the product. Wrap both halves of it with tape. Separately, make bows decorated with beads. Place them in a free order around the perimeter of the product.
You can also complement the composition with artificial or even natural flowers. Please note: the first option is very short-lived. Therefore, it is better to either make floral elements out of paper, or attach them just before the presentation of the present, if they are alive.
For the birthday boy
Cakes made from chocolates and sweets, made with your own hands, are the perfect birthday gift, regardless of the age of the birthday person. Such a colorful sweet surprise will be an unforgettable present, the memory of which will warm the soul of your loved one. It can also serve as a wrapper for a small souvenir that you will present.

There is nothing difficult in making such a cake from sweets with your own hands. A step-by-step description of working on it traditionally begins with preliminary preparation. You are required to collect the following materials and tools:
- a large piece of foam;
- double-sided adhesive tape for fixing parts;
- stationery scissors;
- gift ribbon;
- wrapping paper (plain and corrugated);
- candies;
- strong glue.

So let's get started
Decide on the size of your brainchild and cut out two identical circles from the foam. Cover them with thick gift paper. You can use the material of the same color or combine two shades (light and dark) to make the product look more interesting. The bottom and lid of the cake-box are ready. Now let's move on to its walls.
In the process of working on how to make a do-it-yourself candy cake, the master class advises you to take the next step. Cut out a ring from the same material, about three centimeters wide. Glue it to one of the previously made surfaces. You should get a figure similar in shape to a low wide glass.
The second circle does not need to be completely attached - it will be a kind of cover. You can only fix it with a small vertical strip of adhesive tape so that it does not fall off at the most inopportune moment and spoil the surprise.
Do-it-yourself candy cake master class advises decorating using double-sided tape, on which sweets will stick perfectly.
Please note: when fastening the bars, you need to ensure that the inscriptions on their packages lie in the same direction (only from the bottom up or vice versa, but not mixed up). Otherwise, the whole composition will look sloppy and careless.
After the bulk of the decor has been applied and fixed, decorate the structure with a ribbon with a bow.
More edible
Do-it-yourself cakes from chocolates and sweets can also be prepared using dough. In this case, baked ones should be used instead of artificial cakes. Along the edges they can be covered with bars and cookies, and sprinkled with small sweets on top and decorated with edible and not very toys.
Fill the cavity inside with candy or put a gift in it. Cover it all with a lid and, if you want, decorate it with flowers, toys or a congratulatory inscription.
Another interesting option is to melt the chocolates, pour the resulting mass into an iron mold (this will be the bottom of the cake) and line up the walls of the bars along the edges.
After the mass has hardened, carefully turn the container over so that its contents fall out without disintegrating. Then pour various goodies inside - a do-it-yourself candy cake for beginners is ready.
When we are going to give someone a gift, we very often think about how it should be unusual, joyful and original. You always want to leave pleasant memories with a dear person. Even if the event is not grandiose, and the gift is only symbolic, having shown a creative approach, you can deliver especially vivid and memorable impressions.
What is the most common gift? Of course candy. A beautiful box is, of course, nice, but rather banal. But by launching your imagination into flight and putting a little effort, you can present it with special sophistication. How to get around the generally accepted stereotypes? An original idea will help here, for example, a do-it-yourself candy cake. With the help of your favorite sweets, you can create a simple and completely unique gift that will definitely be appreciated.
Sweet gift "Poppies in chocolate"
Special skills and abilities are not required. The manufacturing process is quite simple even for beginners. The main thing is desire and a little effort. After the first self-made cake, you can easily make more complex compositions.
Would need:
- a piece of foam or any other dense material;
- corrugated paper of various colors and shades;
- PVA glue (you can take a hot gun);
- double-sided tape;
- sweets (absolutely any to your taste and color).
So, if everything you need is at hand, you can proceed.
1. Cut out a round base of the required diameter from the foam. It is not forbidden to use any other dense material, either to make a cardboard base, or to take a ready-made one, for example, a cookie box. As for the shape of the product, there are also no restrictions here - round, square, oval and even triangular, if you wish.
Glue the resulting blank with paper with glue. We choose the color of the paper depending on the tone of the candy labels. Instead of paper, you can also take colored foil. After pasting, we leave our future cake to dry for several hours.
2. While the base dries, you can start preparing sweets. To make the cake look neater, twist the ends on the candy wrappers on both sides tightly. They shouldn't be visible.

Then you can start gluing. To do this, take double-sided tape and stick it on the side surface of the base. On it we will attach our sweets.
 Protective paper from double-sided tape can be removed not all at once, but as sweets are glued. So we will avoid sticking of unnecessary debris and the adhesive base will not dry out. To make the cake even and beautiful, confectionery products must be placed tightly against each other. We do everything diligently.

3. Now let's move on to the decoration. Fantasy and ingenuity are also welcome here. You can use various decorative elements: paper or fabric flowers, figurines, soft toys, etc. Do not forget about the event you are going to congratulate and pick up jewelry with the appropriate motif.

So, for example, to congratulate a school teacher, you can use school attributes in addition to flowers: pens, rulers, a small notebook or something like that. Don't be afraid to invent, originality is always welcome.
4. Well, in our case, it turned out such a beauty. We hope that those who receive this kind of treat as a gift will appreciate the efforts and originality. 
Consider another option: for a child's birthday. In addition to the unusual design, our cake will also have a surprise that will surely delight the young birthday girl.
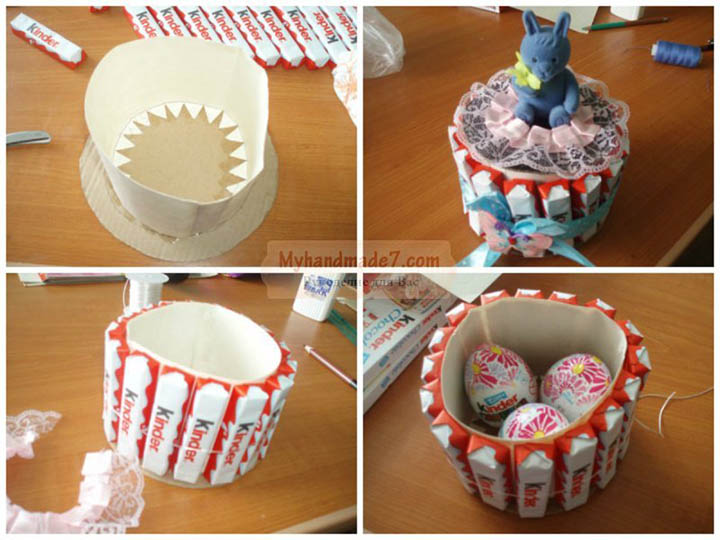
Kinder surprise with a secret
A child's birthday is always a wonderful and magical holiday for any family. Little heroes of the occasion receive many different gifts, among which, of course, sweets. You can arrange goodies in a very peculiar way. Children love everything unusual, so our idea will be appropriate.
To work you will need the following:

- kinder chocolate (the number of chocolates depends on the desired size of the cake);
- kinder surprises or other sweets to fill the box (the number also depends on the size);
- thick cardboard for making the base (you can use a ready-made round box, for example, from Raffaello);
- thick paper;
- PVA glue or hot gun;
- scissors;
- ruler;
- pencil;
- small thin elastic band;
- lace, satin ribbon, rhinestones, bow and other decor for decoration;
- thread and needle;
- children's jewelry box (you can use any other toy).
Now you can start.
1. First, lay out all the kinder chocolates in one line to determine the diameter of the future cake. We apply thick paper to the chocolates. On both sides we add a centimeter: so then you can glue the box. We measure the height of the chocolate bar and draw a rectangle. On one side, draw arbitrary teeth and carefully cut everything out.


2. We bend the teeth on our triangle inward, and glue the rectangle together. It turned out a round detail - the basis for the future box. We measure the diameter of the resulting workpiece. Cut out a circle from cardboard. This is the bottom of the cake. The diameter of the circle should be made a couple of centimeters larger than the required diameter. This is necessary so that the chocolates have something to rely on. Otherwise, they may jump down.


4. Now we put a thin rubber band on the workpiece. It should not be tied tightly so that sweets can be pushed under it. Then we begin to place our chocolates under the gum close to each other. When all the sweets are in place, you need to make sure that they are pressed tightly enough with an elastic band. If the design is weak, the elastic should be tightened. Otherwise, chocolates may simply fall out or begin to fall on their side - this does not look very attractive.


5. It remains to make a lid for the cake box. Cut out a circle from cardboard. We make the diameter of the circle a little larger so that the lid can fit on the box. From thick paper we make a blank with teeth, similar to the very first part. Its height should be no more than a centimeter. Glue the teeth to the cardboard circle. The lid is almost ready.


6. We begin to decorate the top of the product. From above, the lid can be decorated with bows, rhinestones, ribbons, flowers, etc. You can even place decorative candles. In general, it all depends on your imagination and resourcefulness. In this example, the product is decorated with pink lace. In the center of the lid is a box in the shape of a bunny. It contains the main gift for a little girl - beautiful earrings. The bunny is attached to the lid with a few stitches. You can also attach it with glue.


7. The box itself can be filled with sweets, kinder surprises or anything else that your imagination tells you. Inside you can put the gift itself, if it is not very large.


8. Now close the box with a sweet surprise. To decorate the rubber band, under which kinder chocolates are inserted, we tie a satin ribbon around the cake. We tie a beautiful bow and decorate it with a butterfly. We stick lollipops in several places. Sweet surprise is ready!


In this way, you can get a product of any size, and put anything inside. Such a gift is sure to please not only a child, but also an adult. In general, things made and decorated with your own hands always carry a charge of positive emotions and are remembered for a long time. After all, the soul is invested in them, and they carry the warmth of your hands. Create, invent, fantasize and delight your loved ones.
Handmade gifts are becoming very popular. Especially if this gift can be eaten with great pleasure. In this article we will analyze all the nuances of cooking chocolate and candy cake.
First you need to choose the type of chocolates that will be included in the composition. After all, each candy is wrapped in a colored wrapper, so it is important to choose a certain color of the packaging material so that the cake is visually attractive.
Preparing such a gift is a creative process that requires the manifestation of imagination and creativity. And in order to get tremendous pleasure from the process and feel like a brilliant master artist, you need to understand all the stages of preparation.
- Prepare a frame on which sweets will be attached. For this, it is best to use foam, because it can easily be used to build the desired shape, be it a circle, an oval or a square. Also, cardboard is also suitable as a material for making the base. It's not as practical as Styrofoam, but it makes simple shapes just as easy.

- The prepared frame must be decorated with any material that you have on hand. It can be satin fabric, corrugated or just colored paper. This is necessary so that the hero of the occasion, after eating sweets, has a beautiful box and pleasant memories, and this will also make the original gift ideal.


- In order for the sweets to hold firmly on the frame and retain the desired shape, they must be attached. To do this, you can use double-sided tape, it will easily hold the chocolate on the frame, and it will be quite easy to tear it off. Adhesive tape is a practical and affordable material. You can still use glue, but this method has its drawbacks - glue, if it gets on the candy, you can’t eat it anymore. Therefore, when using it, be very careful.
- To make the cake beautiful, use chocolates of the same shape for each tier of the cake. The first (lower) tier is best made from cylindrical chocolates. This will make the tier higher. Also consider the color of the wrapper.

- Decorating a cake also requires imagination. For this, candles, and beads, and small toys, and any confectionery figures, in general, everything that suits the theme of the holiday, are suitable for you.
Chocolate cake decorations
Anything can be used as sweets for such an original gift. The main thing you need to know is the taste preferences of the person for whom this cake is being prepared.
To prepare a children's sweet cake, most often they use:
- Kinder chocolate
- Kinder Surprise
- barney bars
- small juice boxes
For older children, they also use Chupachups, MMDems, chewing gums and much more.

For adult recipients of a sweet gift, a preference for milk or dark chocolate is taken into account. And already knowing this, they choose the right sweets.
Making a chocolate cake
A spectacular chocolate cake decoration is the key to success. This stage of preparing an original gift must be approached with special interest and imagination. Here are some options for decorating a cake for a children's party:
- Having prepared the frame-base of the desired shape, we give it color with the help of corrugated paper. Cut out a strip 4 cm larger than the width of the base.
- Glue with glue, smooth the joint well.
- We wait a little for the glue to seize, and gently stretch the side sticking out at the top (our 4 cm). This will turn out a wavy side of the lower tier of the cake, which can be filled with small multi-colored sweets or other decorations.

- You can also glue pockets for each bar along the rim of the frame, or glue the sweets with the same corrugated paper as the entire frame.

- Having attached chocolates, bars or juice to the body, you can tie them with a beautiful satin ribbon.

- You can make beautiful flowers from corrugated paper. To do this, cut out 5 or more petals in the form of a drop and wind them onto a toothpick, breaking it in half.
- We stick the flower into the cake with a sharp end, forming a beautiful composition.
- The middle can be made from candy in a beautiful wrapper by gluing it with double-sided tape.

- If the cake is intended for a birthday person, candles are placed on top, either a large number or small candles. They can also be wrapped in the shape of a flower, but it is better to use packaging foil for this.

Photo of chocolate cakes for a children's party


Chocolate cakes for adults
- When decorating a cake for a woman, the main thing that is used is corrugated paper bouquets with a sweet center, various shapes of beads, ribbons. Here are some options for jewelry compositions for a creative gift for a woman:


In order to learn how to make flowers of unique beauty for decoration and giving such a gift a simply stunning look, watch the video master class.
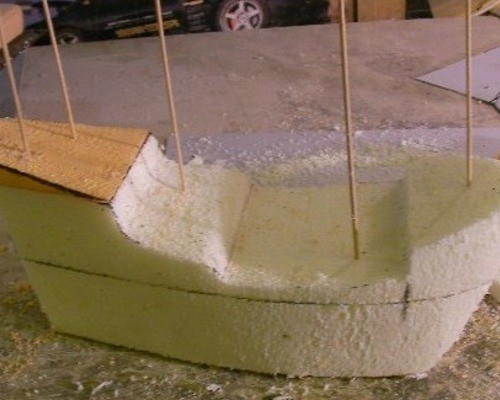
A male cake is often decorated in darker colors and various models of cars are used, cakes are made in the form of emblems of car brands, in the form of a ship or an airplane, it all depends on the skillful preparation of the frame.
Here are some cake options for congratulating men:


No one can forget a gift of such beauty. It will please not only small lovers of sweets, but will also charm adults with its beauty. A creative, and most importantly handmade, chocolate cake decorated with sweets and other decorative elements is a real gift from the bottom of the heart. After all, this grandiose work done will require tremendous patience from you and investing your whole soul in it.