Unusual crochet baby blankets. How to crochet a blanket for newborns A simple pattern for tying a blanket
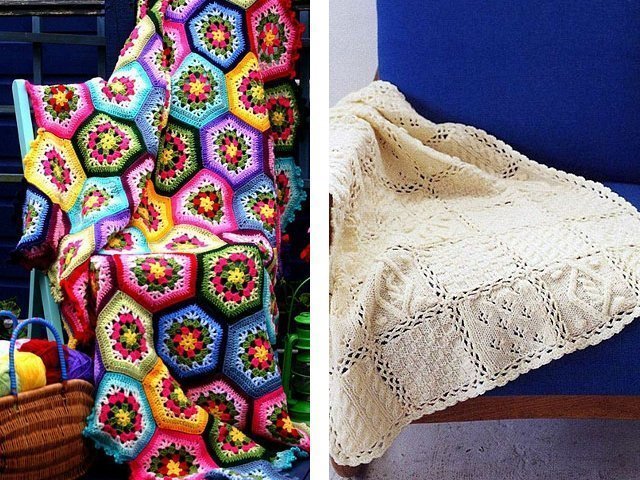
Children's openwork plaid crocheted is the perfect gift for a baby to be discharged. White color is suitable for both boys and girls. A handmade gift is the most precious gift. And most importantly, you can choose the yarn and the size of the blanket yourself.
To crochet a blanket
we need 500 gr. yarn Milk Cotton (45% cotton, 15% rayon, 40% acrylic
150 m, 50 gr), hook No. 2, satin ribbon 1 cm wide, 6 meters.
Description of crochet plaid:
the size of the finished plaid along with the openwork harness is 92 cm by 114 cm.
We collect a chain of 196 loops, and knit exactly according to the scheme to the desired length. In my case, the width of the blanket to the strapping is 71 cm - 21 reports.

1 row: air loops;
2 row: alternate 5 and 4 air loops;
3 row: * 9 double crochets, single crochet *
4 row: * double crochet, air loop *
5 row: * single crochet, 3 air loops *
Then we continue to knit from the first row.
In length, I got 31 reports. After the main canvas is ready, we select the strapping. I really liked the binding that I used, it resembles large fans, and the main canvas resembles small fans. Therefore, a good combination and harmony in the pattern turned out.
We tie all the edges of the plaid with columns without a crochet, we count the columns so that their number on parallel sides is the same. Next, we knit 2 rows with double crochets, in the corners for even expansion we knit 5 double crochets in one loop. Next, we knit a row under the ribbon as follows: * 3 single crochet, 3 air loops, while skipping 3 loops of the base *, repeat the whole row like this. in the corners we knit like this: 3 double crochets, 3 air loops, 3 double crochets in one loop of the base.
we knit another row with a double crochet and proceed to the strapping itself according to the scheme.

I got 6 fans in width, and 7 in height, and 4 fans in the corners.
The blanket is very soft and cuddly. And it knits pretty fast.
You can decorate with a ribbon of any color, I just have bows in 4 corners, since this blanket is designed for a newborn boy.


Have you decided to start eating right? Did you know that there are three fatty foods that help you lose weight? You can read about healthy fats at vstylefitness.ru.
Good afternoon dear friends!
I want to offer you a master class on making a children's fleece blanket with your own hands.
Mothers and grandmothers - needlewomen who are interested in the question "How to sew a baby blanket" should like this idea. After all, here you don’t need to sew anything, but you just need to crochet the edge of the blanket. It looks much more interesting than just sewing the edge on a typewriter.
material for baby blanket
The material is better to choose fleece. Baby fleece blankets are so soft and warm, pleasant to the touch. And the edges of the fleece fabric do not crumble.
How much fabric is needed? You need to proceed from the size of the blanket.
It is better to sew a standard blanket in a crib for a newborn baby with a size of 60 x 120 cm. It is undesirable to do more, as the blanket will crumple and cause inconvenience to the child.
For a child of 2-3 years old, the size of the blanket can be 110 x 140 cm.
The width of the fabric is usually 150 cm, it is enough for a blanket.
And the lengths need to be measured twice the size of the blanket, i.e. 120 or 220 (for the second option) centimeters. We do not need additional seam allowances.
How to cut and prepare fabric
For a baby blanket in a crib, we measure and cut off a canvas measuring 120 x 120 cm, for another, respectively - 220 x 140.
Fold the fabric in half inside out along the length and cut at the fold.
We cut off the factory edge on the fabric.
You will get two canvases connected to each other.
We will not sew them, but immediately proceed to crochet the edge. You can pre-peel with pins so that the canvases do not move.
Crochet the edge of the blanket
We choose threads to match the fabric, it can be cotton or children's acrylic.
You will need two hooks, one thinner, for example, No. 1.3, it is more convenient for them to pierce the fabric, and the second is thicker, already matched to the thickness of the thread.
We make a puncture with a thin hook on the fabric anywhere, retreating 0.5-0.6 cm down from the edge.
Look at the hook. At the beginning, it is thin at all, it is very convenient for them to pierce the fabric. And then it expands a little, which is what we need to get a hole through which the thread will then be pulled.
We pierce the fabric with a crochet hook and insert it deeper, expanding the hole a little, and then we attach the thread and begin to tie the edge with single crochets.
The distance between the punctures must be made the same, it can be 0.4-0.6 cm. Do not make punctures far apart, otherwise the edge will be tightened after tying.
In the corners we knit three columns in one hole.
Having tied the entire blanket around the perimeter, we connect the first and last loops.
Crochet the next row thicker. We make small arches: 1 RLS, 1VP, 1 RLS. When knitting columns, the hook is inserted through one loop of the base.
3rd row: we stretch the thread with a connecting column to the middle of the bow, 3VP, * 1VP, 1С1Н under the next bow of the previous row *. In the corners we knit three columns with a crochet.
4th final row: as 2nd.
This is how a do-it-yourself baby fleece blanket turns out:

Other options for edge binding
You can also knit the border wider by adding one, two or three more rows of tying with double crochets (like the 3rd), before knitting the final row.

It will also be interesting to use threads of different colors for tying a baby blanket.
Every child always wants to bury himself in a soft blanket on quiet evenings so that nothing can disturb him. But you must admit that a blanket knitted by the mother with love and warmth will be much better than a blanket bought in a store, especially since it will be much more expensive. Below is a step-by-step master class on a children's warm crocheted blanket, and the diagram and description will help you quickly master the technique.
A beginner craftswoman, and do not know how to knit? No problem! In today's material, you will learn how to easily make different types of blankets, schemes for children's cozy blankets will help you master the crochet technique much faster.
Crocheted striped children's blanket according to the schemes and descriptions
Plaid size: 80 by 97 cm.
For the blanket you will need: SMS Bravo Baby polyacrylic yarn in blue (2 skeins of 50 g each (184 m) and white (2 skeins of 50 g each (184 m), hook No. 3. For a girl, blue yarn can be replaced, for example, with pink .
Color alternation sequence: * 3 rows blue, 1 row white, 1 row blue, 3 rows white, 1 row blue, 1 row white, then repeat from *.
The main pattern is knitted according to the scheme. 1st row is repeated.
Description of the work of a crochet blanket: with a blue thread, you need to make a chain of 187 air loops + 3 lifting air loops, then the main pattern is knitted in the indicated sequence according to the scheme.

This is how a column with one crochet is knitted (1 tbsp. S / n).

After 97 cm = 103 rows from the typesetting edge, the work can be completed.
Source: Lena Creative magazine No. 2, 2016.
The best of the best product options
Blue baby blanket
To knit this blanket, you will need 4 skeins of cotton or acrylic threads (382m / 100g) and hook No. 3.5 (4).
Plaid dimensions: 92*92 cm.
It is necessary to dial a chain of 206 air loops. In the second air loop, it is necessary to tie a single crochet and continue according to the scheme until the length of the plaid reaches 86-87 cm. The binding is performed with double crochets.
Scheme:

"Like a Cloud"
It is better to take white yarn "Nako Bambino" acrylic / wool - 75/25 (skein - 130m 50g), hook number 2. Consumption for a blanket measuring about 1m by 1m: 1,250 kg.

Scheme:

"Angel wings"
Knitted from delicate silky yarn "Maigik" crochet 3.5.


Plaid knitting patterns:


Plaid "Thumbelina"
Jeans yarn from YarnArt (55% cotton, 45% polyacrylic, 50 gr./160 m), color is pale pink. On a blanket measuring 90 * 90 cm, 9 skeins are left. Hook 1.75.

Scheme:

"Tender Tender"
Yarn Alize Diva (100% microfiber acrylic, 100 gr./350 m) - light silky yarn, pleasant to the touch, hygroscopic, white, 6 skeins. Hook 1.75 Clover. The size of the finished blanket is 90*90 cm.

Scheme:

Crochet baby blanket video:
Working with motifs in crocheting a baby blanket
A warm children's soft blanket knitted from motifs will be the most gentle and pleasant gift for a baby.

It will take a couple of evenings to make a children's blanket from motifs. Despite its size, approximately 1 m * 1 m, this plaid of motifs is knitted quickly and easily. This work will be within the power of both experienced craftswomen and beginners in knitting. Below is a step-by-step master class "Children's crochet blanket", a diagram and description will help you quickly master the technique.
The material that will be needed in the master class on creating a children's blanket, namely a pattern of motifs: yarn (you can use leftovers) - acrylic, wool mixture, wool. In 100 g no more than 240 m; hook - 4.5, scissors, needle, thread for connecting motifs.

Abbreviations:
- Vp - air loop;
- Sc - single crochet;
- C1n - single crochet.
When crocheting a baby blanket, you need to knit freely, as the edges and tops of the blanket can turn out to be skewed. The plaid consists of two parts. The first is the inner part of the motifs (4 square motifs), the second part is crocheting the motifs. Each of the four motifs is knitted according to scheme 1.

A square motif is knitted. It is necessary to dial on the hook a chain of 5 ch.

The chain is closed with a half-column and knitted 2 ch.

It is necessary to make a crochet on the hook and knit s1n into the ring of the chain. Such columns are knitted 2 pcs.


3 more s1n are knitted.

Again knit 3 in. This will be the second vertex of the square element.

Then 3 more s1n and 3 ch for the third top of the square.

In this first row of s1n, you need to knit only 12 s1n. So, we will knit the last 3 s1n and 3 ch.

The beginning and end of the row is closed with a half-column.

To switch to knitting the second row in a square motif, you need to make 4 ch.

Under a chain of 3 ch of the last row, we will knit 3 s1n.


We knit 1 ch and in the next chain of 3 chs of the previous row we knit 3 s1n.

3 ch are recruited and 3 more s1n under the second chain from ch.

By the same principle that two vertices were knitted, the third vertex of the square element is knitted.

The fourth peak must be connected like this: 3 s1n, 3 ch, 2 s1n. In this case, the third column with 1n will serve as air loops at the beginning of the row.

Pull the thread under the chain from ch.

Pull one loop through the other to secure the thread.

The inside of the square element for the children's motif blanket is ready. The gray thread is being cut. The yellow thread is pulled up with a hook, and a chain of 3 ch is knitted under any of one ch of the previous row.

Under the same 1 ch, 2 sb is knitted.

We knit 1 ch, and at the top we knit 3 s1n and 3ch.

Under the same 3 ch of the previous row, another 3 s1n are knitted. This will be the newly formed vertex of the square.

We knit 1 ch and 3 s1n under 1 ch of the previous row.

Next, the second peak is formed, the third and fourth.


To move to the second row of yellow yarn, cast on 4 ch.

3 s1n are knitted in 1 ch of the previous row.

Finish the row with yellow yarn, forming all 4 tops and linking the row with a connecting half-column.

The yellow thread is cut and fastened. A green thread is pulled up and 2 rows are knitted.


By analogy with how the first motive was knitted, you need to knit 3 more of these. Total 4 square-motives.

Sew along the edge of 2 finished motifs, folding them with their right sides inward. So you need to sew all 4 motives.


When the motives are sewn, we proceed to the strapping. We connect the yellow thread under any of the ch of the previous row and knit according to the same principle as we knitted small square motifs for a baby blanket crochet.

Where the seam passes between two motifs, 3 s1n are knitted.

You can make the top of a children's blanket from crocheted motifs by following scheme 1 (the same as the top of the motifs).

We tie the stitched motifs with one row of yellow yarn.

We hook light pink yarn and knit the next row. You need 5 of these side by side.


A blue thread is knitted and 1 row is created.

Again 2 rows of light pink yarn.

And 2 more rows of light green yarn.

Repeat knitting with 2 more rows of pink and yellow yarn.


A row of sc is knitted along the perimeter of the plaid. At the tops, 8 sbn are knitted under a chain of 3 ch.

To make wavy edges for the plaid, knit 2 rows of chains of ch around the perimeter as follows: hook the hook under the sc of the previous row, stretch the loop, knit 5 ch from it. Skip 1 sc of the previous row and in the next sc enter the hook on which the chain from ch.
Pull the yarn through the sc of the previous row and the last loop on the hook. Repeat this around the entire perimeter of the blanket. Knit the second row of chains from ch, winding the hook under the chains from 5ch of the previous row.


Crocheted baby blanket from motifs is ready!
Video on knitting children's blankets from motifs:
We study the beautiful pattern "Houndstooth"


This crochet pattern looks very good on high-volume threads, such as acrylic, that is, on fluffy ones. The pattern is double-sided and is perfect for children's blankets.
For a blanket you will need: woolen or semi-woolen yarn of three colors (bright shades), hook number 4. Another option is acrylic yarn 230m per 100g, hook 4.5.

The pattern consists of four rows. The warp is knitted in the first three rows.
We begin to knit the base as follows: we knit a chain of ordinary air loops, determining their number, the desired length of the future product, a multiple of 4 + 2 lifting loops.
The pattern of the first row will be single crochet. The beginning of the second row will be three lifting loops. Then you need to knit three columns with 1 crochet. The whole row we repeat the pattern of 1 air loop and 3 double crochets. We end the row with a group of 4 columns. We knit the third row according to the scheme of the second, paying attention that groups of three columns do not move relative to each other. After the third row is knitted to the end, it's time to move on to a thread of a different color. Carefully fasten the end of the thread in knitting, passing it several times through the loops of the previous row.

Some craftswomen prefer to crochet large items only, since the peculiarity of this method allows you to achieve beautiful openwork patterns on blankets, and thin, almost jewelry work is very to the liking of lovers of creating beautiful things from details.
Crocheted blankets will perfectly warm adults and the smallest children, the main thing is to choose the right yarn. Another important function of plaids is to decorate the home and create the right mood. All this directly depends on the shape and method of crocheting, which we will examine in detail in this article.
Crochet a plaid with diagrams and descriptions
There are a huge variety of crochet blankets, as well as knitting styles for these warming bedspreads. Even the simplest patterns look interesting on rugs and are always associated with the stepfather's house, warmth and care.
But you will not surprise experienced needlewomen with simple patterns, interesting openwork motifs have been invented for them, patchwork blankets of incredible complexity and beauty, thin and delicate bedspreads for newborns, over which it is so interesting to pore over. In this type of needlework, there is work for every interest and request. But let's start learning from the basics - the simplest patterns and patterns for crocheting plaids.
Master class for beginners
In any case, you need to start somewhere in order to learn. And to learn how to crochet a plaid - a master class for beginners is ideal. Such a blanket, completely made in the style of "grandmother's square", will please both adults and children. Consider how it is knitted using the example of step-by-step instructions.
Popular articles:
Instruments:
- Yarn (in this case, bright green, yellow and brown);
- Hook;
- Needle.
Abbreviations for the knitting pattern:
- VP - air loop;
- RLS - single crochet;
- SSN - double crochet;
- SS - connecting column.
Progress with step-by-step photos:
You need to start knitting with the main color of the blanket. We close six loops in the ring, then we make three VPs and knit two more CCHs into the ring. We make two VPs (photo 1). After that, we crochet three CCHs into a ring and make two VPs. We repeat two more times, as a result of which a square is knitted (photo 2).

After that, we make three VPs (this is the first CCH) and in the corner in the arch we will perform three CCHs, two VPs and again three CCHs (photo 1). This is what we will knit in the remaining arches. We will finish the last one with two CCHs and CCs (remember that the first column at the very beginning was knitted in the form of three VPs) (photo 2).

We knit a new row of the square and make three VPs from the arch in which we have the hook. We knit two CCHs into it. Next we move on to the corner. And we knit everything in it that was knitted in the previous row: three CCHs, two VPs and three CCHs (photo 1). In the next arch we knit just three CCHs. And so in a circle (photo 2).

In the corners you will always need to knit the same thing. And in the arches that are on the sides of the square, we always knit just three CCHs. As a result it turns out the so-called grandmother's square. We knit several rows for the desired size of the blanket. And, completing the grandmother's square, we will change the color of the thread to yellow (photo 1). Knit two rows in yellow. And another row in green. And then we will make the binding of the edges. In one arch we will knit seven CCHs, in the other one RLS. And so we alternate the strapping throughout the blanket (photo 2). Finish tying in green. We will make three VPs and knit one sc in each loop (photo 3).

Plaid decoration
To decorate this simple, but no doubt cute plaid, you can crochet a small decorative element, for example, a butterfly. This is how it can be created:
- We knit five VP and close in a ring. Next, we knit three VP and one more CCH. We make two VPs. And two more SSNs. In total, we need to knit eight times like this. That is, we get sixteen CCH.
- We pass to the arch from the VP. SS We knit three VPs and here we perform two SSNs. We perform three VPs and under the same chain we knit three CCHs. So we knit under all the arches from the VP.
- Now attach the brown yarn. Under the chain of the VP, we knit six CCH. We make one VP and here we perform six more CCHs. Skip the bottom three dc and knit sc.
- And in the next chain we knit everything the same as we knitted before.
- We tie our butterfly with yellow yarn. We knit one sc in six underlying loops and one sc under the VP. We make a pico of three VPs. And so we tie the whole butterfly.
- We fold it in half and fix it with a chain of brown VP. Now it can be sewn to one of the corners of the finished plaid.

How to knit a baby blanket with a simple pattern
Very often, people resort to knitting only to create a crochet children's blanket with an original pattern for their baby. Many try to crochet a plaid with a pattern and color that will not look like any other plaid. And this is a completely doable task, because making a crochet blanket will definitely result in an interesting and beautiful product, even if it is made with the simplest pattern - for example, embossed columns.

Instruments:
- 8 skeins of 50 g of wool mixture or white bulk synthetic yarn (A);
- 8 skeins of 50 g of wool mixture or blue bulk synthetic yarn (B);
- hook number 3.5.
Knitting density: 20 loops x 11 rows = 10 x 10 cm (embossed columns).
Size: 75 x 100 cm.
Main pattern
The embossed crochet stitch is knitted like this: we make a yarn over, insert the hook (from front to back) under the stitch (leg) of the previous row, pull out the loop, grab the thread and pull it through the first 2 loops on the hook. Yarn over again and pull through the remaining 2 loops.
Work progress and knitting pattern

With white yarn we knit an initial chain of 145 VP.
Base range: 1 dc in 3 chs from the hook, 1 dc in each ch to the end, 144 loops are knitted. 1st row: 2 VP for lifting, * relief. Art. around the loop of the previous row, dc in the dc of the previous row, repeat from * to the last loop, 1 relief. Art. around the loop of the previous row.
We turn the work around.
Next, we knit according to the scheme of 7 rows. Cut the thread (A). We knit the thread (B) according to the scheme of 8 rows. Cut the thread (B). Next, knit according to the pattern of 8 rows of thread (A). Repeat the stripes until 96 cm is knitted.
strapping
To tie the edge of the finished product, use the thread of color (B).
1st-4th rows(wrong side): 1 VP, RLS to the end of the row. In the corners of the finished product, knit 3 sc in the sc of the previous row.
Then knit 1 row with a “crustacean step” (sc is knitted from left to right, not right to left) around the entire outer edge of the product.
Finish knitting PBN (semi single crochet) in the 1st sc. Fasten the thread.
From soft yarn for a newborn
A very responsible job is to crochet a blanket for a newborn. A warm blanket for a baby should be gentle, warming and always beautiful. The airiness and delicacy of the yarn for the newborn will give the product a special look that young parents will remember for a lifetime, because they will remember the baby during discharge from the hospital in this blanket, created by caring hands. This blanket is suitable for both girls and boys. It can be used both at home and for walking with a stroller.

Instruments:
- 325 g of white yarn for knitting children's clothes;
- hook number 3.5.
Knitting density: one motive = 4.1 x 3.8 cm (fantasy pattern in the central part).
Work progress and knitting pattern
central part
knitted as follows: a chain of 171 loops is dialed and 73 rows are made with a fantasy pattern in accordance with the diagram and explanations for the symbols accompanying it. 
strapping
At the end of the 73rd row, without cutting the thread, knit the 6th circle. rows with shells (2 CCH (double crochet), 3 VP (air loops), 2 CCH), performing additions in each corner, as shown in the diagram. Replace the last 2 VPs of the 1st and 2nd round. rows 1 dc (semi double crochet), knitted in the 3rd of 3 VPs, replacing the 1st dc. Close the 3rd - 6th circle. rows 1 SS (connecting column) in the 3rd VP from the beginning, and move forward, knitting additional. SS on the arch of the 1st shell.
After that, knit 4 circles. a row of arches of 6 loops without additions and decreases, 1 circle. a row of simple shells (1 SSN, 5 VP, 1 SSN), separated by arches of 5 loops. Run fans of 13 dc in each simple shell. Replace the last 3 VPs of the 7th - 9th circle. rows of 1 CCH, knitted on the 1st RLS, and 4 last VP of the 10th circle. row - 1 C2H, close the 11th and 12th circle. rows like 3rd round. row, and perform another SS in the 1st arch at the end of the 11th circle. row. Finish 1 lap. next to the “crawl step” pattern, as stated in the explanation, close 1 SS in the 1st RLS and cut off the thread.

Openwork from motives
Lovers of beautiful designer things will like an openwork plaid of crochet motifs, which is exciting and interesting to work on. The result is a very beautiful product that will decorate a sofa in the living room or a bed in the bedroom, while warming and giving warmth on cold evenings. For example, you can knit a blanket of large floral motifs, which then need to be combined into a single whole.

Instruments:
- Novita Isoveli yarn (75% wool, 25% polyamide, 65m/50g) - 2300g yellow-green (334) or Novita Napko yarn (50% cotton, 50% acrylic, 104m/100g) - 1800g blue (013);
- hook number 5-6.
Finished product dimensions: Isoveli yarn plaid -140 x 210 cm; Napco yarn plaid -110 x 180 cm.
Knitting density: the diameter of one motif is 17 cm.
Progress and schemes
The plaid consists of separately connected full and half motifs. For a complete motive, dial a chain of 6 VPs, close it in a SS ring. 1st row - cast on 3 ch lifts, knit 1 dc, 2 ch, * 2 dc, 2 ch * in the center of the ring, repeat * - * 4 more times, close the sl-st row. Next, knit according to scheme 1 from the 2nd to the 5th rows. Cut the thread and fasten off. Work 104 motifs with Isoveli thread or 67 motifs with Napko thread.

For a half motif, dial a chain of 4VP, lock into a SS ring. 1st row - VP, 2 CCH, 2 VP, 2 CCH. Next, knit in straight and reverse rows according to scheme 2 from the 2nd to the 5th rows. Cut the thread and fasten off. Tie 8 such motifs with Isoveli thread or 6 motifs with Hanko thread.
Assembly
Lightly steam each motif. Connect the motifs to each other in accordance with scheme 3 (motifs from Hanko yarn are highlighted in gray). For the Isovely yarn plaid, crochet the fringe. To do this, cut the threads 45 cm long, fold them into 3 pieces and tie around the edges. Run 7 brushes for each motif.

Knitted plaid from squares
A very fashionable phenomenon that designers and housewives with taste love - crochet plaid from squares. There are a huge number of crochet patterns for a wide variety of geometric patterns for a patchwork product, most of which look very interesting in their hodgepodge of colors and patterns, while others are elegant in one color but made with different complex motifs. Such a playful and uplifting plaid will look good not only in the nursery, but also in the living room, and in an armchair on the balcony. In addition, you can give it to friends or relatives - let them also rejoice.
Consider here such a plaid of squares, which is easy to knit according to step-by-step instructions.

Instruments:
- yarn - 200 g dark blue SMC BRAVO;
- 100 g each of beige, orange, red, lilac, green, blue, brown, yellow and pistachio SMC BRAVO yarn;
- hook number 3.
Main pattern - square
Link a chain of 6 VPs and close it into a ring with 1 SS. Knit a circle. rows. Every circle. the row starts with 3 ch lifts and ends with 1 sl-st in the ch of the rise of the previous row. Attention! 2 CCH + 2 VP + 2 CCH are indicated in the instructions as a group of CCH.
1st circle. row: 3 dc, 2 ch, * 4 dc, 2 ch, repeat from * 2 more times.
2nd circle. row: 3 CCH, in an arch of 2 VPs, tie a group of CCHs, * 4 CCHs, in an arch of 2 VPs, tie a group of CCHs, repeat from * 2 more times.
3rd circle. row: 5 CCH, in an arch of 2 VPs, tie a group of CCHs, * 8 CCHs, in an arch of 2 VPs, tie a group of CCHs, repeat from * 2 more times, 2 CCHs.
4th circle. row: 7 CCH, in an arch of 2 VPs, tie a group of CCHs, * 12 CCHs, in an arch of 2 VPs, tie a group of CCHs, repeat from * 2 more times, 4 CCHs.
5th round. row: 9 CCH, in an arch of 2 VPs, tie a group of CCHs, * 16 CCHs, in an arch of 2 VPs, tie a group of CCHs, repeat from * 2 more times, 6 CCHs.
6th round. row: 11 CCH, in an arch of 2 VPs, tie a group of CCHs, * 20 CCHs, in an arch of 2 VPs, tie a group of CCHs, repeat from * 2 more times, 8 CCHs.
7th round. row: 13 CCH, in an arch of 2 VPs, tie a group of CCHs, * 24 CCHs, in an arch of 2 VPs, tie a group of CCHs, repeat from * 2 more times, 10 CCHs.
8th round. row: 15 CCH, in an arch of 2 VPs, tie a group of CCHs, * 28 CCHs, in an arch of 2 VPs, tie a group of CCHs, repeat from * 2 more times, 12 CCHs.
9th round. row: 17 CCH, in an arch of 2 VPs, tie a group of CCHs, * 32 CCHs, in an arch of 2 VPs, tie a group of CCHs, repeat from * 2 more times, 14 CCHs.
10th round. row: 19 CCH, in an arch of 2 VPs, tie a group of CCHs, * 36 CCHs, in an arch of 2 VPs, tie a group of CCHs, repeat from * 2 more times, 16 CCHs.
11th round. row: 21 CCH, in an arch of 2 VPs, tie a group of CCHs, * 40 CCHs, in an arch of 2 VPs, tie a group of CCHs, repeat from * 2 more times, 18 CCHs.
12th round. row: 23 CCH, in an arch of 2 VPs, tie a group of CCHs, * 44 CCHs, in an arch of 2 VPs, tie a group of CCHs, repeat from * 2 more times, 20 CCHs.
Cut and fasten the thread.
Assembly of motifs in a plaid
Knit 54 multi-colored squares. Connect the edges of the squares to each other by completing the faces. side 1 row RLS with a dark blue thread. For the blanket, collect 6 x 9 squares in the desired order.
Make a circle around the perimeter of the blanket. a row of dark blue thread border. Every circle. the row starts with 3 ch lifts instead of 1 dc (or 2 ch lifts instead of 1 sc) and ends with 1 sl-st in the last ch of the rise of the previous row. Attach the thread to the beginning of the corner square and knit as follows.
1st circle. row: ** 2 dc, * 4 ch, skip 2 sts of the base, 4 dc, repeat from *, before the next corner, tie 4 ch, skip 2 sts of the base, 2 dc, then tie the group of dc into the arch of 2 ch of the previous row, repeat from ** on each side of the bedspread.
2nd circle. row: work 1 sl-st in the next loop, ** 4 dc, * 4 ch, skip 4 sts of the base, 4 dc, repeat from *, before the next corner, tie 4 ch, skip 4 sts of the base, tie the group of dc into the arch from 2 ch of the previous row , ch 4, skip 4 base sts, repeat from **.
3rd circle. row: ** 1 dc, 4 ch, * 4 dc, 4 ch, skip 4 sts of the base, repeat from *, before the next corner, tie 4 ch, skip 2 sts of the base, tie the dc group into an arch from 2 ch of the previous row, 4 ch, Skip 2 base sts, 3 dc, repeat from *.
4th circle. row: ** 1 sc, * 4 dc, 4 sc, repeat from *, 4 dc, 2 sc, 4 dc into the arch from the 2 ch of the previous row, 2 sc, 4 dc, 3 sc, repeat from **. Cut and fasten the thread.
Video lesson
It's always a good idea for beginner needlewomen to preview a few video tutorials on how to work with a hook, especially when it comes to such an important task as a blanket for a newborn baby.
Video “plaid for a newborn crochet”:
Choosing a pattern for knitting a plaid is usually not difficult. On this site, and on the Internet as a whole, there are hundreds of diagrams and descriptions for every taste and color. The question of choosing a pattern for crocheting a plaid is more acute. The fact is that the pattern of the plaid and the strapping options you like often do not fit together, so choosing a pattern becomes a headache for the needlewoman.
In this material, we will try to make it easier for you to choose a border pattern for crocheting a plaid. Let's sort the possible strapping options by category and write which harness fits which blanket.
Article navigation
Binding for a plaid from grandmother's squares
To tie a blanket of grandmother's squares, you need to choose a simple border, consisting of several rows. Complex schemes are extremely rare here, since the pattern itself is extremely simple. Below are several options for such strapping.
In this version, the green row is the last row of the grandmother's square. The harness starts with a red row (middle) and consists of only two rows.
A simple option for tying a plaid from grandmother's squares
No less simple tying option. Please note that the finished plaid of grandmother's squares must first be tied with single crochets. The diagram shows three such rows. You can knit them either more or less.

Border scheme for a plaid of grandmother's squares
Harness "Pineapples" for a blanket
It is used not only as an independent pattern, but also as a border. This option is suitable for blankets connected light pattern. It should be borne in mind that the pineapple border is quite voluminous - at least 10 centimeters in height (depending on the yarn). This must be taken into account when planning to knit a blanket of strictly defined sizes. An example is in the photo below.

Throw with pineapple piping

Crochet "Pineapple" border - diagram

Crochet pineapple pattern
Harness for an openwork plaid
To tie an openwork plaid, you need to choose a light pattern. By the way, as a strapping, you can take the same “Pineapples” pattern, which was discussed above. Let's consider other options.
The lower elements of this scheme outwardly resemble pineapples. Between them passes an element resembling an expanding fan.

Scheme for tying an openwork plaid with an extension
The strapping scheme with roundings, inside each semicircle - flowers. This strapping option for openwork blankets is close to universal. However, you need to pay attention to the rapport of the pattern, since not every blanket will eventually contain a suitable number of loops.

Another simple strapping (in Spanish conventions). Triangles on the diagram- pico.

Strapping for a plaid with bumps
A border in the form of bumps is not a universal option for decorating a plaid. But it is worth considering, since the blankets connected dense patterns, are fairly common. It is for them that such a harness is suitable.
Below is one of the simplest and most beautiful options. Please note that in the sample in the photo, fewer rows are knitted with single crochets. The number of such rows is determined independently, to your taste.

Tying for a blanket "Bubbles" is simple

The bumps may not go perpendicular (vertically), but parallel (horizontally) with respect to the side of the plaid. A video tutorial on tying a blanket for the second of these options is below.
Trim for a plaid with flowers
Floral piping is suitable for plaids with a less interesting main pattern. Against the background of openwork patterns, the strapping in the form of flowers seems like an excess. There are also several options for making flowers.
The simplest option is flowers, almost entirely consisting of air loops. Such a border is suitable for blankets with both a dense and openwork pattern.

Simple crochet flower border
Wider version of the border. Here the flowers are "hidden" under each semicircle - an incredibly interesting pattern.

Wide border with flowers - scheme
This video tutorial presents the most popular version of the border in the form of flowers. The knitting process is a little specific, because there are no rows above the flowers, but they are knitted without interruption. That is why it is better to watch the master class.
Binding for a baby blanket
Children's blankets, as a rule, do not differ in the complexity of knitting. Their main feature is a simple pattern combined with pastel-colored yarn. Therefore, the strapping should be as simple as possible, but at the same time not form corners and rough elements. You can take patterns for tying blankets from grandmother's squares (see above).
Below are two of the simplest strapping options that are suitable for more or less dense patterns.

Scheme for tying a baby blanket

Border with arches for tying a baby blanket
This border is more suitable for an openwork plaid, although the diagram shows a grandmother's square.

Harness for a baby blanket with "paths"
Not all strapping schemes are presented above, but this is a decent selection. It presents more or less classic options for harnesses and borders for blankets. Remember that you can experiment. Perhaps a modification of any of these schemes will give an amazing result.