How to crochet a teddy bear diagram and description. Descriptions of bears
You will need
For knitting and stuffing
Hook No. 1.5; white woolen or acrylic threads; synthetic winterizer or synthetic winterizer.For decoration
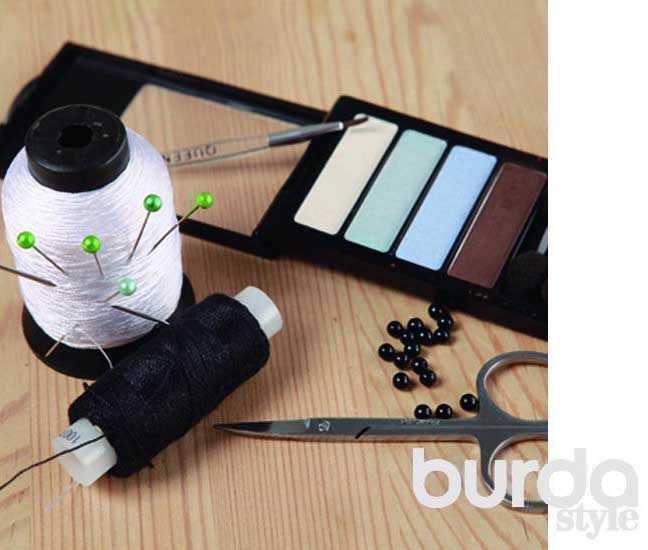
Black threads; brown eyeshadow; 4 pins; large needle with a large eye; scissors; strong nylon threads; 2 black beads for the eyes.Completing of the work
First we knit the details of the bear.
Head
1st p.: 2 ch, 6 tbsp. b / n in the second loop from the hook.2nd p.: 2 tbsp. b / n in each column \u003d 12 st..
3rd p.: * 3 tbsp. b / n, 2 tbsp. b / n in the next column, from * repeat 3 times = 15 st. b/n.
4-5th p.: Art. b / n in each column in a circle. Knit 1 tbsp. b / n in the next column to shift knitting to the middle of the neck of the head. This column is not taken into account and is used to adjust the center of knitting.
6th p.: 3 tbsp. b / n, 9 conn. st., 3 st. b / n, knit in each loop.
7th p.: 3 tbsp. b / n, * 2 tbsp. b / n next. column, from * repeat 9 times, 3 tbsp. b / n \u003d 24 st. b/n.
8th p.: 6 tbsp. b / n, * 2 tbsp. b / n next. column, from * repeat 3 times, 6 tbsp. b / n, ** 2 tbsp. b / n next. column, from ** repeat 3 times, 6 tbsp. b / n \u003d 30 st. b/n.
9-12th p.: St. b / n in each column in a circle.
13th p.: * 4 tbsp. b / n, 2 tbsp. b / n together, from * repeat 5 times = 25 st. b/n. Knit 2 tbsp. b / n in the next column to shift knitting to the middle of the neck of the head. These columns are also not taken into account and are used to adjust the center of knitting.
14th p.: * 3 tbsp. b / n, 2 tbsp. b / n together, from * repeat 5 times = 20 st. b/n.
15th p.: * 2 tbsp. b / n, 2 tbsp. b / n together, from * repeat 5 times = 15 tbsp. b/n. Knit 1 tbsp. b / n in the next column to shift knitting to the middle of the neck of the head.
16th p.: * 1 tbsp. b / n, 2 tbsp. b / n together, from * repeat 5 times \u003d 10 tbsp. b/n. Stuff your head with sintepuh and close the posts, knitting 2 together to the end.
torso
1st row: ch 2, 6 tbsp. b / n in the second loop from the hook.2nd p.: 2 tbsp. b / n in each column in a circle = 12 tbsp. b/n.
3rd p.: * 1 tbsp. b / n, 2 tbsp. b / n in the next column, from * repeat 6 times = 18 st. b/n.
4th p.: * 2 tbsp. b / n, 2 tbsp. b / n in the next column, from * repeat 6 times = 24 st. b/n.
5th p.: * 3 tbsp. b / n, 2 tbsp. b / n in the next column, from * repeat 6 times = 30 st. b/n.
6-9th p.: St. b / nv each column in a circle.
10th p.:. *1 tbsp. b / n, 2 tbsp. b / n together, from * repeat 10 times = 20 st. b/n.
11-13th p.: St. b / n in each row in a circle.
14th p.: * 2 tbsp. b / n together, from * repeat 5 times, 10 tbsp. b / n \u003d 15 st. b/n.
15th p.:. *1 tbsp. b / n, 2 tbsp. b / n together, from * repeat 5 times \u003d 10 tbsp. b/n.
Stuff the body with sintepuh and close the posts, knitting 2 together to the end.
upper paws
1st p.: 4 ch, 1 tbsp. b / n in the second column from the hook, 1 tbsp. b / n, 3 tbsp. b / n in the next column, turn to the other side of the chain of air loops, 1 tbsp. b / n, 2 tbsp. b / nv next. column \u003d 8 tbsp. b/n.2nd p.: * 2 tbsp. b / n next. column, 1 tbsp. b / n, from * repeat 4 times \u003d 12 tbsp. b/n.
3-4th p.: Art. b / n in each column in a circle. Knit 1 tbsp. b / n in the next column to shift knitting to the middle of the back side of the upper paw.
5th p.: 4 tbsp. b / n, * 2 tbsp. b / n together, from * repeat 2 times, 4 tbsp. b / n \u003d 10 tbsp. b/n.
6-13th p.: St. b / n in each column in a circle.
Stuff the foot with sintepuh and close the columns to the end, knitting 2 together.
lower paws
1st p.: 6 vp, 1 tbsp. b / n in the second column from the hook, 3 tbsp. b / n, 3 tbsp. b / n next. column, turn to the underside of the chain of air loops, 3 tbsp. b / n, 2 tbsp. b / n in the next column \u003d 12 tbsp. b/n.2nd p.: 2 tbsp. b / n in the next column, 3 tbsp. b / n, * 2 tbsp. b / n in the next column, from * repeat 3 times, 3 tbsp. b / n, ** 2 tbsp. b / n in the next column, from ** repeat 2 times = 18 st. b/n.
4th p.: 6 tbsp. b / n, 2 tbsp. b / n together, 2 tbsp. b / n, 2 tbsp. b / n together, 6 tbsp. b / n \u003d 16 tbsp. b/n.
5th p.: 4 tbsp. b / n, * 2 tbsp. b / n together, from * repeat 4 times, 4 tbsp. b / n \u003d 12 tbsp. b/n.
6-12th p.: St. b / n in each column in a circle.
Stuff the paw with sintepuh and close the posts to the end, knitting 2 together.
Knit the second foot in the same way.
Ears
1st p.: 4 ch, 1 tbsp. b / n in the second p. from the hook, 1 tbsp. b / n, 3 tbsp. b / n in the next column, turn to the other side of the chain of air loops, 1 tbsp. b / n, 2 tbsp. b / n next. column \u003d 8 tbsp. b/n.2nd p.: * 2 tbsp. b / n in the next column, 1 tbsp. b / n, from * repeat 4 times \u003d 12 tbsp. b/n.
3rd p.: Art. b / n in each column in a circle.
Finish by connecting the column into the next column. Cut off the thread.
Connect the second ear in the same way.
Tail
1st p.: 2 ch, 6 tbsp. b / n in the second loop from the hook = 6 tbsp. b/n.2-3rd p.: Art. b / n in each column in a circle. Finish by connecting the column into the next column. Cut off the thread.
Step 1
We embroider the nose, mouth, claws with black threads. We outline the eyes and ears with pins.
Step 2
We thread the nylon thread, leaving the tail, from the left ear to the right eye, put on the bead and thread it back.
Step 3
Tightly pull the ends of the thread so that the eyes sit deep, tie. With these ends of the thread we sew the ears.
Step 4
With one thread, we immediately sew both lower, then both upper paws, but on the outside of the paws we insert the needle 1-2 mm below the exit point of the thread, and on the inside and in the body, the points of entry and exit of the thread coincide. We pull tight.

Step 5
For the navel, insert the thread several times on the tummy and bring it out in the place of the tail.
Step 6
Sew on the tail and head.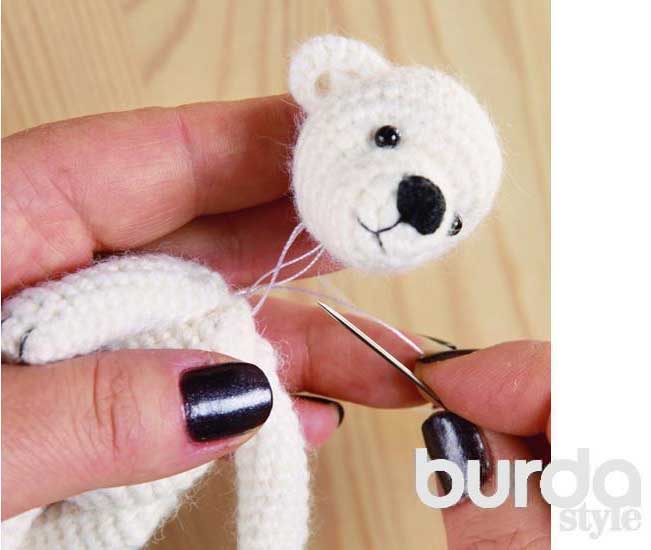
Step 7
With the tip of the brush, apply tinting (shadows) around the eyes, nose and navel.
Knitted bears are always in fashion. And after Winnie the Pooh, Teddy, amigurumi bears became popular, there are such toys in almost every home. It is enough just to crochet the bear yourself. The process will not take much time, but the finished product will delight the owner with its individuality for a long time. In addition, a knitted bear can be a wonderful gift for a child for the holidays.
Often, knitted bears are made using the amigurumi technique, which belongs to the Japanese art of crochet. Their feature is the presence of human signs - elements of clothing and other accessories.
Descriptions and patterns of crochet bears can be easily found on the Internet. If desired, even a novice master can easily make a cute little animal.
To create a toy you will need:

When choosing a crochet hook, it is better to buy a thin one so that the knitting is tighter. The denser it is, the neater the finished product will look. In the process of work, all parts must be knitted with a single crochet (sc).
bear body
The main part is the body of the figure, to which the rest of the parts will then be attached. The crochet bear master class begins with the manufacture of the torso:


toy head
Knitting should start with white threads. First, dial 2 ch, then knit 6 sc in the second. Knit 2 stitches in each of the resulting loops. There should be 12 loops in total. After that, do the following manipulations:

Animal paws
When the head and body of the little animal are ready, you can start knitting the paws of the animal. Step-by-step instructions for making the upper limbs:


The lower limbs of the bear are made in the same way as the upper ones. The difference is in the number of loops. Step-by-step process of working with the lower paws:

Assembly of the finished product
 First you need to check the strength of all the stretched threads on the details so that the bear does not bloom when the child plays with it. Sew all the pieces together with a needle and thread. Carefully hide all the tips inside so that they do not stick out. In addition, you need to sew a careless patch on the side of the product, because this attribute is the "calling card" of each Teddy bear.
Such bears can be not only children's toys. For example, wedding bears can be made from white yarn. It should be noted that the teddy bear does not have to be small. If desired, you can make a big bear with your own hands in a similar technique. This will require a lot of patience and effort.
Even a novice craftswoman can quickly and easily crochet a teddy bear. The main thing is to have a desire to make a real masterpiece with your own hands.
I don't know about you, but I bears occupy a special place among others toys. Especially if it bear made do it yourself. How to make it? There are a lot of ways! You can, for example, sew. Our website has several master classes in sewing bears.
Can i make a toy out of wool. For some, this method will seem more difficult than the first. But this is only at first glance. Believe me felting wool- an unusually exciting and not at all difficult task. The main thing is to try! If you have such a desire, then I advise you to look at our master classes on felting toys.
And finally, bear can to tie. I think this is the most popular way. Toys can to knit knitting needles or crochet. But for some reason, most often it is crocheted. So before you crochet bear knitting master class. I will try to describe everything in great detail so that even the most-most understandable beginners.
knit teddy bear we will do this: first we will connect the individual parts, and then we will assemble them. The details are knitted in a spiral, that is, we will not make air loops for lifting. Since with such knitting it is very difficult to keep track of where the new row begins, and counting the loops is not very reliable (I was distracted for a second and already lost), I advise you to use a knitting marker. For me, the role of such a marker is usually played by an ordinary small pin, which I place at the beginning of the row.

Materials and tools for knitting.
We will need the following materials:
- Yarn for knitting bears. My teddy bear is knitted from Grass Stretch yarn (pictured). It is difficult to knit from such yarn, therefore, if you do not have enough experience, it is better to take not such “fluffy” yarn for a start.
- Hook. Its number must match the yarn. Usually, the yarn label indicates the number of the hook and knitting needles. By the way, about the consumption of yarn. On this teddy bear, I left the whole skein of yarn, as they say "back to back". If you knit not too tight, then for reliability, I would advise you to purchase two skeins. Well, just in case. And if the yarn remains, it will be possible to knit another bear.
- Needle for sewing soft toys. The most important criterion when choosing a needle is the width of the “eye”. It is necessary that you can thread the yarn from which you knit a bear into it.
- To decorate the nose, you can use two methods: the first is to embroider it, then you will need black floss threads and a needle, and the second way is to knit the nose out of wool (you need black felting wool and a thin needle No. 40). The second way is closer to me (I really like to play wool toys!). You choose the one that is closer to you. Embroidered noses also look very cute.
- Eyes. I used purchased eyes for toys.
- Filler (synthetic winterizer, sintepuh, cotton wool).
- Scissors.
- Knitting marker (I have a small pin).
- Yarn for knitting blouses. It is better to choose yarn in bright colors.
- Four knitting needles for knitting a blouse. I used a set of needles for knitting socks. Very comfortable, they are all the same size.
I already did a master class on crocheting a bear. In some places I will rely on it so as not to repeat myself:
Bear crochet with a felted muzzle. Master class and knitting pattern.Legend:
Legend:
V.p.- air loop.
Art. b\n- a single crochet.
Knitting the head of a bear (1 detail).
Dial 2 ch. If you want the muzzle of the bear to be a lighter shade, then start knitting with light yarn. I knitted everything with yarn of the same color.
1 row:
2 row:
3 row:
4-5 rows: Art. b \ n in each loop (18 loops).

If you started knitting with light yarn, now we change the color of the yarn to the main one (brown).
6 row: 4 tbsp. b \ n, 10 increments, 4 tbsp. b \ n (28 loops).
7 row: 6 art. b \ n, 3 increments, 10 tbsp. b \ n, 3 increments, 6 tbsp. b\n. (34 loops).
8-11 rows: Art. b \ n in each loop (34 loops).
12 row:- repeat 5 times, 4 tbsp. b \ n (29 loops).
13 row:- repeat 5 times, 3 tbsp. b \ n (24 loops).
14 row:- repeat 8 times (16 loops).
We fill the head with synthetic winterizer.

Decreases until the hole is completely closed. We cut the working thread and carefully hide the “tail” with the help of a hook.
Knitting of the body (1 detail).
We start knitting with yarn of the main color. We collect 2 v.p.
1 row: 6 art. b \ n in the second loop from the hook (6 loops).
2 row: increase in each loop (12 loops).
3 row:[increase, art. b\n] - repeat 6 times (18 loops).
4 row:[increase, 2 tbsp. b \ n] - repeat 6 times (24 loops).
5 row:[increase, 3 tbsp. b\n] - 6 times (30 loops).
6 row:[increase, 4 tbsp. b\n] - 6 times (36 loops).
7-9 rows: Art. b \ n in each loop (36 loops).
10 row: 6 deductions, [Art. b \ n, decrease] - 8 times (22 loops).
11-12 rows: Art. b \ n in each loop (22 loops).
13 row:- 7 times, 1 tbsp. b \ n (15 loops).
14-15 rows: Art. b \ n in each loop (15 loops).
This completes the knitting of the torso. We do not close the hole, we leave a long “tail” of yarn in order to sew the head to the body later.
I confess that I knit from Travka for the first time. But before that, she knitted mohair toys many times. And I noticed that the wrong side turns out to be more fluffy than the front. With "Grass" the same story. And then I thought, why not turn the part inside out? For a comparison of the back and front sides, look at the photo. I liked the back side better. Therefore, I turned the part inside out and only after that I stuffed it with filler.

And in the future, I knitted all the details so that the front side remained inside the knitting, and the wrong side (more fluffy) - outside.
Knitting handles (2 parts).
We collect 2 v.p.
1 row: 6 art. b \ n in the second loop from the hook (6 loops).
2 row: increase in each loop (12 loops).
3 row:- repeat 4 times (16 loops).
We knit so that the front side is inside (see photo).

4-6 rows: Art. b \ n in each loop (16 loops).
7 row:- repeat 4 times (12 loops).
8-10 rows: Art. b \ n in each loop (12 loops).
11 row:[reduction, 1 tbsp. b \ n] - 4 times (8 loops).
Loosely stuff the handles with filler.
Decreases until the hole is completely closed.

Knitting legs (2 parts).
1 row: We start knitting with a set of 5 air loops. Then we cast on 1 air loop for lifting and knit 1 single crochet in the first loop (out of five cast on), 3 single crochet, 2 increases, 3 single crochet, increase (14 loops).
2 row: 2 inc, 4 single crochet, 4 inc, 4 single crochet, 2 inc (20 sts).
3-4 rows: Art. b \ n in each loop of the previous row (20 loops).
5 row: 5 st. b \ n, decrease, 2 tbsp. b \ n, decrease, 2 tbsp. b \ n, decrease, 5 tbsp. b\n. (17 loops).
6 row: 6 art. b\n, decrease, 1 st.b\n, decrease, 6 tbsp. b \ n (15 loops).

7-11 rows: Art. b \ n in each loop of the previous row (15 loops).
We fill the leg with filler.
Decreases until the hole is completely closed.

Knitting ears for a bear (2 parts).
We knit ears in the same way as in master class from the link below:

Decoration of the muzzle of a toy.
Now the fun begins. We will make out the muzzle. It is at this stage that the image of the future toy, its individuality, is created.
Take a needle for sewing soft toys, thread the thread from which you knitted a bear into it. The length of the thread is about 30 cm. Now pull the muzzle as shown in the photo, thereby forming recesses for the eyes.

I had eyes without an eyelet for which they could be sewn. Therefore, I first formed the recesses for the peephole, and then glued them. If you have eyes with eyelets, then you simply sew them on at the tightening stage.
So, we glue the eyes to our teddy bear.

It remains to make a nose. As I wrote above, it can either be felted with black wool or embroidered with threads. Choose what is more convenient and closer to you.

Sew the head, arms and legs to the body.
Here is such a baby turned out:

We make eyebrows with a few stitches:

The bear is ready. Now we will knit a blouse for him.
Knitting sweaters for bears.
We will knit a blouse for a bear with knitting needles.
As a basis, I took a sweater that Svetlana (unfortunately, I don’t know her last name) knitted for her Happy Micah.
Cast on 34 stitches.
In the front rows, all the loops are knitted with the front ones, in the wrong ones - with the wrong ones.
1 row: K5, yarn over, knit 1, yarn over, knit 5, yarn over, knit 1, yarn over, knit 10, yarn over, knit 1, yarn over, knit 5, yarn over, knit 1, yarn over, knit 5.
2 row:
3 row: K6, yarn over, knit 1, yarn over, knit 7, yarn over, knit 1, yarn over, knit 12, yarn over, knit 1, yarn over, knit 7, yarn over, knit 1, yarn over, knit 6.
4 row: knit with purl stitches.
5 row: K7, yarn over, knit 1, yarn over, knit 9, yarn over, knit 1, yarn over, knit 14, yarn over, knit 1, yarn over, knit 9, yarn over, knit 1, yarn over, knit 7.
6 row: knit with purl stitches.
7 row: K8, yarn over, knit 1, yarn over, knit 11, yarn over, knit 1, yarn over, knit 16, yarn over, knit 1, yarn over, knit 11, yarn over, knit 1, yarn over, knit 8.
8 row: knit with purl stitches.
9 row: K9, yarn over, knit 1, yarn over, knit 13, yarn over, knit 1, yarn over, knit 18, yarn over, knit 1, yarn over, knit 13, yarn over, knit 1, yarn over, knit 9.
10 row: knit with purl stitches.
11 row: K10, yarn over, knit 1, yarn over, knit 15, yarn over, knit 1, yarn over, knit 20, yarn over, knit 1, yarn over, knit 15, yarn over, knit 1, yarn over, knit 10.
12 row: knit with purl stitches.
We knit 10 facial loops. This will be the shelf. Now let's start knitting the sleeves. To do this, we take an additional knitting needle. We knit the front loops of the raglan line in the sleeve (17 loops).

We knit 6 rows of the sleeve with the front stitch, close the loops. Insert a hook into the last remaining loop and sew the sleeve with it.


With the first knitting needle (the one that first knitted 10 facial loops of the shelf), we knit the back with facial loops. We get to the second sleeve. We knit it in the same way as the first.

When the sleeve is ready, again with the first knitting needle we knit the remaining 10 loops.

We knit the front surface of the shelves and the back to the required length. We close the loops.

Now let's start knitting the hood. We hook the loops on the neck onto the knitting needle.

We knit with the front stitch the fabric of the required length. Periodically we try on the future hood on a teddy bear.

When the required length is reached, close the loops. We crochet single crochets to the middle of the hood, then we knit the halves.


We do not cut the thread, we tie the edges of the blouse with columns without a crochet. After that, cut the thread and carefully hide the "tail".
Clothes for the bear are ready!
To give the teddy bear some charm of an old toy, I embroidered a seam on the tummy with black thread. The edges of the nose and the contour of the eyes I slightly darkened with brown eye shadow.
This is such a miracle :)

Happy knitting! With best wishes in creativity, the author of the toy is Anna Lavrentyeva.
This master class was written specifically for the site, so copying the entire material is FORBIDDEN!
When partially copying, be sure to place a link to the source.

The touching Teddy bear is loved by both children and adults.
Appearing in the toy world, he immediately won the love of the people. You can buy a bear in a store, but how much cuter and more expensive it will be if you knit it yourself with an ordinary crochet hook made of woolen or cotton yarn.
The first Teddy bears were made with moving head, paws and legs. But such complex toys can only be knitted by very experienced craftswomen. We will talk about simpler Teddy bears that even beginners will make.The traditional color of the Teddy bear is gray and blue, and the needlewomen try to adhere to it in their work. Although bears of other colors also appear, they are also very charming and attractive. Talented knitters come up with new clothes, jewelry and accessories for Teddy that make the beloved bear fashionable and modern. Crocheting a Teddy bear is not difficult, you just need work and patience. But as a result, you will get a favorite toy of the whole family. To make a bear you will need:
- Woolen or cotton yarn, hooks of different sizes.
- A piece of fabric for patches.
- Sintepon, floss threads, buttons, ribbons, beads and beads.
- The body, head, muzzle, ears, paws and legs are crocheted according to the pattern.
- The connected parts are stuffed with padding polyester and sewn together.
- Eyes, a nose are sewn on and a mouth is embroidered.
- For stuffing, use only synthetic winterizer. Cotton wool will crumple over time and spoil the look of Teddy.
- The eyes and nose of the bear can be sewn on in the form of buttons or bought ready-made in a needlework store.
- Try to knit the fabric tightly. Take the hook into work in thickness less than the thread.
- To make a knitted Teddy look cute and touching, sew his eyes close to each other.
- The teddy bear will become even more charming if you provide him with clothes by knitting a hat, scarf and sweater.
Symbols used in knitting patterns:
- VP - air. a loop
- SBN-st. single crochet
- PSN - semist. double crochet
- SSN - Art. double crochet
- C2H - Art. with 2 crochets
- SS - connecting st.
- P - addition (in the loop of the previous row we knit 2 sc)
- U - decrease (we knit two loops together)
Crocheted Teddy Bear - master class
We will need: gray and white yarn, blue and black floss threads, hook No. 2.5, black beads for the eye, synthetic winterizer, gray fabric for patching.Step one: we knit the details of the bear according to the schemes (head, torso, ears, nose, paws and legs).
torso
 With gray yarn we knit 2 air. loops, in the 2nd air. we knit a loop of 6 sc. Without connecting the rows, we knit in a spiral.
  We add a synthetic winterizer and evenly distribute it over the body, rolling it in the palms. Then close the hole with a needle.
 Head


We do not close the occipital loops yet, leaving a thread 50 cm long for 1 row of decreases. We begin to make out the muzzle of a teddy bear. Sew eyes with black thread in the form of two black beads. It is advisable to sew the beads closer to each other so that the bear looks more touching. Then we embroider the eyebrows and “scars” with black threads, and the nose with blue threads. After making the muzzle, we close the last loops.
Ears
We knit 2 air with gray yarn. loops, in the second air. we knit a loop of 6 sc. The first row - we knit 1 sc in each loop to get 6 loops. We fix the thread with a connecting column, leaving 15 cm for sewing. Then we sew the ears to the head.
Paws

 legs
legs


Step two: we sew all the finished parts with gray yarn. Teddy bear is ready!
Knitted Teddy bear - master class

We will need: semi-woolen or acrylic yarn, a little white yarn for the muzzle, blue threads for the spout, synthetic winterizer or holofiber for filling, beads for the eyes, black threads for patches.
The order of work: we knit the details of the bear according to the above scheme, sew them together, sew on the eyes, embroider the nose and patches.

Knitted Teddy bear with a bow - master class

We will need: woolen or cotton gray yarn, hook No. 2 or No. 3, ribbon, beads for the eyes, black threads for the nose and eyebrows.
The order of work: we knit the details of the toy according to the scheme, fill it with padding polyester and sew it.
Knitted bear with a scarf - master class

We will need: 60 g of brown Soufflé yarn, 30 g of beige yarn, a little lilac yarn for a scarf, hook No. 2, 2 beads, black threads for the spout, synthetic winterizer.
The order of work: we knit the details of the bear (we knit the body and head together). We sew the connected parts together. We start knitting from the head in a circle. without a crochet.
Head with body:
- We knit 6 rows, increasing to 40 loops, then we knit exactly 11 rows.
- We reduce the number of loops to the volume of the neck (it should turn out 18 loops), then we knit exactly 2 circles, adding loops of the volume of the body. To do this, first double every second loop, and in the next rows - at the beginning of every 4th, then - every 6th loop.
- We knit two rows evenly, then we double every 3rd loop until the torso is slightly larger than the head (55 loops should be obtained), then we knit 8 cm evenly.
- We begin to decrease the loops, skipping every 3rd loop.
- As we knit, we fill the details with padding polyester.
- We knit a chain of 3 air with a beige thread. loops and close in a ring.
- We knit 3 rows, increasing to 25 loops.
- Change to brown yarn and knit exactly 5 rows.
- Then we decrease 4 loops, we knit exactly 9 rows and we decrease the remaining loops.
- With beige yarn we knit a chain of 8 air. loops.
- We knit around the chain, adding loops at the turns. In total, you need to knit 4 rows, then knit exactly 5 rows.
- Dec 7 sts on one side, then dec 2 more times 3 sts.
- We knit exactly 7 rows, evenly decreasing the remaining loops.
Ears: with brown yarn we knit a chain of 6 air. loops, close the circle and knit 9 tbsp. with a crochet in the center. You need to knit 2 pieces of brown yarn and 2 pieces of beige.
Scarf: we knit a chain of air with lilac yarn. loops of the desired length and tie it with art. with a crochet. So that Teddy does not feel sad, you can knit a cute girlfriend in a fashionable skirt for him.
According to the same crochet pattern, each bear cub gets its own special character.
Teddy bear cubs also live at the North Pole.
Mohair bear with a flower, knitted with your own hands, will be a wonderful gift for any holiday.
To crochet a Teddy bear, you need to invest a lot of work, but the result will exceed all your expectations. A funny teddy bear, knitted by your talented hands, will fill the house with warmth and comfort.
Crocheted toys are a real exclusive, because, in the process of knitting, each needlewoman brings something from herself into it, and therefore, the end result will surely surprise with her individual zest.
Knitted bears are very popular with children - both ordinary clubfoot and overseas Teddies, and a loving mother can easily make any of them with her own hands, you just need a little free time and suitable yarn at hand.
Most often, bears are made using the technique of Japanese circular knitting "amigurumi". Toys knitted from Travka yarn look original, thanks to the fluffy structure of which the bear turns out to be truly furry. However, excellent hand-made toys are also obtained from ordinary cotton or woolen thread - they are knitted with a dense fabric (w / n columns) for a long time retain their original appearance even if children actively play with them.

At the same time, not only a knitted toy-bear will delight a child. For kids who want to always have a reminder of their favorite fairy tale character with them, try knitting a bright bear patch appliqué that can be placed on a baby's hat, outerwear or backpack.

We invite craftswomen to practice crocheting teddy bears, we guarantee that children will be delighted with such cute soft toys! 
Crocheted applique "Teddy Bear"
Teddy bear is one of the favorite children's characters, especially among girls. If the needlewoman does not dare to knit a real soft toy due to inexperience in crocheting, then even a beginner knitter will knit an application in the form of a bear.
We offer you to analyze in detail the knitting lesson of the “bear cub” application, with which you can decorate not only knitted hats and sweaters, but also pockets of denim pants and kids jackets!


Materials for knitting appliqués: crochet hook, gray, black and white yarn, eyelet beads, ribbon for decoration. 
Text abbreviations:
- VP - air loop;
- runway - air lifting loop;
- KA - amigurumi ring;
- RLS - single crochet;
- CCH - double crochet;
- С2Н - double crochet;
- PRIB. - an increase, where 2 RLS are knitted from one loop;
- REDUCED - a decrease, where 2 RLS are tied together;
- PR - previous row;
- pet. - a loop;
- SS - connection column;
- (number) - the number of loops obtained after knitting a row.
Knitting steps:
1. We collect the base-chain for 5 VP, we close the connection. column in KA.
3 runways, 11 SSNs. 
We get the finished first row: 
2. 2nd row we knit 3 runways, from each CCH PR - 2 CCH. In total we get 24 loops.

3. 3rd row: 3 runways, alternating increases: 2 CCH in CCH PR, 1 CCH in the next. SSN PR. (36).

Three knitted rows look like this: 
4. In the fourth row, you need to knit the ears: 2 runways, 11 sc. 
We start knitting the ear: skipping one column of PR, from the next pet. PR - 8 С2Н, again skipping one column, we knit 6 SS along the fabric of the teddy bear (we pass in a chain of columns for a “flight” between the ears). 
Again we skip one column of PR, knit 8 С2Н, skip a column of PR, 12 RLS along the circumference of the application. 
It turns out this is the head of the bear: 
5. We knit the muzzle with a white thread: 5 VP into the ring, in the first row - 3 runways + 11 CCH, in the second: 2 runways, 23 RLS (from each column b / n PR - increase in 2 columns).

6. Assembling the teddy bear: sew eyes, muzzle, embroider a nose, decorate with a bow if desired.

The teddy bear is ready! According to the specified knitting pattern, you can make large-sized applications (make appropriate increases), and even real bedside rugs in the children's bedroom.

"Bear-toed": knitted finger toy
For the comprehensive development of the child, the game of finger theater is the best suited. You can revive your favorite heroes of fairy tales on your own, for this you just need to tie a finger puppet!

For example, everyone's favorite Bear-toed from the fairy tale "Teremok" is knitted literally in one evening from the remnants of yarn. Well, are you ready to try to knit such a toy for your baby?

Knitting progress:
Bear head and body:
We start knitting with brown yarn:
Row #1: 6 sc in KA.
Row #2: 6 APP. (12).
Row No. 3: 6 times (PRIB. + 1 RLS), (18).
Row No. 4: 6 times (PRIB. + 2 RLS), (24).
Rows 5-9: no increase, 24 sc.
Row No. 10: 6 times (DEC. + 2 RLS), (18).
Row No. 11: 3 times (DEC. + 4 RLS), (15). Change yarn to white.
Rows No. 12-15: we knit without increments, 15 sc each. At the end of the 15th row, we change the thread to red.
Row 16: 3 times (4 sc + inc.), (18).
Row No. 17: 3 times (5 sc + inc.), (21).
Rows No. 18-20: 21 sc each.
Row 21: 5 times (2 SC + DEC.), SC (16).
Rows Nos. 22-23: 16 sc.
Muzzle (beige thread):
Row #1: 6 sc in KA.
Row #2: 6 ARRAY, (12).
Row #3: 3 times (2 sc + dec), (9).
Ears:
Row number 1: (beige thread): 6 dc in KA, do not close the circle, knitting turn to the second row.
Row #2: 3 sc, inc, 3 sc (8).
Paws (two parts):
Row #1: 6 sc in KA.
Row 2: 6 sc, change yarn color to white.
Rows No. 3-7: 6 RLS, fill the part with holofiber, tighten the thread, hide the ends inside.
Teddy bear assembly:
We fill the finished elements with holofiber. We sew ears, a nose to the head, decorate the muzzle (we sew eyes from beads, a blank on the nose, we embroider the mouth and eyebrows). We sew paws to the body, Mishka is ready to play "Teremok"!
Big Bear, knitted using amigurumi technique

You can knit a big soft friend for a child right now. A detailed decoding of the knitting steps of the Bear will help novice craftswomen to make an amazing soft toy without much effort. For knitting, it is better to use brown acrylic yarn and a little beige for the nose and soles of the bear's paws.
Step by step knitting process:
Torso: with a brown thread, dial the flail. from 3 VP (runway is not taken into account in the calculations).
Row number 1: 5 sc in the 3rd ch chain. (6 p.).
Row number 2: 1 runway, 2 sc in the VP PR, 4 rapports: “2 sc in the next. RLS PR "(12 RLS).
Row number 3: 1 runway, 5 rapports: “2 RLS in the next. RLS PR, 1 RLS in RLS PR "(18 RLS). Row number 4: 1 runway, 5 rapports: “2 RLS in the next. RLS PR, 2 RLS in RLS PR "(24 RLS).
Rows #5-8: Knit as 4th row. The result should be 48 sc.
Rows No. 9-14: 1 runway, 1 RLS in RLS PR, (48 RLS).
Row No. 15: 1 runway, 3 rapports: “2 is incomplete. RLS, with one vertex, in the next. RLS PR, 10 RLS in RLS PR "(44 RLS).
Rows No. 16-19: 1 runway, 1 RLS in RLS PR, (44 RLS).
Row number 20: 1 runway, 3 rapports: “2 is unfinished. RLS, with one vertex, in the following RLS PR, 9 RLS in RLS PR ”, (40 RLS).
Rows No. 21-24: 1 runway, 1 RLS in RLS PR, (40 RLS).
Row No. 25: 1 runway, 3 rapports: “2 is unfinished. RLS, with one vertex, in the next. RLS PR, 8 RLS in RLS PR "(36 RLS).
Row No. 26-29: 1 runway, 1 RLS in RLS PR, (36 RLS). Run shoulder seams 1 cm.
Head: with a brown thread, we collect the base-chain for 3 VP.
1st p.: 7 RLS in the 3rd VP chain. Only 8 loops.
2nd row: 1 runway, 2 sc in the VP PR, 1 sc in the next. RLS PR, * 2 RLS in the next. Sc pr, 1 sc in sc pr *, repeat from * to * 2 times. Total 12 sc.
3rd p.: 1 runway, * 2 RLS in the next. Sc pr, 2 sc in sc pr *, repeat from * to * 3 times. There are 16 sc in total.
4th p.: 1 runway, * 2 RLS in the next. Sc CR, 3 Sc in Sc CR *, repeat from * to * 3 times. Only 20 sc.
5th–11th p.: Knit like 4th p. There are 48 sc in total.
12th–17th p.: 1 runway, 1 RLS each in RLS PR. There are 48 sc in total.
18th row: hole for the ears. 1 runway, 14 sc in sc in inc, 5 ch, 1 sc in 6th sc in inc from hook, 9 sc in sc in inc, 5 ch, 1 sc in 6th sc in inc from hook, 13 sc in sc in inc.
19th p.: 1 runway, 1 RLS each in RLS and VP PR. There are 48 sc in total.
20th p.: 1 runway, 1 RLS in RLS PR. There are 48 sc in total.
21st p.: 1 runway, * 2 unfinished RLS, connected. together, following. Sc pr, 6 sc in sc pr *, repeat from * to * 5 times. There are 42 sc in total.
22nd p.: 1 runway, * 2 unfinished. RLS, with one vertex, in the next. Sc pr, 5 sc in sc pr *, repeat from * to * 5 times. There are 36 sc in total.
23rd–33rd p.: Knit like 22nd p. There are 12 sc in total. We cut the thread, leave it in length so that it is enough to complete the 1st row.
Muzzle: we knit a flail with a brown thread. from 3 VP.
1st p.: 8 RLS in the 3rd VP chain. Only 9 pet.
2nd row: 1 runway, 2 RLS in the VP PR, 2 RLS in the next RLS PR, * 2 RLS in the next. RLS PR, 2 RLS in RLS PR *, repeat from * to * 1 time. There are 12 sc in total.
3rd p.: 1 runway, * 2 RLS in the next. Sc pr, 3 sc in sc pr *, repeat from * to * 2 times. There are 15 sc in total.
4th p.: 1 runway, * 2 RLS in the next. Sc pr, 4 sc in sc pr *, repeat from * to * 2 times. There are 18 sc in total.
5th–7th p.: knit according to the principle of the 4th row, 27 sc. Cut off the thread.
Ears (2 parts):
Beige inner part (2 pcs.): Knit straight and back, we take into account the runway. We collect a chain of 5 VP.
1st p.: 5 RLS in the 3rd VP chain., 1 p / st. in the 2nd VP chain. from the hook.
2nd p.: 1 runway, * 2 RLS in the next. RLS PR *, repeat from * to * 4 times, 1 RLS in VP PR. There are 12 sc in total.
3rd p.: 1 runway, * 2 RLS in the next. RLS PR, 1 RLS in RLS PR *, 2 RLS in the next. SC PR, 4 SC in SC PR, repeat from * to * 2 times. There are 16 sc in total. Cut the thread.
Top piece brown (2 pcs.): knit by analogy with the inner. Both parts are aligned with the wrong side inward and connected with a brown RLS thread in a circle.
Front paws (2 pcs.): knit according to the description of the head from the 1st to the 11th rows.
12th r.: 1 runway, * 2 unfinished. RLS with the 1st peak, in the following RLS PR, 3 RLS in RLS PR *, repeat from * to * 3 times. There are 16 sc in total.
13th–19th p.: 1 runway, 1 RLS each in RLS PR. There are 16 sc in total.
20th p.: 1 runway, * 2 unfinished. RLS with one vertex, in the following RLS PR, 2 RLS in RLS PR *, repeat from * to * 3 times. There are 12 sc in total.
21st–23rd p.: 1 runway, 1 RLS each in RLS PR. There are 12 sc in total. 24th p.: 1 runway, * 2 unfinished. RLS with one vertex, in the next RLS PR *, repeat from * to * 5 times. Only 6 RLS. Cut the thread.
Lower part of the foot (2 parts): dial a flail with a beige thread. out of 9 VPs.
1st p.: 1 RLS in the 3rd VP chain., 6 RLS in the VP chain., 2 VP, 8 RLS on the reverse side of the chain., 2 VP. Row finish SS.
2nd row: 1 runway, 8 RLS in RLS PR, 3 RLS in an arch of 2 VP PR, 8 RLS in RLS PR, 3 RLS in an arch of 2 VPs. There are 22 sc in total.
3rd row: 1 runway, 8 RLS in RLS PR, 2 RLS in the next. 3 RLS PR, 8 RLS in RLS PR, 2 RLS in the next. 3 RLS PR. There are 28 sc in total.
4th row: 1 runway, 8 RLS in RLS PR, 2 RLS in the next. 6 RLS PR, 8 RLS in RLS PR, 2 RLS each in the next 6 RLS PR. 40 sc in total. Cut the thread.
5th p.: we attach a brown thread, 1 runway, 1 sc each in sc PR. 40 sc in total.
Upper part of the foot (2 parts): knit in rows straight and back.
We collect a flail with a brown thread. from 7 VP.
1st p.: 2 RLS in the third VP chain., 2 RLS in the VP chain., 2 RLS in the next. VP chain., 1 RLS. Only 8 sc.
2nd p.: 1 runway, 2 RLS in the next. RLS PR, 4 RLS in RLS PR, 2 RLS in the next. RLS PR, 1 RLS. Only 10 sc.
3rd p.: 1 runway, 2 RLS in the next. RLS PR, 6 RLS in RLS PR, 2 RLS in the next. RLS PR, 1 RLS. There are 12 sc in total. 4th p.: 1 runway, 2 RLS in the next. RLS PR, 2 RLS in the next. RLS PR, * 2 RLS in the next. RLS PR *, repeat from * to * 3 times, 2 RLS in the next RLS PR, 2 RLS in the next. RLS PR, 1 RLS. There are 18 sc in total.
5th p.: 1 runway, 2 RLS in the next. RLS PR, 3 RLS in the next. RLS PR, * 2 is incomplete. RLS with one vertex, in the next RLS PR *, repeat from * to * 3 times, 3 RLS in the next RLS PR, 2 RLS in the next. RLS PR, 1 RLS. There are 16 sc in total.
6th–10th p.: 1 runway, 1 RLS each in RLS PR. There are 16 sc in total.
11th p.: 1 runway, 5 RLS in the next. RLS PR. Turn knitting, continue on these 6 sc.
12th–17th p.: 1 runway, 5 RLS in RLS PR. We cut the thread. We attach a new thread to the fourth row and knit by analogy, starting from the 5th to the 17th row. Sew the seam from the wrong side. Connect the upper and lower parts with a brown RLS thread in a circle. Cut the thread.
Back paw (2 parts): attach a new thread to the seam.
1st row: 1 runway, 8 sc from the side, 4 sc in the center. parts, 8 sc from the other side of the foot. Total: 20 sc. We finish connecting. Art.
2nd p.: 1 runway, * 2 unfinished. RLS with the 1st peak, in the next. RLS PR, 5 RLS in RLS PR *, 2 unfinished RLS with the 1st peak, in the next. RLS PR, 2 RLS in RLS PR, repeat from * to * 1 time, 2 unfinished RLS with one vertex, in the next. RLS PR. There are 16 sc in total.
Rows 3-6: 1 runway, 1 sc in sc in pr. There are 16 sc in total.
7th p.: 1 runway, * 2 RLS in the next. RLS PR, 3 RLS in the next RLS PR *, repeat from * to * 3 p. Total: 20 sc.
Rows 8-13: 1 runway, 1 sc each in sc pr. Only 20 sc. 14th p.: 1 runway, * 2 RLS in the next. Sc pr, 4 sc in next sc pr *, repeat from * to * 3 times. There are 24 sc in total.
Rows 15-16: 1 runway, 1 sc each in sc pr. There are 24 sc in total. 17th row: 1 runway, * 2 unfinished sc with the 1st peak, in the next sc in pr, 2 sc in sc in pr *, repeat from * to * 5 times. There are 18 sc in total.
18th p.: 1 runway, * 2 unfinished RLS with one peak, in the next. RLS PR, 1 RLS in RLS PR *, repeat from * to * 5 p. There are 12 sc in total.
19th p.: 1 runway, * 2 unfinished RLS with one peak, in the next. RLS PR *, repeat from * to * 5 times. We cut the thread.
Teddy bear assembly: insert the ears into the hole on the head and sew on the wrong side. We sew a muzzle. We fill the head with holofiber, tighten it with a b / n column. and sew to the body. We perform the same actions with the front and hind legs. We decorate the finished toy as desired. We knit a vest or a dress, you can decorate the Bear with a tie or a bow.
A large selection of detailed descriptions of knitting bears using the amigurumi technique
Any of the patterns below has been tested in practice, so right now you can start knitting toys - choose the bear you like and create with pleasure! 


Video tutorials on crocheting bears