DIY cotton swab toys. Crafts from ear sticks and cotton pads
DIY crafts from cotton swabs look original, but they are done quite simply, any preschooler can handle them. Crafts made by the hands of a child do not require significant costs. Children's works, unusual in their execution, are obtained from improvised means or waste material. At the same time, the significance of handicrafts is quite important for the development of a child. They develop in young craftsmen fine motor skills of hands, imagination, logic, artistic vision and communication skills.
The master class offers to make several works from cotton swabs. They will be able to decorate a postcard or a panel and become one of the first significant works of a child.
What can be done
From cotton swabs, namely from their tips, you can make both flat crafts, for example, for panels, and volumetric ones - figurines of plants and animals.
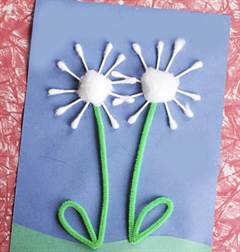
The easiest thing to do with cotton swabs is flowers. Let's try to make them on paper (in two ways) and in volume.
For the panel you will need:
- cardboard base;
- colored paper;
- white cardboard;
- PVA glue;
- cotton wool;
- plasticine;
- cotton buds;
- sharp scissors or wire cutters;
- felt-tip pens or pencils;
- paint (gouache or acrylic).
How to make a flower from cotton swabs (first option):
- Using a pencil, outline the silhouette of the future flower on the basis - arrange the leaves, stem and round corolla;
- Cut out the stem, leaves, pot and the rest from colored paper, which is necessary for the background of the picture, and glue to the base;
- Cut off the cotton swabs at one end with scissors or wire cutters;
- Gently spreading the sticks on one side with glue, glue them to the base with the "sun";
- In order to "close" the cut ends in the center, glue cotton wool or a round piece of plasticine in the middle.
Plasticine can also be used instead of colored paper: to mold the stem, leaves and the middle of the flower from it. Sticks are stuck into it, no glue is needed in this case.

Second execution option:
- Cut circles with a diameter of about 5 cm from white cardboard;
- Cut off the cotton tips from the sticks;
- Spreading glue in a circle on a cardboard circle, glue a row of cotton tips along the edge;

- Make the second and subsequent rows, greasing the cardboard and the previous row with glue;


- Assemble the entire composition on a cardboard base by drawing or gluing stems and leaves to it and gluing the corolla of flowers on top;

- If you wish, you can paint the sticks with paint.


The volumetric flower resembles a dandelion. To complete the work, you need to prepare:
- cotton buds;
- plasticine or floral ball;
- wire, skewer, tube;
- paint;
- water and a container for diluting the paint;
- tape;
- vessel.
How to do:
- Cut the sticks at one end with scissors;
- Roll a ball of the right size from plasticine or use a ready-made ball for floristry;
- Stick the cut ends of the sticks evenly into the ball (you should get a fluffy dandelion);

- Dilute a little paint of any color in a deep container and twist the ball in it so that it is colored on all sides;

- Allow to dry and stick in the "stem" of a skewer, wire, straws for drinks, sticks for sushi (you can pre-wrap in paper or paint green);

- Decorate the bouquet by tying it with a ribbon, placing it in a suitable vessel or sticking it into a stand.


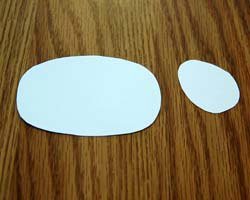
Also, from a variety of cotton swabs, a cute Dolly sheep can turn out. It is necessary to prepare the appropriate templates (torso and head), as well as other materials and tools:
- cotton buds;
- thick cardboard;
- scissors;
- clothespins;
- PVA glue;
- marker;
- ribbons.
How to do:
- Cut the ends of the sticks with scissors;


- On the prepared cardboard circles for the body, begin to glue cotton sticks in rows in a fan in rows (from the tail to the head);


- Glue the head, making ears and bangs, draw a muzzle;


- Glue the head to the body, covering the cut ends of the sticks with it;

- From the seamy side, glue two clothespins with the "ears" down.


Ready! This lamb can be used as a stand for signs and notes.


The panda, the symbol of China, is made according to the same principle as the lamb. For work, you need to prepare:
- cotton buds;
- white and black cardboard;
- thick sheet of paper;
- base - cardboard;
- PVA glue;
- scissors;
- dye;
- brush.
Progress:
- For convenience, you can cut the silhouette of a bear according to a template or draw it by hand (so as not to cut out a separate circle and an oval for the head and body, respectively);
- Cut the ends of the sticks;
- Lubricating the template with glue, start laying sticks on it in a circle in several rows (separately for the head and body);
- Cut the legs (4 pcs.) And ears (2 pcs.) From white and black cardboard;
- Glue the ears and legs to the workpiece from the wrong side;
- Draw spots around the eyes and stripes on the body of the bear;
- Bend the ears slightly on the front side;
To celebrate the New Year holidays in a wonderful festive atmosphere with your family or friends, you should decorate all rooms and, most importantly, Christmas trees. For this purpose, you can use the Christmas tree decorations, mechanical garlands, decorative beads, rain and tinsel that have accumulated over the past years. But sometimes you want something new and original, which will emphasize the solemn surroundings of the whole house as a whole, brightly highlight its individuality and uniqueness, make everyone rejoice and admire the sparkling atmosphere around. In this case, we advise you to do needlework with your children, through which you can make excellent transformation elements with your own hands. As an example, we recommend that you read our article, in which we will provide 5 photos of ideas for the simplest crafts from cotton swabs for the New Year 2020 with your own hands made using interesting master classes with step-by-step instructions. Such an activity will bring all the creators who are engaged in great joy, peace of mind and skills, which is especially important for the development of children who go to kindergarten or primary school.
Snowflake
The Christmas tree - a beauty for the New Year 2020 can be elegantly decorated with snow-white snowflakes made with your own hands from cotton swabs. Such an easy craft will be of great interest to your kids, because the technique of its manufacture will really be within the power of little creators. Of course, your help will still be needed, but most of the work will certainly be done by children.
This will require:
- Cotton buds;
- Sequins or rain;
- Glue;
- Decorative rock;
- Plasticine.
Progress:
- Each cotton swab must be fluffed up and dipped in glue and glitter. In this state, they should dry out a little. For one snowflake, you need to use 3 sticks, which must be fastened together with a piece of plasticine.
- As a decoration, a decorative stone should be attached to the middle of the snowflake. As a result, we got a Christmas tree craft for the New Year 2020, created quite quickly with our own hands.
Together with your child, you can make a wonderful product in the shape of a panda. It can serve as a decorative piece for you or a wonderful work for an exhibition in a kindergarten or school.
Master class: panda from cotton swabs
Cotton swab sheep

If you want to create a do-it-yourself sheep-shaped craft from cotton swabs for the New Year 2020 with your children, then study our master class. It will turn out to be extremely simple and understandable for you, see for yourself by starting to immediately create.
This will require:
- Cotton buds;
- Ice cream sticks;
- Cardboard;
- Glue;
- Scissors;
- Markers.
Progress:
- To create a lamb on cardboard, you need to draw an oval that will serve as the body of the animal.
- Cotton swabs must be cut into halves and glued to each other along an oval. As soon as the first layer is over, you can stick on the second one. Continue until the entire surface is filled with them.
- To create the legs of the lamb, you need to glue 4 ice cream sticks to the body.
- Then you need to cut a circle out of cardboard and draw eyes, nose, mouth, after which this blank is glued in place of the sheep's head. You can also attach a bow or other decoration here. Crafts for the New Year 2020, made by hand, are ideal for primary school children.
Video: master class for making a sheep from cotton swabs
Herringbone

Another cool craft of their cotton swabs can be a Christmas tree that you make for the New Year 2020 with your own hands. The room interior will be amusingly transformed with a number of such delicate products that you have the right to attach to anything in order to achieve grace and simplicity at the same time.
This will require:
- Cotton buds;
- Cardboard;
- Gouache;
- Glue;
- Beads;
- Ribbons.
Progress:
- You need to draw a Christmas tree on cardboard. To create crafts with your own hands, you will need tips from cotton swabs. They need to be glued to the drawing, creating the desired ornament. It is advisable to use green gouache for painting.
- After the Christmas tree dries, beads or sequins need to be glued to its surface. Then the product can be cut and used to decorate the room for the New Year 2020. This instruction does not have to be used. , after all, the Christmas tree can be made in any other way that you like best.
Flowers from cotton swabs

Nothing will decorate your home for New Year 2020 like handmade flowers from cotton swabs. The craft will perfectly accentuate your lush festive table or delight loved ones who have received such a wonderful and unusual gift on New Year's Eve. The work does not contain any difficulties, see for yourself by plunging into the world of creativity.
This will require:
- Cotton buds with colored base;
- Foam balls;
- Wire;
- Colored paper;
- Paints.
Progress:
- The styrofoam balls should be cut into two pieces, and these pieces will serve as the center of the flower.
- Then they need to be repainted yellow and stick cotton swabs into them in a circle, after cutting off their ends.
- After that, you will need to make a stem for the flower, and we will use wire for this.
- You also need to glue a piece of green paper to the flower. If you make several of these flowers and put them in a vase, you get an unusual bouquet with your own hands. By gradually observing this master class, you can make different types of flowers. Here is our interesting craft for the New Year 2020 and is ready!
To understand in more detail the process of this work, you should watch our video tutorial.
Master class on creating flowers from cotton swabs
Cotton bud snowman

If your child wants to create a craft from cotton swabs for the New Year 2020 with his own hands in the form of a snowman, then help him using our master class. There is nothing complicated and incomprehensible in it, on the contrary, the ease of action will amaze you. Let's get to work at home.
For creativity you will need:
- cotton buds;
- cardboard;
- decorative stones;
- ready-made eyes;
- compass;
- orange gouache paints;
- scissors;
- glue.
Work process:
- In order to make such a cool snowman as in the photo, you first need to make three circles, differing in size from each other. Then you need to cut them out with scissors.
- To get a complete body of a fairy-tale character, we need to fasten all three circles with glue, from smallest to largest. In addition, do not forget about the hands of the snowman.
- Having completed this creative stage, we need to decorate our product with cotton swabs, or rather their fluffy white tips. We cut off only the head of the sticks with scissors and proceed to improve our craft. To do this, we take glue and lubricate the surface of the cardboard circles, starting with the bottom - the largest. Immediately attach cotton blanks around the entire circumference of the circle, as shown in the photo. The number of rows that fill the empty space of the torso depends entirely on the size of your snowman.
- Having completed the lower part of the body, we make out the middle in the same way.
- The snowman's head is also created using the same material at hand that we used earlier. Only after the main work will we need to decorate the entire character. To do this, we need to glue ready-made plastic eyes, previously purchased from a specialized store.
- Highlight the nose with orange gouache paint. Mouth - according to your wishes!
- The final course of action will be to attach the buttons on the snowman's clothes. In this case, their role will be performed by various decorative stones selected by you. That, in principle, is the whole complexity of creativity. As you can see, it looks easy and quite funny. If you try, then with your own hands you can create an excellent craft for the Christmas tree and not only for the New Year 2020. Imagine and thereby make the world more beautiful and more enjoyable!
Conclusion
So our article came to its end, which provided you with the necessary information on how to make crafts from cotton swabs for the New Year 2020 with your own hands at home with your family. As you have already seen, this activity is so exciting that it can become a favorite activity for young children who go to kindergarten or school. This is exactly what you need for the development and formation of a child's personality! And besides, through such creativity, your home will sparkle with new colors, raising the mood of the whole environment on a magical night of celebration. Happy holiday, dear friends! Peace to you, prosperity and good health!
One of the fertile materials for hand-made work is cotton pads. They absorb paint well, flowers made from them fit perfectly into bouquets that will decorate any postcard with dignity.


Crafts made from cotton pads made by kids' hands are especially valuable. An elementary example is the caterpillar, a cheerful, positive character in cartoons and children's books. This is a common appliqué, using component elements painted in different colors.

Whole flower fields can be created from cosmetic cotton pads. One such composition combines both artistic and applied creativity. In addition to cotton pads, you will need a minimum of materials: an A3 sheet, colored paper, glue and paints.
- First, we draw the background (you can simply paint over the sheet with blue or blue paint, or you can depict additional elements on it - the sun, stars, etc.)
- We glue the cotton pad as shown in Figure 2-4.
- Cut out additional elements from paper (stems, leaves, grass).
- It remains only to beautifully arrange our flowers on a piece of paper.
Another option for applied art is eclectic flowers made from cotton pads. In this case, you don't even need paper, just paints and glue are enough. The step-by-step process for creating such beauty is shown in Figure 2-5. Use an eyedropper to keep the paint in neat droplets.
Crafts from cotton swabs
If you have faded decorative flowers lying around at home, you can give them a second wind with the help of cotton swabs. Such flowers made will look much more original than dull fabric inflorescences. We will need:
- a set of cotton swabs;
- gouache;
- stems from old decorative flowers;
- Super glue.
Take 10-15 cotton swabs (the more there are, the more voluminous the inflorescence will turn out) and cut in half. Fold all the halves with the cotton-wrapped sides up and fold in the shape of a flower. Thoroughly coat the place where the stem is attached to the inflorescence with glue and attach our flower to it. Once the glue is dry, you can paint our cotton swab crafts any color by simply dipping them in paint.

Another way to make flowers from cotton swabs is to use styrofoam balls, which can be purchased at any craft store. The mechanism of work is similar: cut cotton swabs in half, stick them into a styrofoam ball to make a flower like a dandelion, and dip the ends of the sticks in paint. Twisted wire can be used as stems.
By the same principle, you can make other crafts from cotton swabs: hedgehogs, the same snowmen, etc.
flower composition
For an older child, it will be an interesting master class on making a flower arrangement, for example, in the form of a bouquet in a basket or in the form of a topiary (this is the word today for original small trees made by hand). It is always fashionable to give such a gift to mom on March 8 or birthday.

For manufacturing you will need:
- cotton pads (the amount depends on the size of the composition);
- needle;
- beads;
- packing boxes for cotton pads;
- polyurethane foam;
- glue;
- a piece of green silk or lining fabric for leaves;
- stapler.
We roll up the cotton pads, fix them in buds, as shown. We put aside the finished flowers, make the leaves. They will be located along the perimeter of the vase and will be a living pillow for delicate and fragile flowers. The sequence of folding the leaf fabric is shown below.
Fill the can from under the discs (you can use any other one, for example, from under the ear sticks), fill it with polyurethane foam, let it dry. We level the surface of the foam with a knife - we make it flush with the edge of the can.

The jar itself can be painted in your favorite colors or decorated with a decoupage method.
We proceed to glue flowers from cotton pads and leaves to the surface of the foam.
The work is ready. Flowers can be made in the form of calla lilies. Then the disks do not need to be folded completely, but you can fasten them with staples and a stapler.
How to make a bouquet of roses - see the video.
DIY crafts from cotton pads can be timed to coincide with such favorite holidays as New Year, Christmas. Cute air angels, smoothly descending on strings of rain around the entire perimeter of the room being dressed up is just such an option. You can use them as Christmas tree toys, garlands, or just additions to New Year's gifts.
The manufacturing steps are shown below. Observing the basic rules of this simple master class, you can quickly and with minimal costs make the living room intriguing, and the atmosphere of the nursery - soft, romantic. Making angels begins with the design of the head and its smooth transition to the body - the dress.


At the end of the work, the head can be decorated with a wreath of yellow-gold braid, wire, or painted with paint.
New year wreath
We have already figured out how to make flowers from cotton pads. The next step is a chic souvenir, similar in the manufacturing method to a flower, but a little more complicated - a floral Christmas wreath. These are often hung on the entrance or interior doors, placed above the doorway or on the gate. True, such a decoration is more homemade, since it will not withstand atmospheric precipitation and fluctuations in air temperature.

It is easy to assemble a wreath step by step, but this must be done carefully and slowly. The same discs bent into four sectors are used as blanks. The corner at the base is chipped off and attached to the base ring. You need to fasten the parts as close to each other as possible. This will create the effect of softness, fullness, artistic exoticism.
Regarding the plane of attachment, it must be remembered that only the front half of the ring should be filled with artificial flowers. The back should be left flat and smooth, since it needs to be in contact with the wall or other surface on which the wreath will be located.
As soon as the wreath is ready, we proceed to the loop for fastening. Its appearance should not spoil the impression of the entire product. Therefore, a silk ribbon rolled into a loop and neatly attached to the back of the ring is ideal.

The general view of the finished product is shown in picture 26, it is very delicate, stylish and soft. Inside a wreath of blooming roses, an angel will be placed in place. The similarity of the materials used for crafts will give the souvenir the character of a single composition.
Lamb
Working with a young child, you can invite him to dream up, imagine in the body of which animal or in which plant there are similar circles. Surely it will be:
- panda;
- owl;
- chicken with chicken after painting discs yellow;
- monkey;
- sunflower.
An interesting craft of a lamb or a lamb. For those who are not lazy, it will not be difficult to make a whole herd by decorating them with multi-colored toy accessories. The step-by-step instructions are as follows:

Let's prepare:
- pieces of felt;
- threads;
- stapler;
- cotton pads;
- scissors;
- glue;
- twine.

If the colored felt is not available, you can use a special fabric dye.
We start by folding the disc in four and fastening the resulting shape with staples. We sew each received element and put them tightly on a silk lace.
Completing the work, we give the lace with the threaded discs the appearance of a ball. The first stage of work is over.


The matter is small - easy design of the face. For this, the very pieces of felt are used, cut to the shape and size of the intended animal. Here you can play with flowers and use the material of the most unexpected colors, so the result will be more fun.

If the idea was to make a lamb in stages, we supplement its head with horns made of wire, if a lamb, there is no need for them.

Having attached the horns to the head, for example, with plasticine, as well as embroidering the eyes and nose with threads or beads, we finish the work. As a result - a skillfully made, handmade toy that will look original on a branch of a New Year tree, for example.


The figure of a chicken from yellow discs is obtained by sticking two circles (one slightly larger than the other), depicting the head and body. The eyes are black beads, the beak is a red triangle.
Christmas card
A holiday card featuring a cheerful snowman is very easy to make! All you need is a sheet of colored paper (preferably blue), cotton pads, glue and felt-tip pens. Use the largest diameter discs as they will have to be shortened.
- Cut out the "body" of the snowman. We only need three discs, two of which need to be shortened to make the snowman look more natural.
- We glue the discs to the paper (Figure 2).
- We "revive" the snowman by drawing a face, pens, a hat, etc. It is more convenient to draw on cotton pads with felt-tip pens, although you can also use watercolors or gouache.

You can add a twist to the craft with the help of additional details - nail polish, ribbons, etc. Let your child show imagination. There is no doubt that the "Snowman" flyer that the kid has created is much more pleasant to receive than the most expensive New Year's cards.
Snowman made of paper plates
We offer you a simple and interesting type of home decor for the New Year holidays. The materials are all the same cotton balls and paper picnic plates of different sizes. This decor can be used to decorate walls, an entrance door, or make a separate panel.
- Lay out a snowman from three paper plates, securing them with thin strips of tape (if you are making a composition in the form of a panel, you can use glue).
- Glue cotton balls to the plates to give the snowman volume.
- From paper or other materials at hand, make the New Year's hero eyes, nose, headdress.

Cheerful penguin
Another idea that even a toddler can implement. To simplify the work, we have prepared a template that needs to be printed on paper. However, you can use any other drawing of the penguin you like, or draw it yourself. The principle of making crafts is the same in any case.
We need:
- printed template;
- cosmetic cotton balls;
- PVA glue;
- scissors;
- trims of black and orange cardboard.
First, download and print a drawing template. Then, cover the entire white area with glue and gently apply cotton balls to it, being careful not to overstep the boundaries. Then cut out the eyes and beak of the penguin from the cardboard and complete the craft.
Any New Year characters (snowman, Santa Claus, Snow Maiden) are created in the same way. The main thing is to find a quality template.
Whether it is souvenirs made only from cotton pads, or crafts made from cotton swabs, they carry a charge of positive energy, develop thinking, and contribute to the development of a child's outlook. Let there be more. Let them unite children and make their inner world wider, brighter, more fun.
So, friends! The New Year is just around the corner, there is very little time left, and you still have to make New Year's decorations: for the Christmas tree, as gifts, for decorating the house, and so on. There is no time to run around the shops, which means it's time to think about New Year's crafts from scrap materials, i.e. from what exactly is available at home.
One of these materials at hand is cotton pads, which can be found in almost every bathroom. Well, if it suits you, then it's time to take a pack of cotton pads, stock up on New Year's mood and start your masterpiece!
# 1 Christmas crafts from cotton pads: making a snowman with your own hands
Let's start with the simplest and most banal New Year's craft made from cotton pads - a snowman. Looking at these white and round cotton swabs, the snowman itself is born in the imagination. So, what we need: cotton pads, thread, needle, scissors, decoration elements (stickers, pom-poms, pieces of felt).

# 2 New Year's crafts from cotton pads: making a postcard with your own hands
Snowmen made of cotton pads can be used not only as independent elements of New Year's decor, but also to decorate postcards or paintings with them. Your little ones will make wonderful applications, which can then be presented to grandparents as a present.

# 3 Christmas crafts from cotton pads: making a garland for decoration
Another easy-to-do craft made from cotton pads is a garland. It is painfully similar to snow, and therefore creates an incredible atmosphere. Where to hang a garland of cotton pads? Anywhere: it will look equally good both on a Christmas tree, on a window, on a dark door, and just as a decorative element in a room.

You may also be interested in:
# 4 Christmas crafts from cotton pads: do-it-yourself angels
Wonderful New Year's angels can be made from ordinary cotton pads. The angels can be left white, or you can add a little shine or color to them. If you most likely have to tinker with the little angel yourself, then children will be happy to take on the decoration! And what could be better than creating Christmas decorations with the whole family!


See more ideas for Christmas decorations:
If you want to make Christmas tree decorations with your own hands, and there is nothing but cotton pads at hand, do not be discouraged. And for this case, there is a great option: take more cotton pads, a stapler, a needle, thread and a small tape. The process of creating a New Year's ball will take no more than 15 minutes, but such a Christmas tree toy looks like a truly winter one!

If you want to do something a little more complex, try this master class.
What is the New Year without the kindest old man in the world? Maybe, in person, he himself will not look at your light, but he will definitely bring gifts. And so that grandfather knows that you remember him and are waiting for him, you need to add his portrait to your New Year's interior. Let's make a New Year's craft of Santa Claus from cotton pads. In addition to the discs themselves, you will need: a disposable spoon, red thick threads, glue and beads for decorating (eyes and nose).

# 7 Christmas crafts from cotton pads: do-it-yourself Christmas tree
Another important attribute of the new year is the New Year tree. It does not have to be alive, because the New Year is a special holiday, fabulous, which means that anything can happen and ordinary cotton pads will turn into a real forest beauty. You will have to tinker with the Christmas tree, there are several execution techniques, and which one to choose is up to you.


If you are confident in your abilities and the previous master classes on making Christmas trees from cotton pads are too simple, then you can try the more complex and time-consuming option from the video.
You can also make an incredibly beautiful Christmas wreath from cotton pads, which can be hung on the door or simply on the wall in the room. By the way, the wreath can be made not just snow-white, but also add a little New Year's mood to it with the help of various decorative elements.


You might be interested in:
If the banal New Year's crafts do not suit you, then you can surprise everyone by making a miniature cupcake. By the way, this appetizing mini cake can be used as a gift decor element. You will need a cork from a plastic bottle, tape, cotton pads, glue, decorative elements (beads, beads, sequins, sparkles).

Of course, a snowflake made of cotton pads will become a themed craft for the new year. It's not difficult to make such a craft, but it looks very cute. See below for a master class on making.

We offer you another selection of ideas for crafts with children. These simple master classes will appeal to mothers of preschoolers and elementary school students. We will make a variety of crafts from cotton swabs with our own hands. In this article, you will find tutorials on how to create various appliqués and volumetric compositions. All instructions are very simple - your kids can easily handle it.
Working with cotton swabs is quite pleasant and interesting. This is why many kids love it so much. In addition, we will add bright colors to the crafts, which will make the creative process even more interesting. Choose what your child will appreciate and get down to business - great fun awaits you!
Application "Verba"

This craft is for the little ones: even a preschool child can easily cope with this task. By the way, this is a good idea for crafts for elementary school or kindergarten - a pussy willow made of cotton swabs and plasticine can be a good basis for a postcard.
We need:
- thick cardboard;
- plasticine;
- cotton buds;
- paints.
It's simple: we dip cotton swabs in brightly colored paint and dry the cotton wool. Using plasticine, rolled into thin flagella, lay out the vase, and then the tree.
We cut off the soft part from the sticks, and from plasticine we make an imitation of the kidneys - we make a willow. That's all - the cotton swab applique is ready!
Application "House"

Another craft from cotton swabs for the smallest craftsmen. True, it is already a little more complicated than the one described above. However, preschoolers will cope with it, so feel free to involve your child in creating this interesting application.
We need:
- blue cardboard;
- cotton buds;
- cotton wool;
- PVA glue.
We form a house from cotton swabs - we make a cross lattice. We glue them on PVA. Next, we cut the cotton wool into small pieces. Pour some glue into a bowl or any surface. Using tweezers, dip a piece of cotton wool into the glue and fix it on the cardboard.

In the same way, you can make a color picture. To do this, you need to mix the glue with paints or dry dye - so the details will be painted in bright colors.
Peacock

For this beautiful craft, you will need one more simple material. We will be creating a beautiful bird with a peacock tail. The cotton bud peacock should really please elementary school age children.
We need:
- cotton buds;
- disposable plastic spoons;
- cardboard;
- bright colors;
- Super glue.
Cut out two elements from cardboard: a circle and a blank for the bird's head. Next, paint the spoons in two or three bright colors. To make the paint lay down well, you can pre-mix it with PVA glue.

We glue the spoons to the round workpiece with super glue. We paint cotton swabs with bright colors. Dry the cotton wool and cut off the soft part. We fill the second part of the cardboard with these blanks. We connect two cardboard boxes with super glue. Ready!
Use bright colors for this craft to make the peacock (or firebird, whatever you like) attractive. Children usually enjoy dyeing both sticks and spoons.
Little animals

Take a look at these cotton swab animals. They are united by the principle of creation. We will make each of them from the soft part of cotton swabs, and a cardboard blank will serve as the basis. Such crafts will appeal to both preschool children and primary school students.

We need:
- cotton buds;
- thick cardboard;
- Super glue;
- stencils;
- bright colors;
- any decor.
Choose the stencil you like and cut it out of cardboard. For inspiration and ideas, we advise you to take a look at our selection of animal and bird templates. Alternatively, you can cut out any image from the children's coloring book and glue it to cardboard.
We cut the cotton swabs - bite off the soft part from them. Next, we fit these blanks tightly in a "fan" on the cardboard. We fix them with superglue. It remains only to add the accompanying decor and decorate the craft in bright colors.

Flowers

This cotton swab craft looks more complicated than the others, but in fact, its technique is very simple. This master class can also be mastered by preschool children if you guide and help them. Only with the wire you will have to act on your own, but otherwise the children will cope on their own.
We will make something like a simple topiary, or more precisely, an original flower bouquet.
We need:
- ornamental foam balls;
- cotton buds;
- crepe paper (can be replaced with colored tape);
- wire;
- bright colors;
- PVA glue.
Cut the sticks into exactly two parts. Then we stick them into the foam balls from all sides.
In a bowl we dilute paints with water (it is better to take not too much water and more paints). We lower the ball and paint over it from all sides.
First, you need to cut the wire as long as you want to make the stems of your flowers from cotton swabs. Wrap them with crepe paper soaked in PVA glue (or wrap with colored tape). Stick the wire into the newly painted ball of chopsticks. Leave the "flower" to dry.
Views: 6 048