Tie a rooster with your own hands for the new year. Rooster crochet knitting pattern
Rooster crochet- a bright and original toy that you can knit as a gift for a godson, a child of a close friend, or maybe directly for a friend. will surely bring good luck, will protect throughout the year, because the Cockerel symbolizes courage and courage.
Rooster crochet
We will use a master class on creating "Catherine Hen" - a popular toy among knitters who are fond of amigurumi, only we will succeed crochet rooster, scheme quite complex and has its own subtleties, but everyone who has basic knitting skills can handle it. You need to learn how to perform air loops and single crochets, as well as be able to knit in a circle, that's all the skills you need to make knitted.
Crocheted rooster is carried out in several stages, more precisely - each of its parts is knitted separately, and then sewn into a solid toy that will stand steadily on its paws. It is necessary to connect the body (49 rows), the head (29 rows) with a serrated edge (30 p.), the tail (10 p.), two identical wings (19 p.). The legs are also knitted separately, while at first each toe is knitted separately, which are then connected together. Earrings, red comb and beak are miniature details of our cockerel, which will be crocheted and then sewn to the product.

As for the colors of yarn: red yarn is always used for earrings and comb, orange or terracotta yarn for beak and legs. For the head and body, you should take the threads of a contrasting bright color. The result is a very beautiful toy that will decorate the holiday and a memory for many years to come. The cockerel's body will look beautiful if you decorate a knitted fabric with circles cut out of felt and then glued to the fabric.
Separately, you need to prepare the eyes: buy eyes for small-sized dolls in the store or sew tiny black beads in their place.
Volumetric amigurumi toys require filler: usually a synthetic winterizer is used as stuffing, you can also take synthetic balls to create an interesting tactile toy.

When you knit each detail of our craft, you should not cut the thread short, you will need the remaining long end to sew all the details together. Each individual part must be filled tightly with filler, leaving no empty spaces - the parts are stuffed before pulling off the last row.
If you are familiar with, then you still have to familiarize yourself with the intricacies of creating amigurumi toys. The main difference is that for amigurumi, a hook is always taken, the size of which is slightly smaller than that required for a given yarn density. This allows you to achieve a very tight knit and create an even fabric through which the fibers of the padding polyester will not seep.

Crocheted rooster
As we have already said to crochet a rooster you need to be able to perform a regular single crochet - this is the main loop, thanks to which a dense knitted fabric is created.
Knitting begins with the main thing - from the body, which consists of 49 rows. First, there is an addition of loops in each row according to the circle pattern - up to 15 rows. From 15 to 26 inclusive - a straight fabric is knitted without additions, and then a gradual decrease in loops begins in each row. There is a special scheme for decreasing: at 27, a decrease is made every 12 columns, then two rows are knitted without decreases - the 28th and 29th rows, and at 30 the columns are again removed, this time after 11 sc, thus continuing to the 49th row - the last one.
The head is knitted a little more difficult, because it is not an even oval, so first you will complete a circle up to 6 p. - you should get 36 loops, after that up to 11 p. you will knit 36 loops without changing their number. At 12, increase again after 5 sc - 42 loops. From 13 to 15 their number does not change. At 16 - they are added after 13 sc. At 17-18 - without additions. At 19 - after 14 sc. Up to 24 - do not change the number of columns. In rows 25-29, loops are added gradually, starting from the scheme - after 7 sc. You will end up with a bell-shaped head detail, and the bottom edge will be “serrated”, so the transition line between the head and the body will be hidden under the frill.
When you knit the feet, you need to start with the fingers: the central one will be larger than the rest. Then three fingers are tied together and stuffed with padding polyester, after which the foot is tied, which is connected to the straight part of the leg.
So that you can easily understand the process of how it fits crochet rooster, description and we have prepared step-by-step photos, if you follow the scheme, then you will get a beautiful and neat New Year's amigurumi toy.

There are other original versions of this knitted craft, for example, in the form of a pillow from African flower motifs. This motif is used by needlewomen to create voluminous soft toys, and the Cockerel figurine can also be brought to life. It will be a three-dimensional triangle with decorative elements - a beak, crest and earrings, and there will be wings on the sides.
The upcoming 2017 New Year will be the year of the Red Fire Rooster. Before its onset, of course, there is still a lot of time, but what will stop us from tying the bird figurine right now? Crocheting a rooster, a symbol of 2017, is not very difficult to crochet with your own hands, moreover, in the master class, each step is accompanied by a photograph. Therefore, it will not be difficult for you to crochet a rooster. Since Petya the cockerel is associated with the word sing, we got a knitted singing rooster.
The threads that we took for knitting are mercerized cotton, it fits very well into the fabric. The colors we used are grey, green and yellow Coco Vita cotton (for 50 gr 240 m), of course you can choose other colors. We also needed some thinner orange thread, we made a comb and a beard out of them. Also hook number 1, artificial filler and a needle with a large eye.
So, what exactly is needed to crochet a rooster:
- cotton threads of different colors,
- artificial filler,
- needle,
- hook number 1.
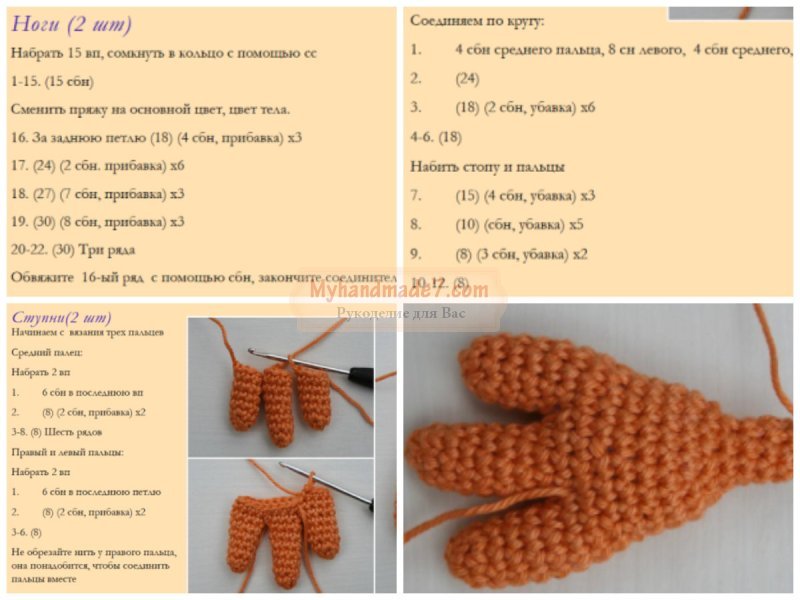
Paws
The bird's paw has four fingers for stability. Three look forward and one looks back. We have to tie eight fingers. The longest one looks forward.
Middle finger
In the ami ring we will dial 5 columns without a crochet. (hereinafter sbn)

Pull the thread of the ring and continue to knit.

In every second column we will knit two, these will be increases. Turn out what is tied, as knitting tends inside out.
3 - 8 rows. 8 sb. We cut off the thread. We will tie two of these fingers.

Lateral toes, short
1 row. 5 sc.
2 row. 5 + 3 = 8 sc.
3 - 6 rows. 8 sb. You need four of these. 
rear finger
1 row. 5 sc.
2 row. 5 + 3 = 8 sc.
3 - 7 rows. 8 sb. You need two of these fingers.

The fingers are ready, they must be filled with filler and collected in a paw. For the side loops with connecting posts (ss) we will tie them in the sequence they should be located in the paw. 

Then the remaining gap should be sewn up from the bottom with a needle and thread, which will also help fix the position of the fingers.

Put the filler in your fingers as tightly as possible.
Through the upper threads, we raise the columns without a crochet, two from each finger. There should be 8 in total.

2 - 3 rows. 8 sb.
4 row. 8 +1 = 9 sc.
5 - 10 rows. 9 sb. We put the synthetic winterizer tightly.

We knit the body of a rooster crochet
Let's move on to the plumage on the legs. Let's take the color blue and start counting the rows from 1.

2 row. 15 + 3 = 18 sc. Double all fifth columns.
3 row. 18 sb.
4 row. 18 + 3 = 21 sc. Double 6, 13 and 20 columns.
5 row. 21 + 3 = 24 sc. At 7, 15, 23 columns, we will do two each.
6 row. 24 sb.
7 row. 24 + 3 = 27 sc. Two in 8, 17, 26 columns.
8 row. 27 + 3 = 30 sc. Two in 9, 19, 29 columns.
9 - 11 rows. 30 sb. On the inside of the leg, we make 7 sbn and a lifting loop (hereinafter referred to as pp, or in another way, just an air loop that does not allow knitting to tighten), after turning, again 7 sbn, 1 st. Do this again and cut off the thread.

We do the same with the second leg.

It remains to tie together and continue to tie both parts with a common row. It is important to make sure that both paws are facing the same direction.

12 - 13 rows. 58 sc.
14 row. 58 + 2 = 60 sc.
15 - 16 rows. 60 sc.
17 row. 60 + 3 - 3 = 60 sc. Increases are made exactly between the legs from the back. This will be the tail. And we will make three reductions on the sides and in front.
18 row. We repeat completely the 17th row.
19 row. 60 sc. We knit a row straight.

20 row. 60 - 3 = 57 sc. We will decrease in the same place where we added. In the tail.
21 row. 57 - 3 = 54 sc.
22 row. 54 sc. Gradually fill the "cock pants" with filler.
23 row. 54 sc. We pass to another color, to yellow through green, using a zigzag pattern. 

24 row. Repeat 23 rows.
25 row. 54 sc. 3 green, 3 grey.
26 row. 54 sc. Here we connect the yellow thread. 1 yellow, 1 green, 3 grey, 1 green, 1 yellow, 1 green, 3 grey.
27 row. 54 sc. 1 yellow, 2 green, 1 grey, 2 green, 1 yellow and all the way through.
28 row. 54 sc. 3 yellow, 1 green, 1 grey, 1 green, 3 yellow and all the way through.
29 row. 54 sc. We remove the gray thread, 3 yellow, 3 green, alternate to the end.
30 row. 54 sc. 1 green, 5 yellow.
31 row. Repeat 30 rows.
32 row. 54 sc. We cut off the green thread and knit the whole row with yellow.

33 row. 54 - 6 = 48 sc. Let's skip all the eighth columns.
34 - 36 rows. 48 sc.
35 row. 48 - 3 = 45 sc. We distribute the reductions evenly over the front of the carcass.
36 row. 45 - 3 = 42 sc. We add it right there.
37 row. 42 sc.
38 row. 42 - 3 = 39 sc.
39 row. 39 sb.
40 row. 39 -3 = 36 sc.
41 row. 36 sc.
42 row. 36 - 4 = 32 sc. Let's subtract every eighth column.
43 row. 32 - 4 = 28 sc. Decrease on every seventh.
44 row. 28 - 4 = 24 sc. Every sixth.
45 row. 24 sb.
46 row. 24 - 3 = 21 sc. Every seventh.
47 row. 21 sb.
48 row. 21 - 3 = 18 sc.
49 -52 rows. 18 sb.
53 row. 18 + 6 = 24 sc.

55 - 57 rows. 30 sb.
58 row. 30 - 6 = 24 sc.
59 row. 24 - 6 = 18 sc. We tightly fill the neck with filler.
60 row. 18 - 6 = 12 sc. We inserted and fixed the eyes on the hairpin in advance before closing the knitting, filled the head with padding polyester.
61 row. 12 - 6 = 6 sc.

Beard. We do not put the filler in the beard, and, in the future, the comb and feathers.


3-5 rows. 12 sb.
6 row. 12 - 3 = 9 sc.
7 - 8 rows. 9 sb.
9 row. 9 - 3 = 6 sc.
10 row. 6 sb.

How to crochet a rooster comb
The scallop consists of several cloves. Let's start one of them. Let's knit five separately for now.
1 row. 5 sc.
2 row. 5 + 2 = 7 sc.
3 row. 7 sb.
4 row. 7 + 3 = 10 sc.
5 row. 10 sb. One is ready, cut the thread. Let's make three teeth of the same size. Another one is bigger and one is smaller.
Bigger tooth, last one.
1 row. 5 sc.
2 row. 5 + 2 = 7 sc.
3 row. 7 sb.
4 row. 7 + 3 = 10 sc.
5 - 6 rows. 10 sb.
The tooth is smaller, the first in the crest.
1 row. 5 sc.
2 row. 5 + 2 = 7 sc.

Now let's assemble the comb into one piece. For two side loops of one clove and the other we will tie together, passing through them the loops from the thread that was left when cutting.

We begin to tie everything together.

3 row. 30 - 4 = 26 sc. Let's subtract 7, 13, 15, 21 columns, if we take a small tooth as the beginning.

We sew a comb on the head, given that it starts with a small tooth.
Crochet a rooster's beak
1 - 2 rows. 4 sc.
3 - 4 rows. 6 sb.
5 row. 6 + 3 = 9 sc. The top of the beak. The bottom also, only up to 4 rows. Sew two halves. 
It is necessary to sew a beak, under it a beard, a comb on the head.


Tail
2 row. 6 + 3 = 9 sc.
3 - 20 rows. 9 sb. Let the feathers be from those threads that have already been used for the carcass. Two gray feathers, two green and yellow in the center. As in a crest, let's connect them together at the sides. 
Let's unite everything in a circular row of single crochets. In this case, 25 sb came out.
21 row. 25 sc.


Starting to crochet rooster wings
1 row. 5 sc. Let's start knitting with a gray thread.
2 row. 5 + 2 = 7 sc.

And let's put it aside for now. Take the green thread and repeat the pen.
11 row. Attach the pen sideways to the pen and, having made 2 joint connecting posts, continue the row with a gray thread of 10 sc.

Set aside again and make a yellow feather.
12 row. We knit a row to the place where we attach the yellow feather after the green one and fix it with a pair of connecting posts. 
13 row. We continue the circle of sc, reaching the yellow feather, we knit a circle, capturing it. 15 sb.


Everything is ready.

So, with your own hands, a singing Rooster is crocheted from threads, a symbol of the upcoming 2017.

Also for the New Year it will be possible
We bring to your attention a master class on crocheting a Cockerel - a symbol of the upcoming 2017 using the amigurumi technique. Knitting it is quite simple, and we will show step by step in the master class all the stages of making a cockerel. Such a stunning rooster will be a great gift for the new year.
Video knitting cockerel
Attention! Every detail starts with an amigurumi ring.
Conventions for knitting cockerel:
KA - amigurumi ring;
pr-ka - increase;
Art. b/n - single crochet;
kill - decrease
For the body, we took green threads. We start knitting according to the following pattern:
1r .: 6 tbsp. b / n in KA
2p .: Pr-ka x 6 times = 12 p
3r.: (st. b / n, pr-ka) x 6 times \u003d 18 p
4r.: (2 st. b / n, pr-ka) x 6 times \u003d 24 p
5r.: (3 st. b / n, pr-ka) x 6 times = 30 p
6r.: (4 st. b / n, pr-ka) x 6 times \u003d 36 p
7r.: (5 st. b / n, pr-ka) x 6 times \u003d 42 p
8r.: (6 st. b / n, pr-ka) x 6 times \u003d 48 p
9-17 p.: 48 tbsp. b/n
18r.: (6 st. b / n, ub-ka) x 6 times \u003d 42 p
19r.: (5 st. b / n, ub-ka) x 6 times \u003d 36 p
20 rubles: 36 tbsp. b/n
21r.: (4 tbsp b / n, ub-ka) x 6 times \u003d 30 p
22-24 rubles: 30 tbsp. b/n
25r.: (3 st. b / n, ub-ka) x 6 times \u003d 24 p
26-35 rubles: 24 tbsp. b/n
36r.: (2st b / n, ub-ka) x 6 times \u003d 18 p
Due to the gradual decrease in the loops, the body of the rooster becomes narrow, now is the time to fill it with padding polyester so that the toy keeps its shape.


37r.: (st. b / n, ub-ka) x 6 times \u003d 12 p
1r .: 6 tbsp. b / n in KA
3-4r .: 9 tbsp. b/n. For an increase, insert twice in one loop.

It is necessary to link 3 such elements. Next, we connect all three teeth as follows: 4 single crochets of the first clove, the loop of the first clove and the loop of the second we connect with a single crochet and knit 3 single crochets in the middle clove. Then one loop of the second clove is connected to the loop of the third clove with 1 single crochet. Next 7 st b \ n in a circle. The last loop of the third clove and 1 loop of the second are knitted together with a single crochet, 2 st b / n, the last loop of the second clove and the loop of the first are knitted together with one st b / n. We knit the last 3 loops of st b / n.
We knit rows 6 and 7 with single crochets.
It turns out a scallop

cockerel beard
We take red threads. It will consist of two identical parts. We knit according to the scheme:
1r .: 6 tbsp. b / n in KA
2-4r.: 6 tbsp. b/n
5p .: kill x 3 times \u003d 3 p

beak cockerel
We use a pink thread and knit according to the pattern:
1r .: 3 tbsp. b / n in KA
2p .: pr-ka x 3 times = 6 p
3r.: (st. b / n, pr-ka) x 3 times \u003d 9 p
4-5r .: 9 tbsp. b/n

Connecting the parts of the head
We connect the details of the cockerel's head, sew the comb, beard and beak with threads.
We hide the ponytails from the beard on the wrong side of the head.
Glue the eyes or they can be embroidered with colored threads.


We knit wings
For them we take white and yellow yarn. We knit in the same way as a scallop, you should get 2 pieces.
For one wing of white yarn, we knit three blanks according to the scheme:

1r.: In KA 6 tbsp. b/n
2p .: (st. b / n, pr-ka) x 3 times \u003d 9 p
3-4r .: 9 tbsp. b/n
5 row knit as scallop .
Change the color to yellow and continue to knit according to the pattern

6r.: (4 tbsp b / n, ub-ka) x 3 times, 5 tbsp. b / n \u003d 20 p
7r.: (8 st. b / n, ub-ka) x 2 times \u003d 18 p
8r.: (7 st. b / n, ub-ka) x 2 times = 16 p
9r.: (6 st. b / n, ub-ka) x 2 times = 14 p
10r.: (5 st. b / n, ub-ka) x 2 times = 12 p
11r.: (4 tbsp b / n, ub-ka) x 2 times \u003d 10 p
Row 12: Kill x 5 times = 5 sts
We decrease the loops to one, tighten and leave enough length to sew to the cockerel.

Sew the wings to the head.
Tail
We use red yarn. We knit according to the scripture as well as scallop , the only difference is that all three parts should differ in size: one will be a little smaller, the other a little larger.

Paws
We knit from a brown thread. Description and scheme are taken from Wings . The only difference is that the whole piece is knitted in one color.

Assembly
It remains only to connect all the parts of the rooster. Sew on paws and wings, connect the head and body.

Your rooster is ready!
And finally, a video of the entire knitting process of a cockerel, good luck.

Rooster: crochet warmer for teapot. Master class There will still be enough time before the New Year to crochet a heating pad for a teapot in the form of a perky cockerel. Such a hot-water rooster is a great idea for a New Year's gift to any housewife. You can make it from the remnants of yarn, which any knitter will always find in abundance. You can also "play" with the color scheme of the heating pad on the kettle with your own hands to your taste. So when crocheting this cockerel, you have room for creativity. Knitting
Knit men's raglan sweater knit crochet pullovers for women knit crochet daisies knit a sweater for beginners knitted luntik knitted rug from circles knitted jumpsuit for a dog knitted cat Leopold tangerine knitted minion knitted bear crochet knitted fly agaric knitted octopus knitted rooster miscellaneous
Knitting perelina knitting gloves knitting knitting feathers knitting rooster knitting pico knitting booties video knitting clothes for dolls knitting pyramid knitting dress for barbie knitting dresses from wool knitting shoulders knitting plus leather knitting according to Chinese magazines knitting headbands knitting cross knitting on knitting needles in boho style knitting for the winter crochet crochet on lux 150 crochet crochet crochet machine brazer crochet crochet machine neva 5 crochet crochet miscellaneous
/ Knitting for hamsters Embroidery Catherine Jones Cross Embroidery Fire Bird Embroidery Cross Magazines Embroidery Cock Embroidery Cold Heart Embroidery Clock Clock Knitting Averchev Knitting Beret Embroidery Africa Knitting Sneakers Men's Crochet Smeshariki Knitted Pilennik Knitted Pilot Crochet Knitting Pullover Vabosko Vaenga Valentina Tsurkan Pulino Amigurum Crochet beard Beaded bracelets master classes Bracelets for bridesmaids other
Dress with hearts kokoshnik crochet Corrugated paper rose Runic formulas and staves Multiplication table on fingers Cake Leaning Tower of Pisa Pattern Chicken foot Pattern Chicken foot Fillet knitting Birds dough week dragonfly kanzashi slimming knitting bag of leather pieces embroidery pattern cats pillow macrame patterns slippers and pompoms teddy hedgehog textile fairies pages for notebooks tilda dwarf tilda to the kitchen tilda rooster tops and T-shirts knitting different
Funny do-it-yourself pillows funny gifs wedding salads cool crafts primitive bear prints for embroidery princess crochet fixture for grinder potholder cock crochet potholder sunflower souvenirs from salt dough country of mothers crochet tunics country of mothers snood country of masters dolls from kapron pages for a notebook dragonfly crochet haircut kare&where =AllPosts wood shavings quilted bedside table diy miscellaneous
Knit + dog, knit + knitting + on + aspen, knit + shortened + row, knit + hat + crochet, knit + helmet + boy +, knit + shrug, knitting + raglan, knitted + jacket + missoni, divination + by + table + predictions, magazine rack + with their + hands, newspaper + weaving + braid, newspaper + tubes, gas + stove, galaret, Galina + Kizima, tie + brooch, knitted + birds + toys, knitted + socks + enterlak, knitted + roosters, knitted +dresses++large+sizes, knitted+dresses+from+mohair, knitted+dresses+irish+lace,
Knitted boots for the street knitting a marine theme leaves Irish lace fishnet skirts cutting puff pastry knitting toys minion pattern with knitting needles rhombuses knitted patterns for children's things leaves crochet video cock crochet mk cold porcelain their wallpaper glue eremey empty kanzashi flowers with a curl of kangaroo beaded flowers voluminous lace Cream cakes
Rooster with a multi-colored tail A bright cockerel with a scarlet comb and bright yellow paws will bring harmony and joy. To knit a rooster with knitting needles you will need: Yarn (purple, scarlet, yellow, turquoise, green, dark yellow) - 50 g of each shade; a little black and white yarn - to decorate the eyes; Knitting needles (6 pcs., number 3); Hook (number 3); Filler (at your discretion: holofiber or synthetic winterizer); Stitching needle. When working on a rooster knitted with ... knitted toys
Cockerel knitting. To knit a rooster with knitting needles you will need: #toys@ujutnoe_mesto_vjazanie Yarn (purple, scarlet, yellow, turquoise, green, dark yellow) - 50 g of each shade; a little black and white yarn - to decorate the eyes; Knitting needles (6 pcs., number 3); Hook (number 3); Filler (at your discretion: holofiber or synthetic winterizer); Stitching needle. When working on a knitted rooster, keep in mind that the diagram and description are indicated with possible additions ... Knitting
PDF Senya Petukhov crochet. FREE crochet pattern; Amigurumi doll patterns. Amigurumi schemes and descriptions in Russian. Knitted toys and DIY crafts #amimore - Rooster, cockerel, cock, rooster, hahn, pau, coq, hanen, kohout, polla, gallo, kogut, bird. Amigurumi doll pattern free; amigurumi pattern; amigurumi crochets; amigurumi crochet pattern; amigurumi patterns free; amigurumi today. Free amigurumi toy patterns
PDF Senya Petukhov crochet. FREE crochet pattern; Amigurumi doll patterns. Amigurumi schemes and descriptions in Russian. Knitted toys and DIY crafts #amimore - Rooster, cockerel, cock, rooster, hahn, pau, coq, hanen, kohout, polla, gallo, kogut, bird. Amigurumi doll pattern free; amigurumi pattern; amigurumi crochets; amigurumi crochet pattern; amigurumi patterns free; amigurumi today. Free amigurumi toy patterns
PDF Senya Petukhov crochet. FREE crochet pattern; Amigurumi doll patterns. Amigurumi schemes and descriptions in Russian. Knitted toys and DIY crafts #amimore - Rooster, cockerel, cock, rooster, hahn, pau, coq, hanen, kohout, polla, gallo, kogut, bird. Amigurumi doll pattern free; amigurumi pattern; amigurumi crochets; amigurumi crochet pattern; amigurumi patterns free; amigurumi today. Free amigurumi toy patterns
What is fraught with such a symbol of the coming year according to the Chinese calendar? At the same time, it can be both bright and demonstrative, as well as elegant. But it is not for nothing that the year is marked by fiery or otherwise red, which means it will be playful and perky, sociable, full of events and life. Therefore, the toy in the form of a rooster, which we will create with you, should be as similar as possible to the image of the coming year. Today I want to offer you a more classic, but at the same time bright model of a knitted cockerel.
We will need:
- red weed yarn one skein will be enough;
- red yarn of medium thickness, with a minimum content of wool for the scallop;
- yarn weed dark blue, as well as the color of the sea wave, one skein;
- spokes straight number four;
- stocking needles number four and a half;
- hook number two or a needle with a large eye for connecting parts;
- copper wire of medium thickness;
- decorative eyes or buttons on the stem are black;
- scissors;
- filler, in the form of synthetic winterizer or foamed polystyrene;
Progress: rooster body
- We will knit the body of the rooster pear-shaped.
- We start knitting from the bottom - up, connecting together the blue threads of both shades, the body of the rooster is knitted together with the head.
- On stocking needles number four and a half, we collect only eleven loops with a simple dialing method and then knit in a circle.
- Now we knit with a simple facial stitch, adding ten loops in every second row, evenly distributing them over the knitting needles.
- When fifty-one loops are formed on the knitting needles, it will be necessary to knit three rows without adding loops. Next, knit four rows without changes.
- Then we begin to decrease five loops in every fourth row of knitted fabric. We pass to the thread of red color, it is better to fold it in half.
- When twenty-one loops remain on the knitting needles, again we knit three rows according to the pattern without additions and decreases.
- Next, we decrease by removing five loops evenly in one row, at the end of the row we should get sixteen.
- We knit four more rows and, stretching the thread through all the loops, tighten them.
Attention! As the body of the rooster is knitted, we fill it with padding polyester or foamed polystyrene.
Rooster comb:
- We take yarn prepared specifically for the scallop.
- We collect sixteen loops and knit four rows with a pattern that was used to knit the torso.
- Next, to form the scallops, we knit as follows: we knit two loops, and the third and fourth together, turn the knitting and knit from the inside without changes. Then we knit one loop from the front side, the second and third together, unfold again and knit without changes. Next, we return to the front side and knit two loops together, thread the thread through the loop and cut. We tie the thread to the next loops and repeat the same with the middle four loops, and then with the next four loops.
- We knit the second part of the comb symmetrically, we connect the two parts together, so that the front surface is outside and the wrong side is inside.
- You can connect both with a needle and a crochet, whichever is more convenient for you.
- Next, we begin to sew the comb to the head, placing it from the frontal part to the back of the head, and fill it as it is sewn.
Rooster Wings:
- We knit with red grass, they do not need to be filled, and we knit only two parts.
- We collect on straight knitting needles number four six loops and knit four rows.
- Then in every fourth row we knit as follows: a loop from the knitting needle, an increase in the loop, so to the end of the row. last we knit a loop from the knitting needle.
- When there are thirty loops on the knitting needles, you need to start knitting feathers, they, like the fingers on the hand, should turn out five.
- We knit them according to the principle of festoons on the comb. Only the number of loops in each pen will be six.
- That is, to form the first feather, we knit the first four loops without changes with the main pattern, then the fifth and sixth together. We turn the knitting over and knit the purl rows without changes. In the next front row, we knit three loops, and the fourth and fifth together; then two loops, and the third and fourth together, so we continue until there are two loops on the knitting needles, through which we pass and tighten the thread. Continue knitting according to this principle to form the remaining fingers - feathers.
Assembly:
- Sew the top of the wings to the border of the flowers on the body.
- Cut the wire into twenty centimeters and wrap tightly with threads of different colors, the more, the fluffier the tail. Next, we thread the thin "feathers" of the tail into that part of the body where they belong, to the middle and bend in half. We do this with all the blanks - the "feathers" of the tail.
- We form a leg from wire with spurs and wrap it with red threads, as for a comb, as well as a rooster's beak. We fix the legs in the right place.
- We sew on buttons or glue decorative eyes and our rooster is ready.
Inspiration to you and creative success.
In contact with
classmates