Warm crochet headband for women. Crochet headband
The headband, which is crocheted, is a convenient and practical thing. It will protect your ears from the wind and keep them warm in cool weather. Such a bandage will not take up much space in the bag, and knitting it, even for beginners, will not be difficult.
A headband, which is easier to crochet than knitting, can be made for both a girl and an adult woman.
To knit it, you will need a small amount of materials:
- yarn of the required color;
- a hook, the size of which fits the selected threads;
- needle and thread;
- various elements for decoration (rhinestones, stripes, etc.).
How to choose yarn and hook number
You can crochet a wide variety of headbands. It is important to choose the right thread for knitting and a suitable hook for them. The denser the threads, the greater the relief of the patterns and the volume of the bandage.
When choosing yarn, you should adhere to the following recommendations:
- the choice of yarn depends on when you plan to wear the bandage (in cool or warm weather). In summer, you should choose yarn from cotton, viscose or linen. For warm options, wool or wool mixture is purchased. If you knit it in several threads, then the bandage will be more voluminous;
- since this product is in contact with the scalp, it is necessary to choose threads with a natural fiber content of at least 30-40%;
- the best yarn thickness is 250-300 m/100g.
When buying a hook, the following rules must be observed:
- the length of the hook should be from 12 to 16 cm;
- the end of the hook, where the head is located, should be sharp, but not very strong so as not to cut yourself;
- the handle can be plastic, aluminum or steel. Plastic ones are light but break easily, while steel ones are heavy but will last longer;
- the diameter of the hook is selected the one that is recommended on the yarn label.
Headband Pattern Ideas
The headband, which can be crocheted using various patterns, will become an indispensable thing in the wardrobe. Among the most popular bandage pattern options, some are presented in the table below.
| Name | Drawing | Scheme |
| braids |  |  |
| Volumetric harnesses and braids |  |  |
| Tight knit pattern |  |  |
| Relief pattern |  |  |
| Pattern with openwork |  |  |
| Braids and harnesses |  |  |
| Paths with openwork |  |  |
| Leaves pattern |  |  |
| tight knit |  |  |
Schemes, a step-by-step description of knitting headbands
The headband, which even beginners can crochet, is versatile and has various models. The following are diagrams and descriptions of various types of dressings.
Abbreviations used in this article:
- Air loops - Vp.
- Air lifting loop - Runway.
- Double crochet - SSn.
- Single crochet - RLS.
- Connecting loop - Sp.
- Lifting loops - Pp.
- Half-column with a crochet - PLsn.
Headband for a girl
To work, you will need the following materials:
- white threads "Romana". For them, hook No. 0.6;
- melange threads "Lily" for them hook No. 0.75;
- pink threads "Maxi". For them, hook No. 0.75.


To run this product, the following steps are required:
- Run a motif based on a square: dial Vp 4 pcs. Close in a ring. Raise the runway 3 pcs. and knit 4 rows according to the scheme. 4 row ends with Sp in the 3rd runway. Raise Vp 5 pcs. Below is a diagram of a square.
- Vp SBn 5 pcs. connect in a chain in the 3rd column of the base from the hook. VP 2 pcs. lift and tie in the 2nd column of the base from the crochet hook.

- In Vp, connected by an arch, 5 pcs., tie SSn 9 pcs. Skip one column of the base of the 4th row. In the next column of the base of 4 rows, tie SC. Dial lifting air loops 2 pcs. Skip base post 1 pc. Run Sc 1 pc.
- Run SSn 2 pcs. in the 1st column of the base. Run SSn 1 pc. in the 2nd column of the base. Repeat 1 time throughout the row. VP 2 pcs. raise. Skip 1 stitch and knit SC at the base of the 4th row.

- Perform actions as in the previous row: alternate SSn 2 pcs. and SSn. The row ends with sc. Break off the thread. Go to the next side. In the 7th column of row No. 4, fasten the thread. Make a chain of Vp in the amount of 5 pcs. Skip 2 columns of the base from the hook and perform RLS. Knit in the same way as on the previous side.
- Run sc 1 pc. in the circumference of the 1st row.

- Run sc around the perimeter. At the point of the motive, make a “picot” Vp 3 pcs. The basis of the product is completed.
- Next, you need to use the scheme. Make flowers in the form of "daisies". Then sew them to the base. Sew a bead into the center of each flower.
- Make laces according to the scheme, the length of which is 5 cm. Sew them to the base and the bandage is ready.
Headband with embossed posts
The headband, which can be crocheted for both summer and winter, can be crocheted using embossed posts. The simplicity of knitting makes it easy to perform even for beginners.
To do the job you need:
- mint-colored threads;
- hook 3 mm;
- scissors.
For knitting you will need:
- Dial a chain from Vp. Its length should be equal to the required width of the product. However, the number of loops must be even, as the product will need to be folded in half.
- In the 1st row, make Pp 2 pcs. In the 3rd loop of the chain, perform PLSN.
- Knit a turning row: make Pp 3 pcs. Then make embossed double crochet stitches 3 pcs: double crochet, and then draw a hook over the stitch from the front side. Knit SSn.
- SSn are being carried out 2 pcs. from the wrong side. They are performed in the same way with the difference that the hook is wound from the wrong side and knitted in the same place. Then, facial columns are performed 2 pcs.
- Thus, alternation is carried out to the end of the row. The last column is double crochet.
- Knitting turn and perform a similar row. Size 18-20 cm. In the purl rows, only purl loops, and in the facial rows - facial ones.

- Run half of the row. With a product width of 20 columns, knit 10 columns according to the pattern.
- Run turning rows of 10 columns 8-9 pcs.
- Connect the thread with the rest of the thread of the first part. Make 8-9 rows.
- For an overlap, two parts intersect. Run a new row, which will consist of columns in the amount of 20 pieces. Knit on the first part of 10 columns. Knit on the second (lower) part of 10 columns.
- Run the canvas 18-20 cm.
- Fold up the bandage. Sew with sc. Unscrew the bandage and straighten the overlap.
Headband "Mickey's Girlfriend"
To make this dressing, you will need the following materials:
- Children's wool yarn.
- Hook number 3.
- Sliding ring for ears.

Knitting process:
- Dial Vp 7 pcs.
- Knit sc 6 pcs. and VPp. So work 6 rows.
- Double the 1st column. The result will be 7 sc.
- In the next 3 rows, knit 7 pcs.
- In the next row, perform RLS 8 pcs. and Vpp.
- Next 3 rows: Sc 8 pcs. and 1 pc. Runway
- Next, a double column of 1 pc., And then RLS and runway are performed.
- Next, 3 rows of 9 sc.
- Double the 1st column. The result is 10 pieces. SBn.
- The next 32 rows include 10 pcs. SBn. It turns out a canvas measuring 22 cm.
- Decrease stitches every 3 rows. To do this: knit the 1st column in a row. Then skip the next stitch of the previous row. It turns out the length of the bandage is approximately 44 cm.
To make the ears you need:
- on the sliding ring make sc 6 pcs. Tighten the ring tightly;
- in the next row knit 12 pcs. SBn. End each row with a connecting loop and runway;
- next row: sc 3 pcs. and double column 1 pc. Repeat 4 times;
- in the next row, perform sc 17 pcs. Do not knit the last 5 pieces. columns.
Fasten the thread. Cut the thread, leaving about 30 cm for attaching the eyelet. Run the second eye in the same way. Sew the strip into a ring and attach the ears.
Bandage-bow
To make such a bandage, you must:
- threads Lana Gold 800;
- hook number 3.

The drawing is done by alternating the connecting loop and PLSN. At the end of each row there is no Pp. You must immediately turn the work and start with a connecting loop.
The connection of the bandage is carried out by a chain of Vp in a zigzag of 3-4 pcs. The center is tied as follows: Ch 6 pcs., Starting from the 2nd loop from the hook, perform RLS in each loop. Run 8 rows. Sew a bandage.
Headband with flowers
A summer headband with flowers will be combined with a skirt, a T-shirt and a dress.

For its implementation you need:
- yellow, white, red, orange and blue threads "Iris";
- hook No. 1.5;
- elastic band: width 1.5 cm.
General scheme:
For the 1st flower: you need to take yellow threads. Form a loop. Knit PLSN 16 pcs in it. Make a ring.

Then the work is carried out according to the following scheme:
- Colors are taken in the following order: yellow, orange, white and red.
- To complete the 2nd flower, you need to: make a loop with white threads. Run PLSN 8 pcs. Form a ring. Then work according to the scheme.

According to the above scheme, tie 2 flowers.
Color sequence:
- for the first: white, orange, white;
- for the second: blue, yellow, blue.
To make flower No. 3, you need to: make a loop with red threads. Tie SSn 16 pcs. Connect the ring. Carry out work according to the following scheme:

Alternating colors: red, yellow and white.
4th flower: make a loop of yellow threads. Knit PLSN 8 pcs. Lock into a ring and knit according to the pattern below:

The colors alternate in this way: yellow, white and blue.
5th flower: make a loop with orange threads. Knit PLSN 8 pcs. Close the ring and knit according to the following pattern:

According to this scheme, 2 flowers are made.
The colors alternate as follows:
- for the first: orange, blue, orange;
- for the second: white, blue, white.
Then you need to measure the gum. Sew an elastic band with an overlap on both sides of 1.5 cm. Put it on a jar and fasten flowers on it with needles. Then you need to sew the flowers to the elastic.
Two-tone headband for a girl
For work you will need:
- yarn - 2 colors;
- hook;
- needle and thread;
- scissors.

Work process:
- With the first color, dial Vp in the amount of 80 pcs. and Pp 2 pcs. As a result, a strip of 50-52 cm in size should come out.
- Start with the 3rd loop from the hook: Sc knit the 1st row. It is important to insert the hook into the link that is behind the loop so that the edge is even. Run runway 2 pcs.
- Make sc for the back wall of the loop. Knit in this way until the length of the strip reaches 5 cm. We must not forget to do 2 VPs at the end of the row.
- Then, according to the same pattern, knit the second strip.
- Link 2 strips as shown in the picture.
- Tie the ends of the strips.
- Tie with half columns.
 Two-color crochet headband: step by step knitting
 - At the end, do Vp. Leave the thread, leaving 10-15 cm.
- Do steps 6-8 on the other side.
- Attach the thread to the side. Run Vp 2 pcs. Process the edge of the bandage RLS.
- Cut the thread, leaving the end. Repeat step 10 on the other side, but do not cut the thread.
- Fasten the bandage with the left threads. To do this, fold it inward with the front side. Ends to fulfill PSb.
- Hide the ends of the threads in knitting with a needle.
- The bandage is ready.
Summer headband for women
A summer bandage can be knitted from linen fiber. It will suit any outfit: dress, sundress, shorts and jeans.

For its manufacture you need:
- linen threads;
- hook 6 mm.
Manufacturing process:
- A pattern of 44 VP is performed. Their number may be more or less. It all depends on the circumference of the head.
- Using a connecting loop, close the chain to continue knitting in a circle.
- Execute runway.
- Link a series of SSn.
- Repeat step 3.
- In the second row, perform ch, and the remaining loops - sc.
- The rapport is performed up to the desired bandage width.
- In the same way, make a rectangle 4-6 cm in size. It is necessary for dressing.
- Close the seam from the connecting loops with this rectangle.
- Decorate the bandage with rhinestones, sparkles, monisto.
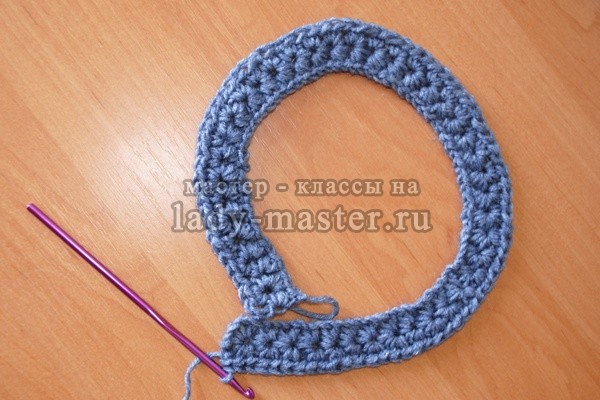
Crochet winter headband for women
A bandage made of wool or wool mixture can replace a hat.
For its manufacture you will need:
- wool yarn with acrylic;
- hook number 4-5.

To make it, you will need to follow these steps:
- Dial Vp. Their length is equal to the girth of the head. The average size for women is 89 cm.
- The dressing is performed in alternate rows: a straight row, the next one is the reverse.
- Front side - Vp 5 pcs. From the 2nd loop, the thread is pulled out from 5 loops of the pigtail. That is, the hook must be inserted into the stitch of the chain, then the thread is pulled out, forming 2 loops. They must be left on the hook without tying. Go to the next loop.
- When forming 6 pcs. loops to yarn over. The working thread is pulled through 6 loops and 1 pc. Vp to get a hole.
- Pick up 6 pcs. loops. Pull 1 loop from the hole, 1 loop from the last one that was part of the previous rapport, 1 loop from the chain loop, 2 loops from the next 2 chain loops.
- Yarn over the hook. Pull 6 stitches through yarn over. Make vp.
- Knit a row in the same way as steps 5 and 6. The last loop is knitted with CC.
- Wrong side, 2nd row: Vp 2 pcs., Plsn 2 pcs. Last SSn. The result is 44 stars and SSn 2 pcs.
- Then repeat from 2 to 8 steps until the product is the desired size.
- Loops of the connecting type to process the edge of the product.
- The bandage can be decorated with fluff, fur or light fabric.
Turban style headband
To complete this model, you will need:
- wool mixture threads;
- hook number 3;
- needle;
- scissors.

Performance:
- Cast on loops. Their number depends on the volume of the head. The example uses 20 pcs. loops and 3 Pp.
- Make the 1st row of PLs. To do this: yarn over, insert the hook into the loop, take the working thread, stretch it and knit all the components with one loop: the elongated loop, the yarn over, the previous loop. Make runway 3 pcs. at the end of the row.
- The second row is knitted with an elastic band. Alternating convex embossed half-column 2 pcs. and a concave embossed half-column 1 pc.

- Execution of the 3rd row: the same gum. Only convex half-column 1 pc. and a concave half-column 2 pcs. Knit to a length of 20 cm.
- The next row is done in half. In this example, columns are made 10 pcs., Vp 3 pcs. Then the work is unfolded and knitted to a strip length of 10 cm.
- Finish the last row. Knit Vp and cut the thread (the tip of the thread should be 10-15 cm).
- Attach the thread to make the second strip. Tie Pp 3 pcs. and follow the same pattern.

- Lay the strips one on top of the other and connect them in the next row.
- Continue work for another 20 cm.
- Fold the item in half. The front side must be inside. Using half-columns, fasten the ends.
- Make the last loop in air. Cut the thread, leaving the tip.
- Using a needle with a wide eye, hide all the threads.
openwork bandage
For work you need: cotton threads, hook number 1.
Work process:
- Dial Vp 27 pcs.
- In the 9th in a row from the hook, knit sc. As a result, an arch emerges from 5 Vp.
- From Vp 5 pcs. pick up a chain. Skip 2 loops. Attach the chain to the 3rd loop of the sc. So perform 5 arches, consisting of 5 ch.
- Execution of the 2nd row:
- dial Vp 8 pcs. chain. Attach a chain of sc to the central part of the first arch;
- before the end of the row, complete arches of 5 ch.

So do the work until the 18th row inclusive.
- 19 row. Finish it this way: run VP 3 pcs. in the last arch and at the base of the last arch from the previous row, make SSn.
- 20 row: 4 arches are made, consisting of Vp 5 pcs. The row ends as 19.
- Rows 21 and 22 are knitted in the same way.
- Rows 23-30 are performed according to the scheme: in each row, make 3 arches, consisting of 5 pcs. Vp. 3 strips are made from Vp.
- Finish the 30th row as follows: raise with semi-columns to the center of the arch from 5 Ch.
- A chain of 12 pieces is being made. Vp. Attach to the second loop from the hook with a half-column. Run a chain of Vp 8 pcs. Attach the chain to the top of the second arch.
- Jump to the top of the third arch with half columns. Run a chain of VP 10 pcs. Attach a chain to the top of the first two chains.
- Vp tie a tie of the required length.
- Change the thread to another color and knit the second side of the bandage in a mirror image.
- Sew on any decoration in the center.
New fashion headband models in 2019
Crocheted headbands are a fashionable and practical element of the female image. In 2019, designers offer new fashionable stripes. They are available in various designs, colors and finishes. Today, the most popular types are bandages made of several materials: satin, cotton, silk.
The most popular types of bandages include:
- product with a small pattern;
- spiral pattern;
- jacquard designs;
- openwork knitting.
To decorate the accessory, you can use bows, buttons, flowers.
For women of age, it is worth picking up plain bandages. For special occasions, you can use rich shades, and for everyday life, calmer tones. Beautiful colors: chocolate, emerald and eggplant. The table below shows some options for bandages with a knitting pattern.
| Name | Scheme |
| Bow variant |  |
| openwork strip |  |
| Floral motif |  |
Crocheted headband will become an indispensable thing in the wardrobe. It can be worn by both women and girls. A variety of options for bandage models allow you to wear this accessory with any style of clothing. This accessory can be made by hand. Ease of implementation allows it to connect even for beginners.
Article formatting: Natalie Podolskaya
Video about knitting a headband
Crochet headband - video how to knit:
Often noticing knitted things on children, every time you admire the skill of mothers or grandmothers. Crocheted headbands look especially interesting. If you have even a little crochet skills, we suggest knitting a bandage with Kitty ears. Crocheted headband with crochet ears is a great accessory for little fashionistas. Knitting consists of a pattern and a description of the work.

Well, isn't this crochet headband with ears cute! A charming knitted headband for a baby is good because you can choose any pattern yourself: starting with the simplest pattern - single crochets, and ending with a pattern - closed combs.

Crocheted headband for girls, suitable for size 48-49 cm, for the age of three / four years. For her, we will take CEAM Alpaca Baby Lux yarn (alpaca wool, 50 gr. 400 m.), 2 skeins for a warm bandage in two threads or 1 skein in 1 thread. A little different yarn for tying (finishing) and eyelet. Hook 2 mm thick.
Abbreviations: VP - air loop, RLS - single crochet. Loop - p.
For the main headband, crochet a chain of Air Loops. Cast on 130 ch on the hook. Next, knit in a circle 20 rows of sc.

The diagram shows 2 options for knitting RLS. If you want the pattern to be more embossed, then knit RLS behind the back arc of the loop (option 2). If on the contrary - you need a flatter pattern - then grab two arcs of the loop (option 1). Next, you need to tie the top and bottom with a “crustacean step”.

“Crab step” is a beautiful product design. We knit in the opposite direction from left to right. To do this: insert the hook into the last left loop of your knitting, make 1 lifting ch, bring the hook counterclockwise into the next. loop of the previous row, pull out the thread (2 sts on the hook), knit the VP through the received 2 sts and again start the hook (counterclockwise) into the next st of the previous row. Continue like this until the last stitch in the row.
So, we have already tied the main warm headband, it remains to tie the ears and sew them on.
Ears for bandage Pussy - master class
There are many options for ear patterns for girls. To perform the ears, this scheme is suitable for us:

Note that the T at the bottom of the ear is RLS.
Abbreviations: Loop - p., VP - air p., SSN - column with nak., RLS - column without nak.
We need to make 2 ears smaller and 2 more - a little more. The width of the details is 8 cm, the length is 6 cm. The thickness of the hook used is 3 mm.

At the beginning we make a small ear. We start work with a dark circle in the middle of the scheme - this is a sliding loop.

1st row: 3 VP lifting, yarn over, 9 CCH.


then, we continue this series in a mirror way - CCH, CCH, CCH, and 3 CCH in one p.
3rd row: 3 VPs, turned the work over, 2 dc in the first st, and again 1 dc in each st until you reach the top point, tie 5 dc to the center, then mirror 1 dc, and 3 CCH in one p.

4th row: 1 VP and tie the bottom of the RLS.
Knit the second ear in the same way as the first (the color is the same in the photo, in reality the color of the second ear is different), but after the 4th row, knit another 5th row (already without a pattern).

5th row: 2 sc, 1 sc to the central corner, in the central column of the previous p. - (1 RLS, double crochet and half-column, 1 RLS), 1 RLS in each. n. to the end of the river, in the last. n. - 3 sc.


In the upper corner, in order to sharpen the ear, we knit again 1 RLS, yarn over and half-column. And then to the end again RLS, capturing 2 details.

Here are the ears ready. We place them at the desired point and sew to the product.
In the photo - knitting children's ears for bandages, hats, and so on.
Evgenia Smirnova
To send light into the depths of the human heart - this is the purpose of the artist
Content
One of the cutest accessories is the headband for girls. The creation of such an original wardrobe item is of interest to many mothers, because each wants to create something special for their child. If you also have a burning desire to crochet a headband for a girl, study the tips and master classes below.
How to make a crochet headband

Beginning needlewomen are advised to divide the entire process of creating a bandage into stages. The first step is to choose the right yarn and prepare the necessary tools. As for the material for knitting, the specific option depends on the purpose of the finished product. If some kind of celebration awaits you in the near future, take cotton threads of predominantly light shades. Bright acrylic yarn is suitable for summer heat. To take a walk with the baby in spring or autumn, get woolen threads.
Additionally, decorative elements may be required, such as sequins, beads, buttons or rhinestones. Among the tools, the main one is the hook. Its number is selected based on the type and thickness of the yarn. Beginners in the field of knitting should give preference to a product with a wooden handle. In addition to it, you will need:
- tape measure;
- scissors;
- ruler;
- needle with thread.
If all the necessary materials and tools are prepared, start taking measurements. Using a centimeter, determine the circumference of the baby's head. This will be the desired length of the product. The width is made according to your desire. For babies up to a year old, it varies between 33-35 cm. After taking measurements, make a control sample to see how well the dimensions were determined and the pattern was chosen. In order for the headband to be knitted qualitatively the first time, strictly follow the instructions.
Longitudinal bandage
One of two methods can be used in the dressing process. The first is longitudinal knitting, in which the product is seamless. The principle of operation is as follows:
- Dial a chain of air loops. Its length should correspond to the girth of the girl's head. It can also be determined from a control sample. To do this, multiply the number of loops by 1 cm by the size of the girth of the head. With the pattern, dial the chain in multiples of the rapport of 9 loops.
- Close the chain with a ring and continue to knit according to the pattern 1-5 rows.
- Work the next 5 rows in reverse.
Cross knitting

Here the knitting occurs across, i.e. from one side seam to the other. The principle of creating a product is to set a chain of air loops of such a length that corresponds to the width of the finished product. Then the first row is knitted, the future accessory is turned over with the reverse side, and the same steps are repeated until the product has a head circumference length.
The finished item is often tied with a hair tie, which is inserted at the beginning of knitting, or you can simply sew the short sides. Then it remains only to decorate the product with decorations to your taste. Often they are small or large flowers, such as roses. Linking them is easy:
- Cast on 30 air loops, turn the chain inside out.
- Raise 3 air loops, make a hole with a crochet in 4 from the hook.
- Knit an air loop again and knit an additional double crochet in the same hole. Continue to the end of the chain.
- Turn over, raise 3 air loops, make 8 columns in all V-shaped holes, and with a crochet. Knit only 1 between the elements of the pattern.
- Twist the resulting strip into a spiral, and place a large bead in the center.
- Sew the flower to the cross seam.
Video

A crocheted headband can be a good addition to your look. It can be worn as a stand-alone accessory or to keep your ears warm in cold weather. A set made in the same style will look good - a scarf, a bandage and mittens.
Such a product can be made even for the smallest fashionistas who will definitely appreciate the thing. A knitted bandage can be knitted with a fabric of a certain length and then simply neatly sewn along the edges, or immediately knitted in a circle.
Crochet a bandage: an easy option
Crochet 10 air loops. You can increase or decrease the number as you wish. But keep in mind that the more loops you collect, the wider the bandage will turn out. Knit all loops with double crochets. And at the beginning of each row, do not forget to pick up air loops for lifting. Do the work until you reach the desired length of the product, which should be measured around the circumference of the head. If you are in doubt, do some fittings from time to time.
At the end of the work, cut the thread, pull the tip through the remaining loop and tighten. Sew the edges of the bandage together or tie two thin ties, you can also thread a ribbon or sew on a button.
Crochet headband in the round

Crochet a chain of air loops. Its length is calculated by the girth of the head plus loops for lifting. After connecting the edges of the chain, continue to knit the bandage in a circle with columns together with the crochet. The width of the future product depends on how many rows you knit. At the end of the work, tighten the last loop and cut the thread.
This method differs from the first in that the bandage is knitted completely and at the end it is not necessary to make a seam to connect the edges. However, it requires the skill of crocheting in a circle.
Crochet headband: patterns
Knitted headband with decor
In order to knit such a simple, but very interesting bandage, you will need: yarn, hook 2, thread and needle, decor items.

- First you should dial five air loops and one edge, then continue to work on the remaining loops. For a bandage of 50 cm, 206 loops are required.
- The first columns must be knitted with a crochet.
- When you tie all the air loops, go to the other side and knit the columns already without a crochet, which will greatly facilitate the pattern.
- Then start knitting a fan, knitting the first single crochet, then skip one loop, and then knit 4 stitches with one loop with a crochet, skip the loop again and work 1 single crochet. In the future, knitting is performed in the same way.
- When you tie the bandage along the entire length, you will need to connect its two ends, and then bring the knots to the front side. Don't worry about what doesn't come out very nice, because then you can cover it all up with some decorative element, such as beaded jewelry. The ends of the bandage can be fastened with fishing line or thread.
- Decorate the bandage however you like. You can use large beads, rhinestones and beaded crafts. The bandage is ready!
Openwork headband

- Let's try to knit a bandage in the form of an openwork fabric. To do this, we use the scheme.


- The bandage to be knitted in length should be approximately 10 cm less than the circumference of the head. Determine the width yourself.
- After you knit the bandage to the required length, tie it around the perimeter with a “crustacean step”. Racha step is a finishing element in which knitting goes back to front along the front side of the product from left to right. As a result, you will get a straight canvas. Now, in order for the bandage to fit snugly over the head, pick up a chain with air loops about 10-14 cm long, complete the ring and start knitting the pipe with columns, without making a crochet, continue knitting to the missing 10 cm of the product. Pass the “pipe” through the bandage, and sew the ends of the bandage to the elastic yourself or with a sewing machine.

- Place the connected "pipe" in place of the elastic, and sew it with hidden stitches. Look at your product, if it suits you, then the bandage is ready.
- For decoration, you can knit poppies according to the pattern. Assemble the bouquet and secure the bases for the brooch. All flaws and irregularities can be hidden under a knitted circle.
Crocheted headband for a girl
To crochet such a wonderful headband for a girl, you will need: crochet hook 2 and melange threads, it is best to choose Diva Batik Design 3241.


The headband for the girl is knitted in the same way as the “Headband with decor”, but it is better to decorate it in a slightly different way. Since this headband is intended for a girl, some cute bright beaded flower is perfect.

When the bandage is ready, connect the two ends and bring the knots to the front side, which will then be covered with a beaded flower. The ends can be fastened with fishing line stitches, and they will look like a whole fan.


Now let's do beaded flower. To do this, type three beads on the fishing line and make a loop, you get one stamen. Then put six large beads on the fishing line and place them so that the stamen is in the middle. Insert the end of the thread into the first bead, and then fasten the ring of beads on the opposite side. Pull the needle through the beads, pick up five beads, and make a loop. The beads should lie in an even arc. So repeat with each bead until the flower is ready.


Pull the line to the middle, where two fans on each side create a center. Attach the bead here. Then type 9 beads on the fishing line and make an arc that will surround the bead. Insert the needle into the first bead to make a circle. Fix such a beaded circle in the opposite side from the first and last bead, so the circle will hold better. Do the same in each center of the fans. That's all, the crocheted crocheted bandage for the girl is ready.


Crochet headbands are a very interesting and stylish thing. It will definitely distinguish you and your child from the gray crowd!
I have always noticed how cute little girls look with bright colorful headbands covering their ears. In stores you can find a huge variety of headbands for young fashionistas. And mothers are not far behind. They knit for their beauties wide multi-colored elastic bands with ribbons, beads or flowers. However, girls and women have completely forgotten about such a once fashionable accessory. But why? This hat is great for warm windy weather, when it will be hot in a hat, but you really want to cover your ears.
Why not bring bandages back into our wardrobe? Unusual modern products can decorate any haircut and will be a great addition to a spring or autumn look. In my master class, I would like to tell you how you can knit an interesting bandage that will compete with berets and hats. In addition, this accessory can be made in 1 day. For knitting I will need: hook No. 4.5 and acrylic + wool threads. I took a thicker yarn so that I could wear a bandage in cool weather.
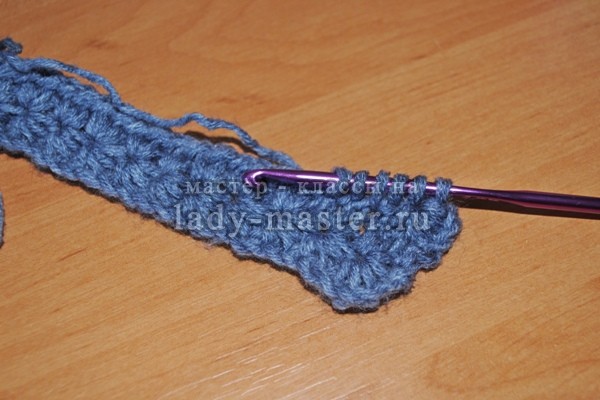
1. First, I collect a chain of air loops, which will correspond to the circumference of the head. I try it on myself. I got a chain of 89 loops. Please note that their number must be odd.
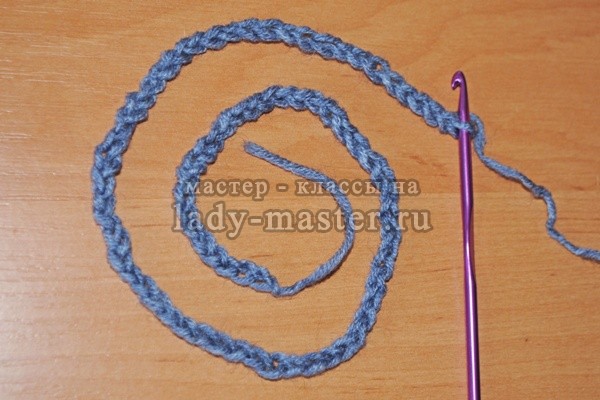
2. The bandage is knitted in straight and reverse rows. The first row (front side) I start with a set of 5 new loops on the hook. Starting with the second chain stitch after the hook, I draw up the thread from 5 loops of the pigtail. This is done according to the principle of making unfinished single crochets: I insert the hook into the loop of the chain, pull out the thread, two loops are formed on the hook, but I don’t knit the column further, that is, I don’t tie these loops together, but leave it on the hook and move on to the next loop of the chain.

3. When there are 6 loops on the hook, I throw on the thread and pull it through all 6 loops. I knit an air loop so that a hole forms over the 6 loops.
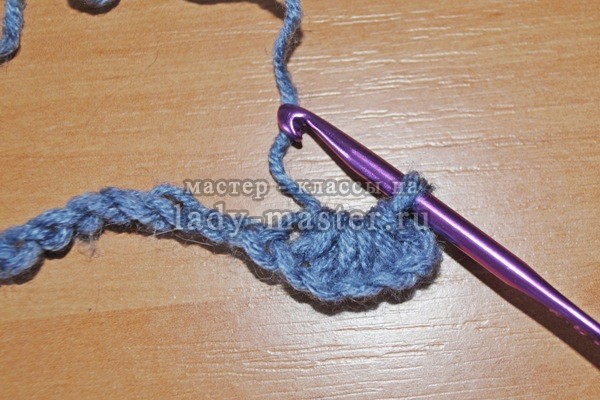
4. Again I dial 6 loops on the hook, but I perform this action as follows: I pull 1 loop from the hole, 1 loop from the last of the 6 loops, 1 loop from the air loop into which the last of the 6 loops was dialed and 1 st from next 2 chain sts. Total 6 loops on the hook.

5. I put the thread on the hook and pull it through all 6 loops, completing the element with 1 air loop.

6. According to the scheme described in paragraphs 4 and 5, I knit a row to the end. In the last air loop, I perform 1 half-column with a crochet and turn the work over.
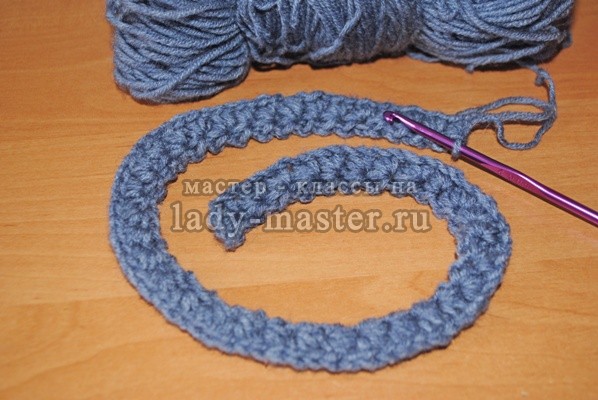
7. The second row (wrong side) I knit like this: 2 air loops, 2 half-columns with a crochet into the hole of each element. I finish row 1 with a half-column with a crochet in the last loop. I'm moving my work.
8. In the first row, I got 44 "stars" and 2 half-columns with a crochet in each hole.
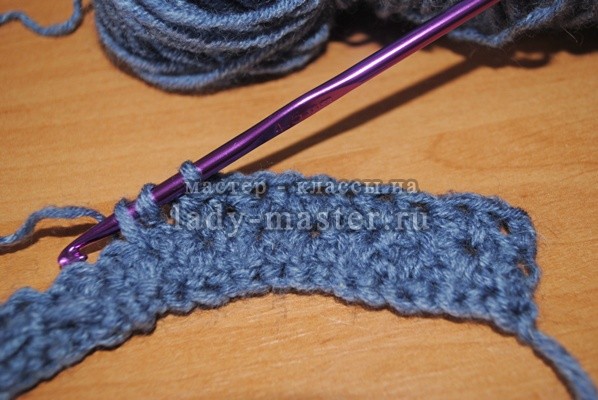
9. The third row (front side) I knit according to the principle of the first. Cast on 3 air loops, pull 1 loop from the 2nd and 3rd air loops from the hook, then 3 loops from the first 3 loops of the row. Total 6 loops on the hook. I yarn over, pull the thread through all 6 loops and finish the element with an air loop.

10. I knit the rest of the stars to the end of the row according to this scheme: I pull 1 loop from the hole, 1 loop from the last of the 6 loops, 1 loop from the same loop into which the 6th loop was dialed and 1 loop from the next 2 columns of the previous row. There are 6 loops on the hook.
11. Yarn over, pull yarn through all 6 sts and make an air loop.

12. Having finished the row, I make 1 half-column with a crochet in the last loop and turn the work over. Next, we knit the purl rows according to the example of paragraphs 4, 5, 6 and the facial ones in accordance with paragraphs 9, 10, 11.12.

13. We complete the product with the wrong side. The number of rows will depend on the desired bandage width. I made 8 rows.
