How to braid your own hair around your head and create a beautiful hairstyle? We learn to braid different types of braids around the head Braiding around the head.
There are many fashionable hairstyle options for girls with long hair. Among them, one of the first places is braids, which are extremely popular this season.
The French braid in a circle is a beautiful, modern and comfortable hairstyle that will always be appropriate.
This braid works especially well with long, thick hair. At first, you can ask someone else to braid it, but after training, doing this hairstyle yourself will not be so difficult.
How to French braid in a circle?
First hairstyle option. Moisten your hair with a spray to avoid excess frizz and comb well. Then comb them back and distribute them evenly over your head. Start weaving a French braid from the center, gradually leading it in a circle. The braiding technique is the same as the usual French one, but the hair is grabbed only from the outside. The captured strands should be the same width, this will make the hairstyle beautiful and neat.
Braid as long as there is loose hair left and finish with a simple braid. Secure with an elastic band and hide the end under the French one. If you have thick hair, you may get several circles.
Second option. Divide your hair into two sections at the top of your head. Start braiding your French braid the other way around above your forehead. Weave it in a circle and finish near the ear, secure with an elastic band. Then start weaving in a circle on the other side and secure it at the other ear. Each braid is attached to the base of the opposite braid.

It turns out to be a French braid in a circle of two braids, like a basket hairstyle option. You can come up with many types of hairstyles. Try, for example, weaving ribbons, flowers and other decorations into your braids. Or divide your hair diagonally, getting braids of unequal width, and then gather their ends into another braid or a fashionable bun. It all depends on your imagination.
The French braid in a circle is one of the unusual and beautiful types of weaving. With this hairstyle you will look neat and attractive all day long.
As you know, everything new is well forgotten old. Fashion is once again turning to grandma's chest to pull out the next trend of the season - braiding with a spikelet.
Weaving braids in a spikelet adds grace and elegance to the female head, lengthening the neck and making the woman a Goddess.
Today we will look at how to braid a spikelet in a circle . To perform this weaving correctly, you must be careful and thorough.
Comb your washed and combed hair back. Separate three strands lubricated with foam at the temple. They must be the same for the rim effect to appear.
We weave a braid - a headband, grabbing new strands one by one. We take the strands from the side of the forehead, otherwise the headband will not work. The first strand lies on the second, separate them with your fingers.
We weave the second side strand from the side of the forehead into the middle. We grab and weave in a new strand of hair each time. You can take large strands or small ones - there are many variations and everyone will look original.
We have reached the second temple, now we weave the strands on both sides. We have a braid. You can pin it on any side of your head, or you can leave it hanging down.
Be sure to secure the “structure” with a rubber band so that it doesn’t fall apart.
Weaving a spikelet in a circle is a flight of fancy that is inherent in stylish women.
Some types of weaving allow you to create practical and elegant hairstyles in just 10-15 minutes. This is how long it takes to weave a braid around your head. Step-by-step master classes with photos and videos will help you learn this.
The set of tools and accessories for creating a braid around the head is small. A brush will help prepare your hair for braiding - it will thoroughly comb your hair. Dividing thick hair into strands and making a straight or zigzag parting is easy if you use a flat comb with a thin end. In addition to these tools, before weaving you need to prepare:
- elastic bands for fixing the braids (silicone or with a fabric braid to match the hair);
- metal pins (can be used with jewelry);
- invisible;
- varnish for fixing the finished hairstyle.

- Regardless of whether you are braiding a circular braid on a weekday or creating a festive hairstyle, experts recommend pre-washing and drying your hair. To prevent them from getting shaggy, you should run an iron over them.
- During weaving, the strands may become electrified. You can cope with this problem if, before braiding the braid around your head, lightly spray your hair with water from a spray bottle or antistatic lotion.
- When choosing a hairstyle with a braid around the head, you should take into account your body type. Girls with short stature are suitable for neat hairstyles that do not visually enlarge their heads. Voluminous braids are the ideal solution for tall, statuesque women.

Types of braids around the head for girls
For little girls attending kindergarten or school, stylists advise choosing braids around the head that even a non-professional hairdresser can easily handle. It is important that the teacher, nanny or the baby herself, after a nap or a walk, can quickly straighten a stray strand, and the braiding in the morning takes no more time from the mother than a simple dragon with multi-colored elastic bands or ponytails.

"Basket" style braid
This hairstyle can be used as a festive or everyday hairstyle. The braid holds securely without fraying all day long. Weaving technology does not require special skills. To master it, you only need to braid your baby correctly once:
- After thorough combing, separate most of the hair on the top of the head from the temporal, occipital and strands above the forehead, and secure the bun with an elastic band.
- From the side of the left temple, two thin strands are grabbed, another one is pulled out of the tail, and they begin to weave a pigtail out of them.
- In each new link, strands of equal thickness are separated from loose hair and secured with an elastic band, making sure that they do not fray, otherwise the braid will not turn out neat.
- They braid until the circle is closed at the temple, the rest of the hair is fixed with an elastic band, tucked under a layer of strands from the tail and pinned with bobby pins.

A basket made from a reverse spikelet looks elegant.
An option that is suitable for the holiday is a basket with a fishtail braid.
Braid around the head
Option for a summer or holiday hairstyle for a girl. Before braiding any braid in a circle, well-combed hair is parted at the temple.

- The strands above the ear are left free, grab 2 bundles of medium thickness, twist them to one side and cross them.
- Moving along the hairline, grab 1 strand on each side and attach them to the main strand.
- Weave until the bunch disappears; the ends are secured with a silicone rubber band.
- A loose tourniquet is placed around the head and secured with a crab clip or 2-3 bobby pins.
"Snail" or spiral braid
The snail braid is a practical hairstyle. It can be braided for a baby on the occasion of a special occasion or in kindergarten, school or sports training - the girl’s head will look neat even at the end of the day.


Ukrainian braid
An ideal braid for teenagers, young girls and adult ladies. The hairstyle will take no more than 5 minutes, and looks elegant:
- All hair is pulled back and combed thoroughly.
- Starting from the back of the head, braid a regular braid. Its ends are tied with an elastic band.
- Wrap the braid around the head and secure it with hairpins in several places.
- The end bundle is hidden under the base in the occipital area.
The hairstyle turns out to be very stylish if you weave a bright ribbon into the strands or decorate it with small flowers.
Options for adults
Hairstyles for girls with braids around the circumference of the head are very elegant. They are appropriate for a country walk, suitable for working in the office, or visiting the theater.

4 strand braid
A four-strand braid looks very elegant, unusual and voluminous. The technique differs from traditional weaving. Those who are planning to build a braid around their head using 4 strands on their own should practice in advance, focusing on the diagram.

The video describes a step-by-step lesson on how to create an original braid.
The thinnest strand can be replaced with a ribbon, chain, or thread with pearls. They are secured with two bobby pins slightly lower than the bun of hair from which weaving begins.
Volume hairstyle with braid
An elegant hairstyle with a voluminous braid around the head is easy to create if you proceed in stages. Part your hair in half, then:
- From each part of the hair, starting from the back of the head, you need to weave a French braid around the circumference. Secure the ends with matching silicone rubber.
- Holding the braids from below, lightly pull the outer sides of each link so that the braiding takes on an openwork appearance.
- Wrap the braids around your head in 1 or 2 rows (depending on the length), securing them around the circumference with hairpins.
- If necessary, add even more volume by pulling the strands outward.

To prevent the hairstyle from losing its shape, it should be secured with a strong hold hairspray.

French braid
It is quite difficult to braid a French braid (spikelet) from freshly washed hair around your head. To prevent clean hair from falling apart before braiding, spread a small amount of fixing mousse over the surface.
- Separate a wide strand in the area of overgrowth and divide it into 3 equal parts.
- The weaving is directed around the head, grabbing a thin bundle from each link and placing new strands under the main ones (inside out).
- If you want to get not a small, but a more voluminous weaving, add side strips after 2-3 links.
- Braids are woven to the back of the head or around the entire circumference of the head. In the first case, the individual parts are fixed so that only the French weave is on the outside. The finished hairstyle is lightly sprayed with hairspray.

Headband
If you want to let your hair down but look elegant, braid a headband and secure it around your head. You don’t have to limit yourself to just one braid - you can braid 2-3 on each side (if you have medium hair) or wrap your head in one in several rounds (this option is for those with long hair).

A narrow three-strand braid is braided at the back of the head or near the temple, wrapped around the head above the forehead, directed to the opposite ear, and secured in several places with invisible hairpins.

The headband looks very elegant - a French braid, even on short hair. They begin to weave it step by step from the left ear. Then additional strands are grabbed from both sides and added to each segment. Secure the headband under the occipital hair with a bobby pin.
A headband braid can be combined with a bun or a fluffy roll at the back of the head. Then you will get an elegant hairstyle in the Greek style.

Among the many styling options for long hair, braids are the most traditional. At the same time, they allow a woman to show maximum imagination and taste. Don’t be afraid to experiment and follow the instructions - a regular braid or complex braiding done around the head always looks good and emphasizes the beauty and sophistication of a lady.
From time immemorial it was believed that long hair is a symbol of femininity. Only they require a lot of attention - care, hairstyle... As for the latter, there can be a lot of options. Various weaves are considered very fashionable today. So owners of luxurious curls simply must know how to braid a braid around their head.
Classics with a new twist
This is how we can describe the real boom that braid-based hairstyles are experiencing today. Only now the standard styling of intertwined curls, ending with a tied bow or ribbon, is considered bad manners. Intricate braids that fit around the head are in fashion. This hairstyle is universal, that is, depending on the selected accessories or jewelry, it can become both a convenient everyday styling option and an elegant accent to a festive look.
Top 9 best ways to style braids
The “braid around the head” hairstyle is available not only for long hair, but also for medium-length locks. Moreover, some options are possible even for those with short hair, but more on them later.
This styling method is considered the simplest, but it looks simply luxurious.

Procedure:
- Comb washed and dried hair.
- We take a thin strand from the temples and divide it into 2 parts.
- We bring the right one onto the left one through the top.
- We twist the one that is on the bottom clockwise and place it on top.
- We add hair from the mop to the strand remaining below and twist it also clockwise.
- Add one curl at a time and repeat steps 4-5 until you have covered all the hair.
- We connect the beginning of the braiding and its end into a regular braid, hiding it under the resulting braid.
This hairstyle can be decorated with a flower or original hairpins, bobby pins and bobby pins.

This hairstyle is also sometimes called “basket” - for its resemblance to a wicker product.
Procedure:
- Divide clean and dried hair into 4 parts.
- From below on the back of the head we begin to weave a spikelet on 3 strands, moving upward and capturing identical - thin - curls.
- Having reached the ear area, we slightly pull out the strands located along the edge to give the hair volume. Please note that there should be more of it at the bottom.
- We continue weaving, grabbing hair from the top of the head.
- Pull the strands again to add volume.
- We continue weaving around the head, ending it in the place where we started - at the back of the head.
- We intertwine the remaining ends, tie them with a thin elastic band and hide them inside the hairstyle.
The hairstyle can be decorated with a bow, hairpin or flower.

Need to style your hair urgently, but time is running out? No problem: it will only take about five minutes to weave this braid.
Procedure:
- Wash your hair thoroughly, dry it and comb it.
- We braid a braid at the bottom of the back of the head.
- We lay it around the head, securing it with bobby pins every 2.5-3 cm.
- We fix the installation with varnish.
Volumetric braid

This hairstyle looks great even on medium-length hair, giving it good volume.
Procedure:
- Divide the hair into 2 parts.
- We braid each of them into a classic (or French) braid, slightly pulling out the side strands.
- We tie the ends with thin elastic bands and hide them inside the hairstyle.
Read also:

The lack of long curls is not a reason to give up braiding. Let's make sure of this!
Procedure:
- We comb clean hair and make a circular parting - from the forehead to the back of the head.
- Starting from the center of the head, we begin to weave the spikelet, grabbing strands from the outer layer.
- We weave in a circle.
- We decorate the resulting ponytail in the center with either a braid or a bun, and decorate it with an accessory.

The style of weaving strands inside a braid, called the “fishtail,” has been trending for several years now. And learning how to braid a braid in the French style around your own head is not at all difficult. But the result will be a free, flowing headband of hair.
Procedure:
- Comb clean hair.
- On the right we take a strand and weave it into a fishtail.
- We put the remaining hair in a ponytail.
- We hide the loose ends in a braid.
This hairstyle looks especially interesting on little girls. Among other things, due to the fact that all hair is removed, nothing prevents the child from playing, doing homework and physical activity.

Procedure:
- Comb clean and dried hair.
- We turn the head to the left, and from the side of the right ear we grab three strands and begin weaving a French braid, directing it along the line of the forehead.
- Having laid the braid over the entire head, we begin the second row.
- Repeat until the end of weaving.

An option especially for those who are looking for a simple way to give their styling a more complex and interesting look.
Procedure:
- We divide clean hair in the middle with a vertical parting.
- Bending over, we separate 3 strands on the back of the head.
- We braid a French braid from the left ear along the line of the forehead to the right side.
- After completing the circle, return the braid to the back of the head.
- We collect the ends of the strands into a bun. Reverse weaving is ready.

This hairstyle claims to be the most intricate, but it's easy to do, so don't let the name scare you.
Procedure:
- We divide the hair into 5 parts.
- We place the right strand overlapping the adjacent one.
- We overlap the central strand located on the edge.
- We place the left part of the future hairstyle on the central one.
- The extreme one - to the neighboring one.
- We carry out such actions until the end of weaving.
Everyone knows what a spikelet looks like, but what kind of braid is called a spikelet?
We invite you to figure out how many types of spikelets there are.
How to braid a spikelet for a child and for yourself, of each type?
Detailed videos and step-by-step photos along with diagrams will help your child and yourself learn how to braid a spikelet.
Ideas with photos for creating different hairstyles based on a spikelet: classic and reverse, two and one obliquely, as well as around the head.
Ready to get started?
Let's start to understand what is called an oblique spikelet?
Due to some uncertainty about the hairstyle of the spikelet, in different sources there is an option:
- 3-strand braid with tiebacks all over the head (dragon), a special case is around the head or 2 braids. These are 1,2 and 4 photos.
- 2 (4 strand) fishtail braid. Options 3,5,6 in the photo above.
We will consider both versions of the spikelet and invite you to master all types of weaving of such an exclusive hairstyle.
I would like to note that the spikelet is a weaving option without age or gradation of length. Suitable for very little girls with short and thin hair and women with any length of curls.
This is what makes this braid accessible and in demand at any time. It can be seen on the red carpet, in kindergarten, at work, and at school as an everyday hairstyle.
How to become a professional in braiding?
What distinguishes the braiding of a beginner from a professional is accuracy, the absence of cocks and the strength of the braid.
To become a pro in braiding, in addition to the technique and practice, follow the positioning of your hands in the video lessons; in the instructions you will find descriptions, but it is better to see and repeat once. Flexibility of the fingers and the correct grips, a strand with the correct placement of the hands, create masterpieces.
Options for weaving a spikelet of 3 strands
 .
.
Over the entire head from the forehead to the back of the head or to the very ends (classic or reverse). Weaving look at the photo:
- weaving with tiebacks all over the head from the forehead to the occipital area;
- diagonally or around the head in the form of a crown (Timoshenko braid);
- snake;
- from the back of the head to the crown, turning into a bow or bun;
- 2nd spikelet with fish tail.
Spikelet fish tail

- The photo shows only a minimal selection of options, and this is the weaving of a spikelet:
- on the back of the head;
- classic and reverse (for the difference in appearance, see photos 2.3);
- from the tail;
- different options for pickups (photo 1,2);
- variations with weaving when we move the strands outside or underneath;
- snake spikelet, photo 5;
- around the head - 4.
Before weaving begins, let's discuss the general mandatory rules.
Rules for braiding
- Braiding begins on carefully combed hair. Clean, only washed hair will fall out of the weave, especially if your hair is friable and soft.
- Therefore, when working with coarse hair, only washed hair is suitable; for soft hair that does not hold volume, we recommend giving it rigidity with the help of powder and volume with a corrugated curling iron.
- To make the braid uniform, we try to separate the strands of the same width; before placing the strand, we comb it with a sparse comb.
- We use wax or gel to avoid roosters and frizz.
- We lay the strands carefully, hide any unevenness or stray strands, returning to such a strand.
- Yes, now the trend is slight negligence, so if the goal is to get such a braid, it is logical to neglect some rules.
We recommend that you learn in detail about classic or weaving in order to further master the different options for weaving a spikelet. Here you will receive step-by-step instructions accompanied by photos and videos. If you are a beginner and have never weaved, then repeat everything from any of the instructions.
How to braid a spikelet for a child (step-by-step instructions)?
- Sit the child down and engage him in his favorite activity. As a last resort, cartoons on a tablet or TV or a game are suitable. The telephone is the worst option, since it is the most harmful for children's eyes.
- A chair or other device that is comfortable for you (note that the baby will not sit or lie strictly straight) so that the child can sit or lie comfortably. Standing half bent for a long time is extremely uncomfortable and you will want to get up, and this is difficult to do if your hair is short.
- Prepare everything you need to speed up the process of weaving a spikelet as much as possible. Combs, elastic bands, gel or wax.
- Practice on dolls or yourself first so that there are no difficulties with the technique.
- Learn to evenly divide strands using your fingers.
- Start weaving by separating the strands.
- Separate a strand with one hand, and with the other, insert two fingers perpendicular to the floor to create 3 strands.
- Then we weave according to the chosen spikelet technique and the desired pattern.
Scheme of a spikelet of 3 strands (photo)
These diagrams will help you quickly master the positioning of your hands and see the process recorded at each moment of weaving.
The photo shows how to do it step by step and what you will see after transferring the strands.
Classic spikelet with tiebacks
In this scheme, we place the picked up strands on top of the main strands. 
Reverse or inverted
In this scheme, the picked up curls go underneath. Pay attention to the photo, where you can see step by step which strand we take and place under the braid. 
Types of pickups:
Tiebacks using the spikelet technique determine the appearance of the braid; let’s look at 2 options.
- lay the strand and grab it under it
- We lay only the picked up hair without the main strands.
Depending on the choice of the tack method, you will get different options for spikelets. In the first case, the braid will be visible, and the tacks will be nearby. In the second case, they will cover the braid completely, i.e. Only the binding areas will be visible.
Let's look at step-by-step instructions for all weaving options with descriptions and in video format.
Spikelet all over the head with 3-strand tiebacks: on a child

- Comb your hair thoroughly and begin braiding like a regular braid.
- We separate 3 narrow strands on the frontal area and shift the right one to the central one and the left one to the central one. This is the first stitch, you can do 2-3 of these and then make hooks.
- 4th span, we shift the side strand to the central one and grab a strand of hair from the side from the temporal zone and put the strands on top. We repeat with the 2nd strand, continue to weave with tiebacks to the back of the head, alternating tiebacks.
- Having reached the back of the head, we braid a classic 3-strand braid.
- We tie it with an elastic band to match the hair or lightly comb it and spray the tip with hairspray to prevent the braid from unraveling.
Educational video on how to weave a spikelet for a child with step-by-step execution:
How to braid a spikelet for yourself video, photo and description
 Pay attention to the photo, you will see some rotation of the spikelet and the braid itself - this happens when braiding on your own, as we often braid to the back of the head, and then we shift the braid to the side when the hooks are over and continue on its side.
To weave for yourself, we install mirrors to see what is happening behind.

It turns out that your hands are placed on the sides and you make grabs with your thumb, lifting them from the hair growth up to the braid.
Large spikelet with your own hands
The second option is to use larger strands and start weaving by making a ponytail from the hair on the frontal part.
Then all operations are repeated, as with weaving above.

Video tutorial on how to weave a spikelet for yourself:
For long hair, as for medium hair, the braiding will be similar, only after moving the braid to one side, try not to turn it out to avoid “turning.”
How to braid a spikelet around your head
 This version of the spikelet is ideal as a hairstyle for kindergarten or school, since all the hair is removed and does not distract from the main activity.
The hair will stay in the braid for quite a long time and not fall out. If the hairstyle assumes that the child will sleep in the garden, then it is worth weaving the spikelet a little tighter, but moderately, to avoid tightness.
Step-by-step instruction:

The video will teach you how to weave a spikelet of 3 strands with tiebacks around the head:
Option for weaving a spikelet around the head on a child with short hair
- Carefully comb and divide the child's hair into a side parting, reaching halfway up the head to the top of the head.
- Use a comb to separate a thin strand and divide it into 3 parts.
- We begin to weave by placing the outermost strand (left) on the central one, then the right one on the central one. If you find it difficult to imagine, return to the weaving pattern above.
- Next, we repeat the operation, laying the side one on the central one, and on top we add a thin strand of the remaining hair from the side of the strand.
- We braid it to the area above the second ear and try to braid it more tightly, without pulling the braid away from the head to avoid airiness. So we continue weaving, slightly wrapping the braid up to the temporal area.
- When there is no hair left for tie-ins, we braid a regular classic braid.
- Tie the end of the braided braid with an elastic band. Pin it with a bobby pin, like a hairpin, hiding the tail of the braid in your hair.
- We lay the rest of the braid along the parting or at our discretion and pin it with hairpins (choose small ones that match the child’s hair).
- Decorate your hair with lavender flowers or any other flowers. Screw-in rhinestones are also suitable.
Pay attention to the video how your fingers hold the braid and how they move when adding strands to the right and left.
Detailed video on weaving a spikelet and creating a festive hairstyle based on it
Reverse spikelet (inverted) of 3 strands
Reverse braiding differs from the classic spikelet in the appearance of the braid.
It turns out that the braid is placed on the outside of the weave, this is achieved by placing tiebacks under the bottom (the name is a reverse French braid, a spikelet).
- Comb your hair thoroughly.
- Divide into 3 strands and braid 2 strands, placing the strands underneath. Right under the central, left under the central, with the help of such manipulations we get an outer braid.
- Next, we make grabs and place them under the strands. So we weave to the occipital region.
- We finish in the same way, with a classic reverse braid and tie with an elastic band./li>
Step-by-step video instructions will help you figure out how to weave a reverse spikelet on a child:
Spikelet - fish tail over the entire head of 2
Having learned how to weave a spikelet in the 1st version, simplify it slightly and braid the spikelet with a fishtail.
Only 2 strands differ in laying.
Scheme of a fishtail spikelet (photo)
The above diagram draws your attention to the fact that there are 2 strands, and the process of transferring and separating strands is slightly different from that discussed above.
Fishtail classic option
In the fishtail technique there are 2 strands, and the transfer goes upward in the same way. 
Fish tail inside out (under the bottom)
Here the transfer of strands occurs under the main strands, i.e. we seem to see the reverse side of the spikelet braid. 
Spikelet from the tail

When you first decide to braid your own spikelet, we recommend that you start braiding on the tail, as it is easier on your hands and you don’t have to worry about the beauty of laying out the initial strands.
To train your hands and hone your technique, watch the video lesson and practice.
Video tutorial on weaving a spikelet on the tail:
A spikelet braid or fishtail of 2 strands on a child
Look carefully at the diagram above; the photo shows all the operations in detail.
- We carefully comb the hair and begin to weave using the usual method of 3 strands, laying them on top.
- On the 3rd stitch we connect 2 strands and work with 2 strands. Hold the strands with a tight fist. We separate a thin strand from one side with the index finger (on the side of the hand) and transfer it to the other, repeat the operation.
- It turns out that 2 large strands remain static, and only thin strands are shifted. We take the strands along the outer part on each side and shift them, adding tiebacks from the side parts, as in the classic spikelet.
- We repeat the operation up to the occipital area, then we can continue weaving, but without hooks.
- We complete the braiding of an oblique fishtail without tiebacks, tying it with an elastic band.
The video tutorial will help you figure out how to weave a spikelet using the fishtail technique with tiebacks:
Video tutorial on weaving a spikelet around the head:
Sideways on one side

Let's look at how to braid a spikelet on its side in reverse, look at the pattern of weaving a spikelet above and the photo.
Then start weaving.

How to weave a spikelet on its side in reverse:
Inverted or outer spikelet of 2
A type of spikelet on both sides of the head. This weaving option has its own secrets; those who already know how to easily weave a spikelet should switch to this option.
Spikelet for two braids
This braiding option can be diversified by combining a spikelet with a transition to a classic braid and vice versa; we will show several braiding options in the photo for inspiration and ideas.
- Part your hair evenly using a sharp-tipped comb or paste.
- Comb your hair thoroughly and lightly lubricate it with wax or grape seed oil, just lightly, just to prevent the appearance of roosters and make braiding easier.
- Separating the area from the forehead to the ear on one side, separate a thin strand.
The thinner the strand, the more accurate and beautiful the weaving will be, and the easier it will be to weave.
- We divide it into 3 strands by inserting 2 fingers into the strand, index and middle.
- We weave 1 strand. The right strand is under the central (middle), the left strand is under the central (middle).
- We fold 2 strands together (the 2 outermost top and bottom) and proceed to weaving a spikelet into 2 strands.
For the right
Positioning of hands: hold the right strand with 4 fingers of the right hand, place the left strand on the thumb. We perform the remaining actions with our left hand.
With our left hand we separate a thin strand from our outermost part and pick it up with the middle finger of our right hand and place it under the right strand. Separate a portion from the remaining hair and place it under the added strand.
For the left
Hold the left strand with 4 fingers of your left hand.
Then, using the index and thumb, we help our right hand to separate a thin strand.
We separate with our right hand (middle or index finger) a thin strand from our outermost part (we hold it with the index and middle fingers of the right hand) and pick it up with the index and middle fingers of the left. Transfer it to your hand, adding it to the strands in your left hand.
As if moving the right strand, we hold it with the remaining fingers of the right hand.
Using the index or middle finger of your right hand, separate it from the remaining mass of hair on the right side and place it in the left strand.
What options are there for adding strands?
- We separate a strand from the main one, put it under it, then add it to the main strand from the remaining ones.
- We separate a thin strand from the main one, add one of the remaining ones to it, or only now place it under the main strand.
Another option:
Left
We hold both strands with 2 hands, use the left index finger to separate a ton strand, turn the hand over and place it under it. Grabbing with your right index finger. Apply part of the hair from the side with your left hand, separating a strand from the remaining ones.
Right
We hold our hand palm down. Using your index finger, pinch off a thin strand to the right of the main strand. Turn it over and grab it with the middle finger of your left hand, while the index finger and thumb hold the weave and prevent it from unraveling. We dive under the strand with our right hand, separate it with our index hand, and place it in our left hand.
Spikelet around the head
Have you decided to decorate your everyday or holiday look with a spikelet around your head? Then let's start with the secrets.
Choose a weaving option: spikelet with tiebacks, external or classic.
Since we talked about tiebacks, you can get 2 different braids around your head.
The first option is when the tiebacks come with a part of the main strands.
Second, we make tiebacks only from the hair on the sides, thereby covering the braid and getting only the middle part.
Outdoor or classic will look like the photo above.
Instructions for weaving a classic spikelet around the head from 2
- Having decided to weave a spikelet, separate a strand behind the ear and divide it into 3 parts.
- We begin weaving a regular braid by making 1 braid. Then we put 2 strands together and get only 2.
- We braid a spikelet or fishtail, picking up the hair on the sides. We hold 2 strands and separate a small part from the main strand on the right, add a strand on the right to it, and place it on the left strand.
- Separate a thin strand from the left strand, add part of the hair to it and place it on the right one. We straighten the strands, smooth them and comb them.
- We repeat this until the next ear, when the hair runs out and there are no hooks left, continue weaving the spikelet. Tie a small ponytail with an elastic band.
- Slightly stretch the spikelet without tiebacks, adding volume, then lay it over the beginning of the braid, hiding the elastic band, or roll it into a shell.
For frizzy hair, use gel or wax; a few drops of grape seed oil will do.
Of 2
The second version of this hairstyle is two braids of 2 strands, on the sides of the head, ending with a ponytail or bun or crosswise folded ends
- Divide into a parting and braid two spikelets.
- Then, having reached the back of the head, we continue to weave spikelets.
- We add volume by stretching the strands on both sides.
- We put the braids in a bun, adding volume and pinning them with hairpins.
Educational video on how to weave a spikelet for a child with step-by-step recommendations:
Classic
Topsy-turvy
Spikelet braid in a braid

To make such an unusual spikelet from 2 braids, consider the option on yourself and on your child.
On a child
- Tie a ponytail and comb your hair thoroughly
- We braid a classic braid of 3 strands underneath, leaving a thin strand from each strand. This is a weaving option with loose strands.
- We braid it to the end of the tail, leaving free strands on both sides.
- Having finished braiding, tie the braid with an elastic band.
- From the thin strands of the remaining weave a spikelet. Picking up strands as you weave.
- We recommend slightly stretching the braid to add volume.
Square spikelet on itself or double spikelet
We shift all the hair to one side, combing it thoroughly.
- We separate a strand of hair from the top and braid it into a regular braid. From these there will be a spikelet.
- It is important that if you leave a very thin strand, the spikelet will turn out to be very thin, so try 1-2 options to determine how much hair is needed for a spectacular hairstyle.
- From the remaining hair we weave a back braid into a spikelet. We just weave underneath.
- Divide all hair into 2 strands.
- Using your index finger, we separate a thin strand from the strand along the edge of the left and transfer it to the right under the bottom; we separate a thin strand from the right along the outer part and transfer it to the left.
- We repeat this for about 5cm until we see the pattern that emerges.
- We release a thin strand from the left strand, leaving it unbraided; we will release such strands somewhere every 2-3 cm.
- Having finished weaving, we select the separated strand (unravel the braid) and begin to weave a spikelet from it underneath, picking up strands from the released strands.
- We braid it to the end and tie the second braid with an elastic band.
Tip: the top one can also be a French braid. Look at the photo above.
Training video of a spikelet braid in a braid:
Exquisite spikelet with released strands
For those who have mastered any type of weaving, we suggest remembering the released strands.
On child:
- Comb your hair thoroughly and treat it with gel or oil.
- We tie without roosters.
- We begin to weave a spikelet. Separate a thin strand on the right and transfer it to the left. Separate the strands on the left from the edge and place them on the right strand, weaving this way 1-2 times. See the photo of weaving a spikelet from 2 strands.
- We separate a thin strand from the extreme part of the right strand and give it to the child to hold. We shift the new separated right strand to the left side.
We separate another strand from the left side and give it to the child to hold in the other hand; we transfer another strand to the right.
- We separated a strand from the tail and moved it to the opposite side, and then we give the strand, separating it from the tail, from the side of the weave and replace it with a strand from the child’s hands, passing it under the strand. Repeat after each pass.
We place the replaced strand on the opposite one, as when weaving a spikelet.
- Repeat to yourself: separated, shifted, separated, shifted, separated, replaced, separated, replaced.
- Experiment with the frequency of shifting and do this through 2, 4 layers or with thicker strands.
- We repeat this until the end of the braid. The outer strands should form framing loops.
To myself:
Prepare: a comb, rubber band, gel or water to make weaving easier and to avoid loose “cocks”.
The difference between braiding yourself is that you need to lay your hair on one side and place the separated strands on your neck.
This option is suitable only for long hair, but it looks simply great and be sure to stretch the edges, so even sparse curls will look voluminous.
Triple fishtail
Double fishtail or two spikelets
The option is unusual, which is attractive, suitable for long and medium-length strands. It would be easier for a girl to do it for kindergarten or school, but it would be more difficult to repeat for herself. Looks impressive when worn either sideways or straight.
Prepare: rubber band, comb, water spray, bobby pins - 3 pcs. and a comb.
- Divide all the hair into an even parting and start weaving a classic spikelet on the back of the head. Shifting the right strand to the left, separating with the index finger, the left to the right. We repeat this 2-3 times.
- Moisten the right strand with the spray.
- We tie one left strand with an elastic band. We divide the right strand into 2 and weave a regular spikelet, every 2-3 braids we stretch only the outer links of the braid, we do not stretch the inner ones.
- When one spikelet is ready, tie it with an elastic band. Let's move on to the second, weaving in the same way. Stretch the outer parts of the spikelets.
- Using a bobby pin, attach one braid to another, do this in several places so that the braid does not fall apart.
- Remove an elastic band from each spikelet and tie one to match your hair or decorate with an elastic band with a flower or other decoration.
So you have mastered many options for weaving a braid of spikelets, and who would have thought that there are so many subtleties.
All that remains is to practice and weave a new spikelet for your child every day, surprising and making others jealous!
Which option did you like best and which was the most difficult? Why? Share with us in the comments.
To the post “Find out 5 options for how to braid a spikelet for a child and yourself, and step-by-step instructions with photos and videos are also suitable for beginners” 3 comments
Leave your comment
Hi all!
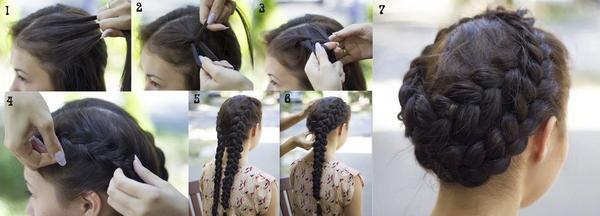
Which hairstyle can make you feel like a queen? It's correct when your hair is braided in the form of a crown. Therefore, today we will learn how to create a braid around the head. You can do this beautiful hairstyle for yourself or your child.
It looks great on all hair types. At the same time, it is very comfortable to wear, whether you are a chef or a fitness trainer. Your hair will be braided and will not bother you at all. She also looks very elegant and feminine.
A crown hairstyle usually consists of one or two braids that follow a circle around your head. There are many types of braids themselves, it can be a fishtail, French or Dutch. If you don't know the basics, you'll have a hard time.
First, let's see how to make a crown-shaped braid. To create it you will need:
- comb;
- texturizing spray;
- hairpins;
- elastic bands;
- Polish for hair.
So, how does the braiding process go?
- Comb your hair thoroughly so that not a single knot or tangle remains. We spray them.
- We make a parting as we like, it can be in the middle or on the side. The crown braid will start and end on either side of the parting. By the way, there is an option when such a braid is created without it at all.
- Usually the braid starts from the forehead, but there are exceptions when it is woven from the back of the head and brought forward, that is, from the bottom up.
- Take some hair from the front and divide it into small sections, depending on how thick you want the braid. We begin to braid the braid on either side of the parting. Now we constantly add new strands to this braid, the process is similar to weaving a French braid.
- As soon as we reach the bottom, we bend the braid and align it along the curve, that is, along the circumference of our head. We continue weaving until we reach the other side of the parting.
- If the hair is too long, then continue to weave a regular braid with the remaining strands. Then we tie the end with an elastic band, tuck it into the main braid-crown and secure it.
- Using your fingers, loosen the braid a little to make it look fuller. Just be careful not to unravel. Now we insert hairpins throughout the braid so that it is well secured. It is advisable to use accessories that match the color of your own strands.
- Finish the hairstyle with a generous portion of hairspray.
Well, that’s all, be sure to study the photos and videos, they will help you quickly master this beautiful hairstyle.
Circular Braid Hairstyle Ideas
Now that you have an idea of how to weave a braid according to the shape of your head, it's time to get acquainted with the different options for creating it. Most hairstyles with video instructions. Get inspired!
Classical

This hairstyle is quite easy to create if you know the basics of braiding. Here you need to start a Dutch (reverse) braid from the front of your head and follow its curve back to the starting point. This crown braid option is ideal for weddings or proms.
Fish tail

The Milkmaid Braid hairstyle usually starts from the back of the head. But this option will be created differently. We begin to weave a braid from the forehead to the back of the head in the form of a fish tail, do not forget to fluff up the links. After this, we secure the braid at the back of the head with hairpins. This gorgeous hairstyle looks great with boho clothes and sundresses.
Braid wreath

Using a thin scarf when braiding a braid is a real trend. We take a little hair from one side of the head, fold a scarf or scarf and place it at the middle strand. We connect each half of the scarf with the side sections. And now we braid the braid into a crown. This is a great beach hairstyle.
U-Dutch braid

This is one of the most popular hairstyles at the gym. After all, hair does not interfere with training, but at the same time it looks very stylish. It can be done in two ways. The first is to Dutch braid and bend it to form a U before continuing to braid the rest of the way. Second, you can braid two Dutch braids - one on each side and fold them at the back to form the same “U”.
Updo style braid

This hairstyle looks simply wonderful. It's not that difficult to make. We begin to weave a Dutch braid from the front, as we reach the back of the head - we do not twist it around the circumference, but braid it to the end. We do this on both sides. Then we twist the braids at the back to form a braided bun. We use hairpins to secure the hairstyle. Spray with varnish.
Thick braid-crown

This hairstyle is created by braiding it into a fishtail. As soon as the hair is secured, we pull the links slightly to the sides to make the braid more voluminous. To frame the face, let out a few strands from the forehead, this will make the image romantic and mysterious.
Dutch crown

In this braid, the middle section of hair passes over two side sections. We take the hair from one side and begin to weave a Dutch braid. We continue to add new strands to the middle part in the same way. As soon as we reach the forehead again, we braid the remaining hair into a regular braid and tie it with an elastic band. We insert the end of the braid into the main braid and secure it. To make the hairstyle look voluminous, we pull several links to the sides.
Boho fishtail

From the forehead we create two fishtail braids and tie them at the back in a semicircle, securing them with an elastic band. Then we wrap a strand of hair around it to hide it. This stunning hairstyle looks perfect with a maxi dress.
Hippie braid

This amazing hairstyle will make you feel as free as a hippie. Take some hair from one side of your head and braid it into a fishtail braid. We secure it at the end with an elastic band. We do the same on the other side. We attach both braids at the back under the crown so that one overlaps the other. Using bobby pins, twist and arrange the ends to secure them in place.
Multilayer braid

This hairstyle is quite easy to do. To create it, we braid two fishtail braids from half of the hair and secure them at the back of the head. This style is perfect for bridesmaids or first dates.
Quad braid

This elegant hairstyle will make the bride's look flawless. To create it, take a strand from the front and braid it into a fishtail-shaped braid. From the same side, take a little more hair and make a regular three-strand braid. We secure both braids with elastic bands. We repeat the same thing on the other side. Now take one fishtail braid and place it along the back of the head and pin it up. We do the same with the remaining three.
Surreal braid

This unusual hairstyle is suitable for a wedding celebration and will leave absolutely no one indifferent. To create it, we throw all the hair to one side and divide it into several small sections. We braid each part and tie them at the end with elastic bands. We wrap each braid around the circumference of the head in different directions and secure with hairpins. Spray it well with varnish.
Princess Crown

All girls and young girls want to look like princesses, and this hairstyle will help them achieve this. We divide the strands into three parts: two small ones in front and one large one, where all the rest of the hair will go. We braid one side part into a Dutch braid, completely going around the circumference of the head.
From the other side piece, create a regular braid and place it in front to complete the crown. We tie the rest of the hair into a high ponytail, add extensions if desired, and place an accessory to create a bun. We divide the hair into 4 parts, twist each section and wrap it around the accessory. Spray with varnish.
Greek braid

We divide the curls into four parts: two side, front (middle) and bottom. Now we braid the hair in all sections into two braids. We attach each braid of the front part to the corresponding side on the sides. We lift the two lower braids and attach them along the curve of the head to create a crown. Next, wrap the remaining braids in a circle formed by the front and bottom sections. We use bobby pins to keep the hair in place.
Rope braid

The basis of this hairstyle is a twisted braid. Comb the curls thoroughly and part them on one side. Take a strand from the side with the most hair. We divide this part into two and place one on top of the other to create a bend. Add more hair to the front section and flip it over to another section again. We continue to weave in the same way in a circle until we reach the back of the ear on the other side of the head. We braid the remaining strands into a braid. We lift this part and wrap it around the head, securing it there. Apply a little varnish.
Viking Queen

We collect the hair in the middle of the head to create a backcomb or use a small chignon. From the frontal part of the head, we begin to weave a French braid until we reach the top of the ear. Then we make a regular braid from the remaining part of the hair. We repeat the same on the other side. Now we divide the remaining hair into two halves - upper and lower.
We braid the upper part into a French braid, starting from the left side. Once we reach the other side, we braid the remaining hair into a four-row braid. Then we place it in front of the backcomb using bobby pins. We release the lower part, divide it in half and create braids again, then place them on top and secure with hairpins.
Crown waterfall

To make this beautiful hairstyle truly look like a waterfall, you need to start by curling your locks. We begin to braid the hair on one side of the head. After the first binding, lower the top part down and take a new one. We continue to do this as we weave. The fall of the top strand will create a waterfall effect. Once we reach the opposite side, we braid a simple braid downwards and secure it with an elastic band.
Double Dutch braid

Create a side parting. We divide the hair into three parts: 1 - the bottom in the shape of a triangle, 2 and 3 - the sides. In the lower section we braid a simple braid and secure it, fluff it up a little and roll it into a bun. Now we braid the part with more hair into a Dutch braid and secure it with an elastic band. We do the same with the other side section. We fluff both braids so that they look voluminous. Now, using hairpins, we place these two braids above the bun. Spray with varnish.
Magic crown

Comb the strands thoroughly. On the middle part of the hair we create small ponytails around the head. We make exactly the same ponytails from the bottom of the hair on the back of the head. Divide the first ponytail (near the ear) into 2 parts and pass the lower ponytail between them. We connect the separated hair of the first ponytail over the second ponytail and secure it with an elastic band.
Now we divide the second tail into 2 parts and pass the third through them. We continue to do this around the head until we reach the first ponytail again. If the hair is long, then we continue to braid the braid down, and then secure it around the head with hairpins. Also, do not forget to fluff the links so that the braid takes on a voluminous shape. We finish with varnish.
Sansa

This interesting hairstyle is from the popular series “Game of Thrones”. We divide the hair into three parts: the main front, two small equal ones at the back. We take the back section and begin to weave a regular braid upwards. We do the same on the other side.
On the central part we create an even parting. We divide it into two sections and braid it on each side, moving down. We twist them and secure them with bobby pins, and bring the ends of the braids up, again using hairpins. We lift the lower braids, place them at the top and secure them.
That's all, actually. I hope you liked the braided crown hairstyles. Making them, of course, is not so easy, especially for yourself. But, if you like one of the ideas, you can always contact a master or practice on a friend, child or relative.
Ideal look for you! See you!